About Me

My photo
Sewing is therapy for me. I hoard fabric, patterns, notions, and spend more time shopping for fabric than I care to admit...
Showing posts with label ITY. Show all posts

Sunday, August 5, 2018

More summer sewing: McCall's 7432

How is summer flying by so quickly?  I knew I had several fabrics in my stash I planned on using before fall set in, so I got busy!

Here's the pattern I used: 
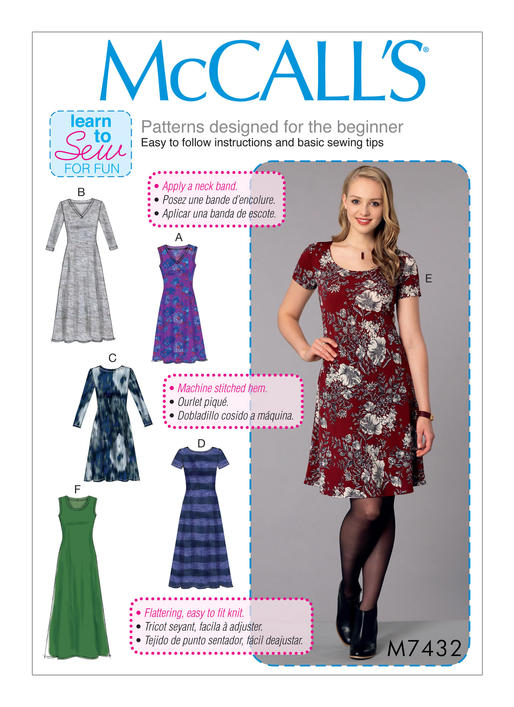
Image result for images Mccall's 7432
I love the simplicity of it.  It's a classic style, super easy, well drafted...need I go on?


This blue fabric is an ITY knit which works really well for this dress.  I so love the royal blue with white and I am a sucker for a paisley print.


I only had enough fabric to make this in a knee-length, which is fine.  This length is nice and cool to wear.


I love how this fabric skims your body, it doesn't cling, making it a great choice for this pattern.
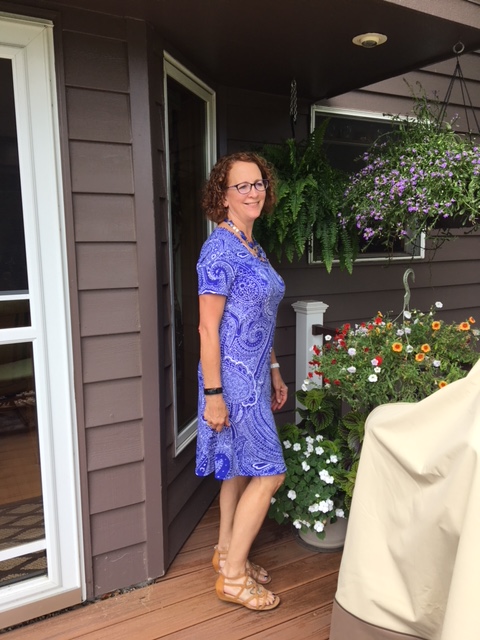

I've been playing a lot with fit, and have discovered that I need to widen the shoulders at my upper back.  This is such an easy alteration to make.


Look at how well this dress hangs in this fabric!  


For my second version, I used a Stof knit that's 94/95% cotton and the rest is lycra.  This fabric feels just lovely on your body.


It doesn't glide from the shoulders like the ITY knit, but that's okay.

I really wanted to do something a bit different so I played with the sleeves.


I cut the sleeve pattern in half, added a hem allowance, and used the ties from Jalie's new tee pattern.  I would have just used Jalie's sleeves, but when I walked the pattern pieces, they were too large for this dress.  Plus, other reviewers mentioned they were difficult to get to look like the pattern photo, which shows them tied tightly.


Fitting is trickier with these cotton knits.  Everything seems to show!  I ended up making a dart at the bust, which btw, wasn't needed on the ITY knit.


I put in an inch at the hemline, as it hangs so much nicer on this cotton knit.  Also, the neckband drooped so I fixed that by opening up a stitch or two on the inside of the neckband, inserting 1/8" elastic, getting the length just right, sewing the ends of the elastic together, and stitching the neckband closed.  Sorry, no photo of that, but trust me, much better!


I worked hard to get all these skinny stripes lined up at the side seams and the effort paid off!

I am sure I will revisit this pattern when I want to make winter/cold weather dresses!

Thanks for reading!
Sue

Thursday, June 28, 2018

Dress drama! Vogue 9268


Once again, my stash is getting a bit out of hand.   I wanted a few sews that would use an entire piece of fabric I have instead of most or two-thirds of it.  This dress came to mind. 
Image result for images vogue 9268

I simply love the drama of this skirt and the neckline.  I simply had to make it. 

A dress, with this type of skirt, just make you want to twirl!


It was a bit breezy out and keeping everything in check was a bit difficult.  


I don't think my fabric has quite as much structure as the designer.  You can see on the pattern envelope how her skirt hangs at the sides.  Mine is much softer.


But I still love it.  I made just a few minor alterations. One was a swayback and the other was to add a band at the neckline.  Oh and I almost forgot that I eliminated the front and back center seams.  I think that by doing this and adding the neckband, it made the neckline higher.  Just to compare, look at the envelope, the neckline is much lower.  


This is just a luscious knit I purchased from a somewhat recent trip to Baton Rouge.  I had 3.5 yards of it, the perfect amount for this dress.  I have a wee little scrap of it left that I really need to donate.  Someone will hopefully snatch it up and make something super creative out of it with some additional fabrics.


Look how awesomely full that skirt is!  I love my new dress!  
Sue 


Saturday, March 10, 2018

Sewing for Elaina

Sewing for little people is so much fun!  It takes minimal fabric when they are this little and I just get the giggles at how cute and little everything is!  

This little cutie is my granddaughter, Elaina.  She just turned one a few days ago.  That little smirk on her face tells a lot about her personality.  :)  As you can see, she lives in a MUCH warmer climate than I do.  I can't even thing about bare feet outdoors right now.  


Isn't she the cutest?  I used three different patterns to create this little ensemble.  
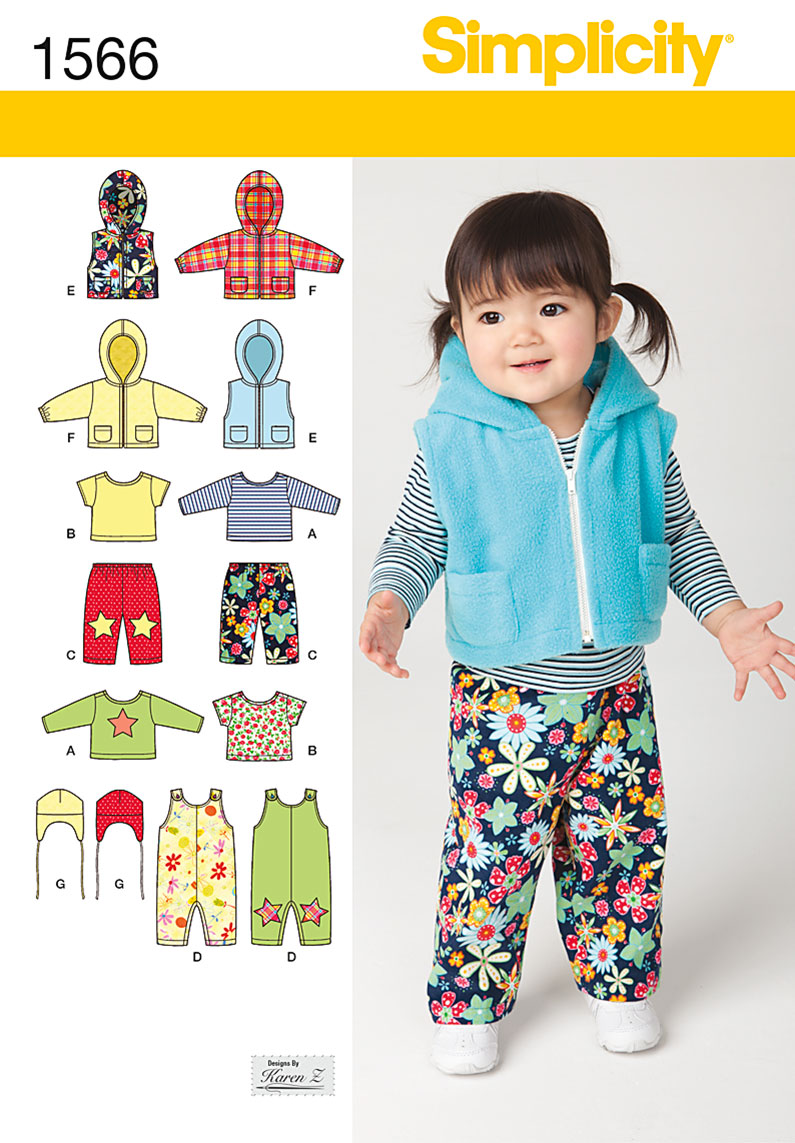
Let's start with the little jacket.  Yes, it is too big for now.  I am hoping by fall it will fit her well.  
Here is the pattern I used for the jacket: 

Image result for images Simplicity 1566

Based on Elaina's measurements, I made her a medium.  Look how much too large it is!  I don't mind growing room for little people and she definitely has plenty of room for this to fit for a long time.  
This is a breeze to put together.  Of course you can see I added a ruffle to the hem.  All I did for that was to measure 2.5 times the length, cut a strip the width I wanted, pleat it with the gathering/pleating foot, and done!  


Since I am very limited on local fabric shops and only have JoAnn's to shop from for zippers for a garment like this  I was unable to find an appropriate zip.  These hook and eyes were from my stash. 


That face, it just kills me!  She is giving her mommy a look of concern, isn't she?


How how quickly emotions change when you are a year old!


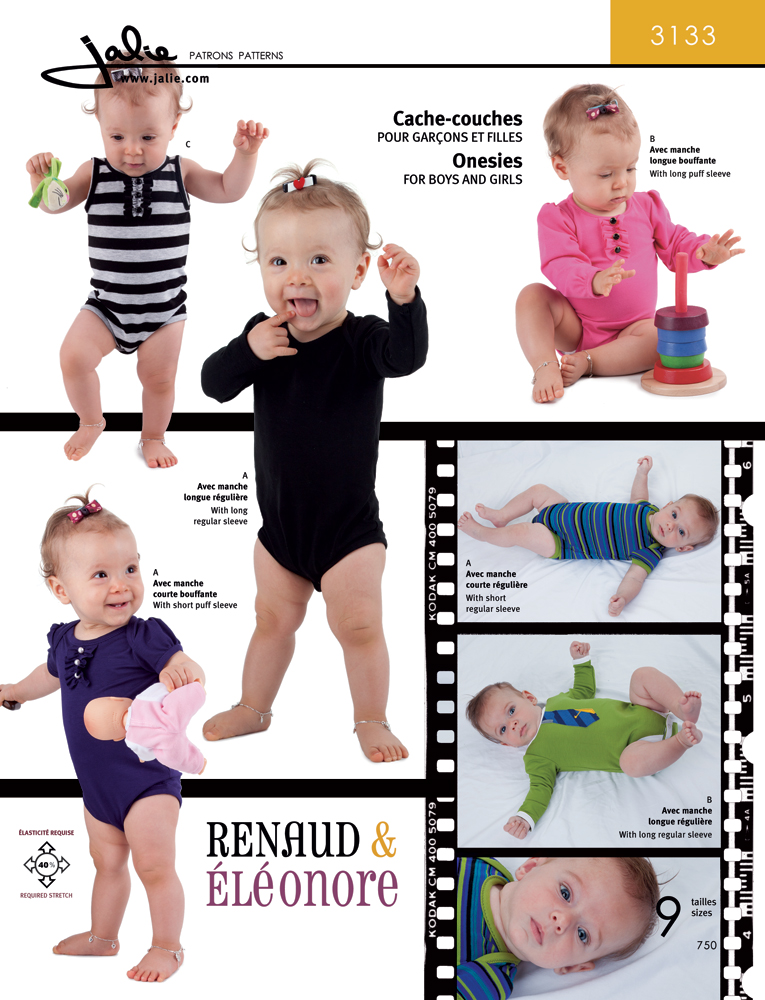
Next, let's talk about the onesie.  Here is the pattern I used: 


How adorable is this?  I love the way the shoulders are constructed and the optional little details to make it fun.   


And look at that fabric!  Every girl needs something leopard print, I don't care how old you are.  ;)  


This fits so true to size.  I made a 12 month size and it fits her great!  Jalie truly knows how to create patterns and directions for home sewers.  This is no exception.  I only wish it came in adult sizes! 


Plenty of diaper room!  Cute little gathers on the sleeve caps.  


Those pig tails!  My daughter, Elaina's mommy, choose these three fabrics for this outfit.  This leopard print was a little thin so to reinforce the area for the snaps, I used some interfacing.  I cut it the width of the binding and it worked perfectly.  I used my Kam snap pliers and some clear snaps for easy diapering.  Aren't little fat rolls adorable on babies?


Lastly, I'll share the legging pattern.  
Image result for images Simplicity 8304

I previously made the dress in version C.  You can see that here: Simplicity 8304


 These leggings are made from a mid-weight ponte.  They were also made in a 12 month size and they are very long!  My daughter cuffs them.  She'll have plenty of room to grow into these!  

I really love sewing for children.  It's fast and fun and they look so adorable!  All my fabrics were from Fabric Mart and are featured on my blog post at their site for this month.  Head on over and check out their selections!  

Thanks for reading!  I do so love your comments!
Sue 


Saturday, July 1, 2017

Another Maxi! Jalie 3246

I've had this pattern for quite some time.  Not sure why I haven't made it as it is super cute and such a classic style!  Whelp. I had some extra time and made it and I am so sorry I waited so very long!


Look at how stunning the styling of this dress is!  It is super fitted through the bust and then gently flows from the waist to the hemline but still skims your curves.  I love how super elegant it looks on the pattern front.


Don't mind the action shot above. :)  I had my vest on, and my fashion photographer told me to take it off a put it on my arm.  So I did.


You just get to see the blurry photos as I am either turning or moving my clothing.  :)


May I say that this print is drop dead gorgeous?  It is what I remember to be a Maggy London ITY knit I purchased from Fabric Mart last summer.  Yes, I did get majorly sunburned several days ago and that is still visible in this photo.  At least it doesn't hurt anymore.


The first thing to do was to determine what the center front would be.  Unfortunately this is still a bit too long and you can't totally see what 'motif' I decided to be center front.  For reference, I am 5 feet 7 inches.  Just a bit taller than that standard of 5 feet 6 inches. 


Gosh, I love this fabric!  Look at those colors!  They look much more muted in person than they do in photographed.
 

There really isn't much to say about construction of this garment.  You reinforce the shoulder seams with clear elastic.   Next, I put on the neckband.  Jalie has you attach the right side of the neckband to the wrong side of the garment.  After stitching that step, you fold the neckband over to the right side of the garment, fold the raw edge into the neckband and are left with a nice edge to stitch on the right side to hold everything in place.  I, of course, take an extra step.  


I like to ensure none of my neckbands, armholes, or any sort of band stretches out of shape, especially with an ITY knit.  
I know you have seen on my blog before so I will just describe it if you are unfarmilar.  I attach staytape on the wrong side of the garment so it barely is in the seamline--maybe the staytape extends 1/8" over.  Next, I sew on the binding making sure it covers the staytape.  I never worry about my bias seams stretching when I use this method.  


Typically I also cut my bindings just a bit wider than the pattern suggests.  Sometimes that is 1/8" and sometimes that is 1/4".  For this stretchy of a knit, I used 1/4".  I just makes turning that edge to the right side so much easier and doesn't add any bulk.  


Lastly, I topstitch on the right side of the garment using a stretch stitch.  I think this dress is going to be in frequent rotation the remainder of the summer and for years to come.  It feels like I am wearing a supper elegant pair of pajamas but look like I am ready for just about any occasion possible.  I will wear this many places!  

Thanks for reading!
Sue :)  

Tuesday, October 25, 2016

SPR's Lillian Top/Dress Blog Tour!!!

Hello sewing pals!  I was so excited when Deepika of SPR asked if I would be willing to create her newest pattern and participate in blog tour!  ME?  This was such an honor and I am excited to share my thoughts with you on this great little top that is easily converted into a dress.  

And, here it is!  The Lillian top/dress! 
PatternReview Lillian Downloadable Pattern 106

And below are my versions: 


Normally with a pattern, I make a sloping shoulder adjustment, swayback adjustment and FBA.  for this pattern, I only needed two of the three.  


Here is the description of the pattern from SPR's site: 
A knit top or an A-Line dress with a V-Neck Yoke and cap sleeves. The front yoke allows for subtle
bust shaping as well as infinite design opportunities. Mix and match fabrics and create a whole
wardrobe of Lillians! The top skims the figure and works for a variety of figure types. Go down a
size if you want it to be close fitting.


After making this up twice, I know the description is accurate.  I made a size medium as I didn't want the dress too snug.  There is some really nice built in shaping with the design of the pattern pieces, especially related to the bust.  


I live in the Northern Plains of the US and winter is approaching...I obviously lengthened the sleeves by measuring how long I wanted them, how wide I wanted the wrist, and using my ruler, I drew the lines to make a new sleeve length.  Easy!  You can see too that on the lighter colored dress, I added a little band at the wrist.


I love the length!  Perfect for tights and boots!


Normally, I make an FBA, but with this pattern I didn't have to!  No drag lines either!  


I used two very different fabrics for my two versions.  The navy is a textured double knit.  The purplish contrast is a ponte.  The lighter colored version is a sweater knit and an ITY.  Both worked equally well with this pattern and its drafting.  


I really like how the yoke looks with both of my fabric choices.  When Deepika designed this, she took a lot of care to make sure the pattern was drafted so the neckline was a nice V shape, but not too low.  I think it is the perfect depth.  If you like a lower V, adjust your pattern to reflect that.  


I like too how you can see the hint of purple at the back neckline.  


Deepika's instructions are well thought out and have some great photos to accompany them.  I have my own way of making a V-neck band and that is how I opted to do this dress as well.  


First, I cut 1/2" strips of fusible knit interfacing and adhere that to the neckband all the way around.  Staystitch the neckband as well, 1/4" from the edge.


This next step is totally optional, but I do it anyway!  After cutting my neckband using a ruler and rotary cutter, I serge the edge of it just to make it look neater.  How long do I cut it?  About six inches longer than it needs to be.  I wish I would have had matching serger thread but didn't so I opted for navy, which is what I used for the remainder of the dress.  


Stitch the neckband on using 1/4" seam allowances using a regular stitch.  I baste this on first to check the fit.  You will need to either make a sample or practice a few times to get the amount of stretch you need so it lies flat.  Since you are using one long piece of banding, you eliminate the center back neck seam as well.  Stitch around to about 1 inch from the V.  Turn to the right side, pin both pieces in place and stitch.  Sorry I didn't take a photo of that!


Other notes about this pattern--there are many notches to get the pattern to line up perfectly.  You can sew the sleeves in flat or set them in.  I choose to set them in.  Did I mention how well this fits me in the shoulders?  Love it!

Printing this off is economical--not that many pieces to assemble!
Ready to get your own?  Here is the link!

I can't wait to try this again when it is warmer outside so I can create the cute little contrast sleeves!

Want to see more?  Here are other sewers whom have created this pattern and the date of their blog tours:


PatternReview.com (24th) 

Julie (24th)

Sue (25th)

Sarah (26th)

Eryn (27th)

Margo (28th)

Bianca (29th)

Hila (30th)


Thanks so very much for stopping by!
Sue :)