About Me

My photo
Sewing is therapy for me. I hoard fabric, patterns, notions, and spend more time shopping for fabric than I care to admit...
Showing posts with label embellishment. Show all posts

Wednesday, August 7, 2019

Another Alabama Chanin Skirt Kit

This is at least my third, if not fourth, Alabama Chanin kit that I am reviewing.  There's something about the process of slow sewing that is so gratifying that I seem to have to have a project such as this going constantly. 
The school of making magdalena swing skirt diy garment kit 2

For this project, I used a swing skirt kit.  Everything was ready for me, meaning the fabric was stenciled, the fabric was cut into four panel, and the FOE was included.  I made an additional purchase of the embroidery floss from the AC site.  This is really nice, quality stuff!  It comes on a spool so it is easy to use. 

Here's my version:

This skirt is so easy to wear.  The sewing process is pretty simple, you stitch the layers together using whatever method you like.  I used reverse applique.  For this technique, you stitch around the motif and then cut away the center, basically reversing the applique process. 


I did some other stitches other than the reverse applique.  I also did some daisy stitching and some satin stitching.  I left the lower hem a raw edge and I like how it curls up a bit.


This skirt fits great at the hips and I love the length.  The waistline is a bit large, so I will most likely end up removing the FOE, taking in the waistline at each seam a bit, and reapplying the FOE.


The drape of this is really nice too.


Enough of me modeling this!  Onto some close-ups!


Here you can see the three stitches I used. After the reverse applique, you trim away the insides of the motif.  I carefully pull the front and back pieces away from other with my finger tips, snip, and then carefully trim about 1/8" from the edge.


This is some slow-sewing, but I find it very gratifying!


I machine stitch the side seams and the FOE on.  I love this process so much, I've already started on my next project!

Thanks for reading!
Sue

Sunday, May 26, 2019

Another 6886--can you have too many?

Honestly, can you have too many McCall's 6886?  I think not.  Here's my latest.  I am so smitten with this pattern.  I really should just use this from now on to create any sort of tee design.  

Here's my latest version of this dress: 


If you've been living under a rock, here's the original dress pattern: 

Image result for images McCalls 6886

See what I mean?  Classic, simple, stylish.

For this version, I used a kit I purchased from Alabama Chanin.  If you are unfamiliar with their work, here's a link to their site: Alabama Chanin


I didn't think I'd like this type of handwork, but turns out that I am quite smitten with this process.


Being a kit that I purchased, it was intended to be a long or maxi-length skirt.  When I saw how much fabric there was, I immediately thought dress and my beloved 6886 came to mind.


My husband is making me laugh.


This is a double-layer of fabric.  The lighter green was printed with the floral motif.  I layered both, stitched together, clipped the top layer away and what-you-see, is-what-you-get.


I love this color combination.


This is a casual yet dressy at the same time.


I always but a seam mid-back to compensate for my swayback.  It helps, but doesn't completely take it away.


I single-layered the neckband.   

I left the hems raw.  That's so hard for me to even type.


I really love this color combination.  I like it with my redish hair.


I am not done with this pattern so I hope you'll be open to reading more about how many more versions I have in my head.

Thanks for reading!
Sue

Thursday, July 26, 2018

Yet another version of McCall's 6886

Have you seen enough of this pattern yet?  
Image result for images McCalls 6886

Please say no, as I feel like I am just getting started!  It's such a blank canvas to let your imagination run wild! 


This is such a simple, simple design that is really well drafted.  Every version I've seen looks great!  This is also a great pattern to hack to your heart's content, which is what I am going to experiment with in the future.  

Here's what I did with it this time.  

I am sort of obsessed with Alabama Chanin's embellishing lately land this time, I wanted to add some 'stripes' to my fabric.  When I talked to DH about this, he was skeptical and thought the dress would look like something made in a weekend craft shop.  Tsk, tsk! I hoped he was wrong, but wondered the same thing.  Since both pieces of the fabric I was planning on using were left overs from other projects, I decided to give it a whirl anyway!

Here is what I came up with: 


What do you think?  

Of course you can see I hacked the pattern to color block it.  


Of course you can see where I added the hand embroidery to the strips of fabric to make my 'stripes'.  


I used Chanin's embroidery book,The Geometry of Hand Sewing.    It has very clear illustrations and a helpful plastic template to assist you in marking where your stitches will go in order to create symmetrical designs.  


For my embroidery, I knew I wanted a contrast color and I love this mustard-yellow with the gray and white.  This is just plain ol' embroidery floss from Hobby Lobby.  I separated it into three strands and just went to town!  

For the hacking part, I cut the bodice and skirt separately and sewed them together.  I pinned the lower and upper half together and manipulated the length of each until I was happy.  

I am really in love with this dress!  When I showed it to DH, he was so very pleasantly surprised that he simply stopped what he was doing, smiled his little half-smile and said, "Wow!"  Isn't that one of the best compliments of all???

Thanks for reading!  What is inspiring you lately?  Do tell!

Sue 

Tuesday, July 10, 2018

McCall's 7122 embellished!


I have been eyeing the Alabama Chanin designs for so long and I tried embellishing on another garment and I simply love it.  I wanted to give this another try.  Here's what I came up with. 

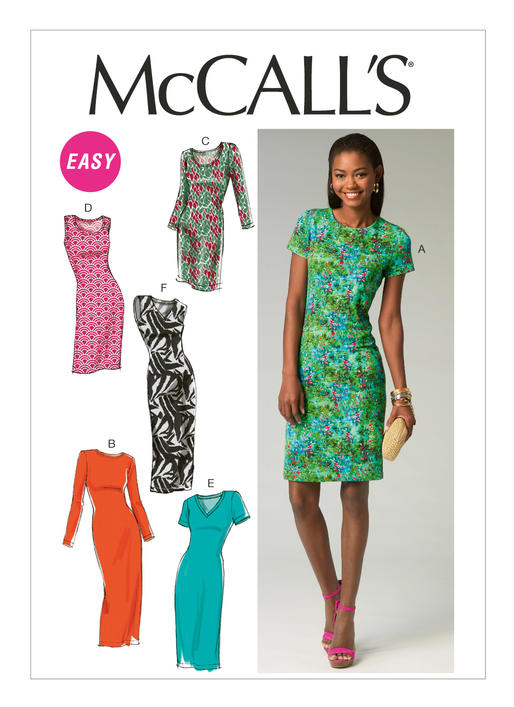
I used this pattern from McCall's: 

An oldie, but a goodie!

I made the cap sleeve version of B but with the length of D.


I choose to embellish the bottom of the dress front and on the center upper back.


I like the contrast of the magenta with the blue.


I could have done a lot more but I am still playing with how this technique works best and don't want to commit to a huge project when I am in the learning stage.


I have always liked the fit of this dress.  It's comfortable and with the organic cotton, very soft.


Here you can see what I did on the back.


I pulled up the dress so you can better see the hemline.


Here is a close up of the work.  You can see my 'thread' is variegated.  Actually, I didn't use thread at all but yarn for knitting!  On a whim, I stopped at a local knitting shop to look for unique buttons and stumbled across this yarn.  It's 100% cotton, super soft and I really like the colors.  


The yarn was small width wise, but still a bit thick for hand sewing so I separated the strands in half and used 3/4 strands to sew with.


I used some magenta on the neckline to balance the design at the hem.


This is what the hand sewing looks like on the inside of the garment. 
Just a few notes, Alabama Chanin hand stitches their garments and leaves them unhemmed.  You can see by my photos, I did neither of those things! I machine stitched the entire thing and in between the areas on the hem, I added machine hems.  Maybe someday I will be able to sleep at night if I leave a hem undone, but for now, it ain't happening.

I like this a lot!  It's unique and since I love maxi's so much, it fits with my wardrobe quite nicely.  I will be looking for more ways to make these sewing techniques work!
Thanks for reading!
Sue

Monday, September 21, 2015

Round 2, SPR's sewing bee using an embellished fabric!

I stressed about this round of SPR's sewing bee.  Embellishing garments for me is something I enjoy, but I have never felt like my skills would land me a winning place in a contest.  And honestly, my goal is to make it to the next round, not win!  I just like the challenges every week as I feel like it makes me step out of my comfort zone.  


Here is what I submitted to SPR's contest and the questions I had to answer: 


What type of fabric did you start with for your project? 
I started this top with two pieces of fabric, both knits. The coral/burnt orange was from Fancy Tiger Crafts, in Denver and the other is a ponte from Fabric Mart. Both were similar weight and coordinated well. Both have similar stretch lengthwise and on the cross-grain. 


What techniques did you use to modify your fabric?
I used reverse applique and also some free-motion quilting with variegated quilting thread. The 'reverse' of the applique is the coral on the gray and the gray on the coral. My inspiration was from a garment I viewed on Pinterest.

Invierta apliques:

I am just gob-smacked by this top!  I knew I didn't want to recreate it exactly, but I love the styling and the sharp contrast of the fabrics chosen.  I also wanted to use fabrics from my stash as it is running over and seems to be multiplying like rabbits when I am not looking!  


For my top, I purchased a stencil from Wal-Mart, traced the outline of it, layered both pieces of fabric, sprayed 505 temporary adhesive to help with the stitching and using a quilting foot, I  lowered the feed-dogs so I could move more freely and with the design I drew.  I used variegated cotton thread to 'trace' the design and also add a little design element at the center of the larger flowers. After stitching, I used some very sharp scissors and carefully cut away the top layer of fabric, close to the stitching. I made a mirrored image of the stencil on the front and a different motif on the back. As I was cutting around the designs, I decided to make a slight modification with the large flower. Can you spot the difference? 


What pattern(s) did you use for your garment, or is your entry self-drafted or draped? 
I used a favorite pattern of mine, McCall's 6435 which is a close-fitting top with the contrasting yokes and one sleeve. It was just perfect for what I had envisioned! I made this top as is except for a swayback adjustment, which is typical for me.  I feel like this top doesn't have as much ease as other patterns and I highly recommend going up one size when stitching.  I ended up adding a neckband as that's how i roll with knit tops such as this!  Typically I cut my neckband about 3 inches smaller than the circumference of the top but I play with it a bit as the degree of stretch also matters in some cases.  My advice?  Baste your neckband, if it doesn't lay correctly--too large for the neckband, cut it down.  Does it cause the top to pucker?  It is too small.  I would rather cut several neckbands than to have one that is ill-fitting.  


How does your garment show off your fabric modifications? 
The modifications are shown in the stencil I used along with the contrasting fabric underneath that I carefully cut away but not through the variegated thread I used to outline the design. 

What particular features would you like to point out to the judges? 
I love how the two fabrics show together; they coordinate but play nicely off each other. I love the variegated thread I used to outline the stencil design and also please notice how carefully I cut so closely to the stitching! I love the fit of this top and that it is long-sleeved, perfect for rapidly approaching fall weather here in the northern plains of the US. 

Any other details that you want to share about your fabric modification or the garment you made from the fabric?


I have always wanted to try an 'Alabama Chanin' style garment and now I have finally dove off the edge of the pool so to speak! I really love this top and will wear it to death! 

Thanks for reading!
Sue