About Me

My photo
Sewing is therapy for me. I hoard fabric, patterns, notions, and spend more time shopping for fabric than I care to admit...
Showing posts with label Henley. Show all posts

Tuesday, June 9, 2015

The Men in my life!

Have you ever sewn for the men in your life?  Do you have many of them?  I have a husband, father, two sons two son-in-laws and an adorable grandson.  That is a lot of men!  I decided to create a shirt for them all, except for my father who is probably one of the pickiest people on the planet when it comes to clothing....but that is another story!

I chose the Strathcona Henley from Thread Theory as my pattern base.

I

I like the slim fit of the top--do you call it a top for a man?  Maybe I'll refer to these as a tee shirt with variations.  The pattern is described as a modern fitting, or slim fitting tee with neckline variations, sleeve length options, and the opportunity to create a Henley placket if you desire!


I briefly asked several of the guys what color of a shirt they would like/possibly wear if I made them one and they came up with gray or blue. Funny in a weird sort of way!  So, I made things easy on myself and ordered 4 yards of gray and 4 of the navy blue.


Both are lighter weight poly blend with good stretch and recovery.  I also let each of the choose their preferred style: long or short sleeves, placket or not.  I guessed on my grandsons as he is only 21 months and probably doesn't really care as long as it is comfortable.


The first shirt I made was for the hubby who wouldn't benefit from a slim-fitting top :).  I knew I would have to majorly alter the pattern to fit him.  The size range on this pattern is XS to XL.  The size on the pattern for an XL is 46-48" chest and 40-42" waist.  Without telling you his exact measurements, I knew I would have to widen the waistline by at least five inches so I added three inches to each side starting under the arm and ending at the hemline creating an a-line shape.  I only did this on the front shirt as I was thinking about how for me I have to create FBAs and I only do that on the front of the garment, not the back.  He also wanted elbow length sleeves and the crew neckline.


Construction is very easy and intuitive for this top and the instructions are really very good!  A beginner could tackle this with the right fabric and a good set of measurements--which in hindsight means more than just the chest and waist.  You also need to measure neckline length and depth, shoulder area and sleeve length.  All the necessary steps are in place for this pattern--stabilizing the shoulder seams.  Have you ever watched a guy pull off a shirt?  Not at all like I do which is carefully. They just grab the back of it by the neckline and yank.  I made sure to sew a stretch stitch everywhere and I topstitched everywhere as well just to keep this from falling apart in the future.


My first go for the hubby didn't receive the reaction I was hoping for--he HATED it!  He didn't like the lightweight fabric and he prefers his tops loose, not a slim fit as the pattern calls for.  I had him get a tee from his closet that he likes the fit of and I found a heavier all cotton knit and drafted my own pattern for him.  Success!  I have his approval now yay!


Next up was Daniel, my youngest.  He isn't a big guy.  His adorable wife makes him eat as he forgets! No wonder he ended up with the smallest shirt--next to the grandson of course!


Daniel needed a small shirt.  His chest is 36.5" and waist is 31.5.  He is always cold so he asked for long sleeves and in blue, just like dad!  He also wanted the shirt to look like he was wearing a short sleeve top over a long sleeve so could I put gray long sleeves there as well?  Of course I can!  In the photos, he is wearing Kevin's shirt but holding his shirt.  Why?  No idea but that is what he wanted to do so I rolled with it.


Andrew, my oldest son is the only guy requesting a placket.  He asked for gray and needed a medium as his chest is 40 with a 34 waist.  He is about 6'2" and I also measured the sleeve length for him as I was concerned it may be a little on the short side.  The placket directions for this tee are very interesting and drafted pretty much like what I imagine an engineer to draft a placket like.  It isn't difficult at all but there are a few steps that do help you get a very nice looking placket.  My only regret with this is that I wish I would have interfaced the placket area on the shirt itself as with this lightweight knit, it isn't the best placket I've ever made but it will do for Andrew.


Now, onto the son-in-laws.

Kevin and Daniel as just about exactly the same size with Kevin's chest being an inch bigger but with the same waistline.  He lives in Baton Rouge so I knew that he'd rather have a shirt a little bigger than smaller with all the heat and humidity present.  I went with a medium for him.  He too wanted gray with short sleeves.  I had a little mishap with his top and as I was trimming threads I accidentally cut a small hole in the sleeve.  Did I mention his was the last make of six shirts?  I just about cried but then remember that Thread Theory sends you an awesome little label for your shirt so I stitched that over the slit and now it is a cool design element--sorry you can't see that in the photos!


Brad, or son-in-law 2, needed a large with a chest of 44.5' and a waist of 39.5.  He is a solid guy and so is his son, my adorable grandson, Simon!

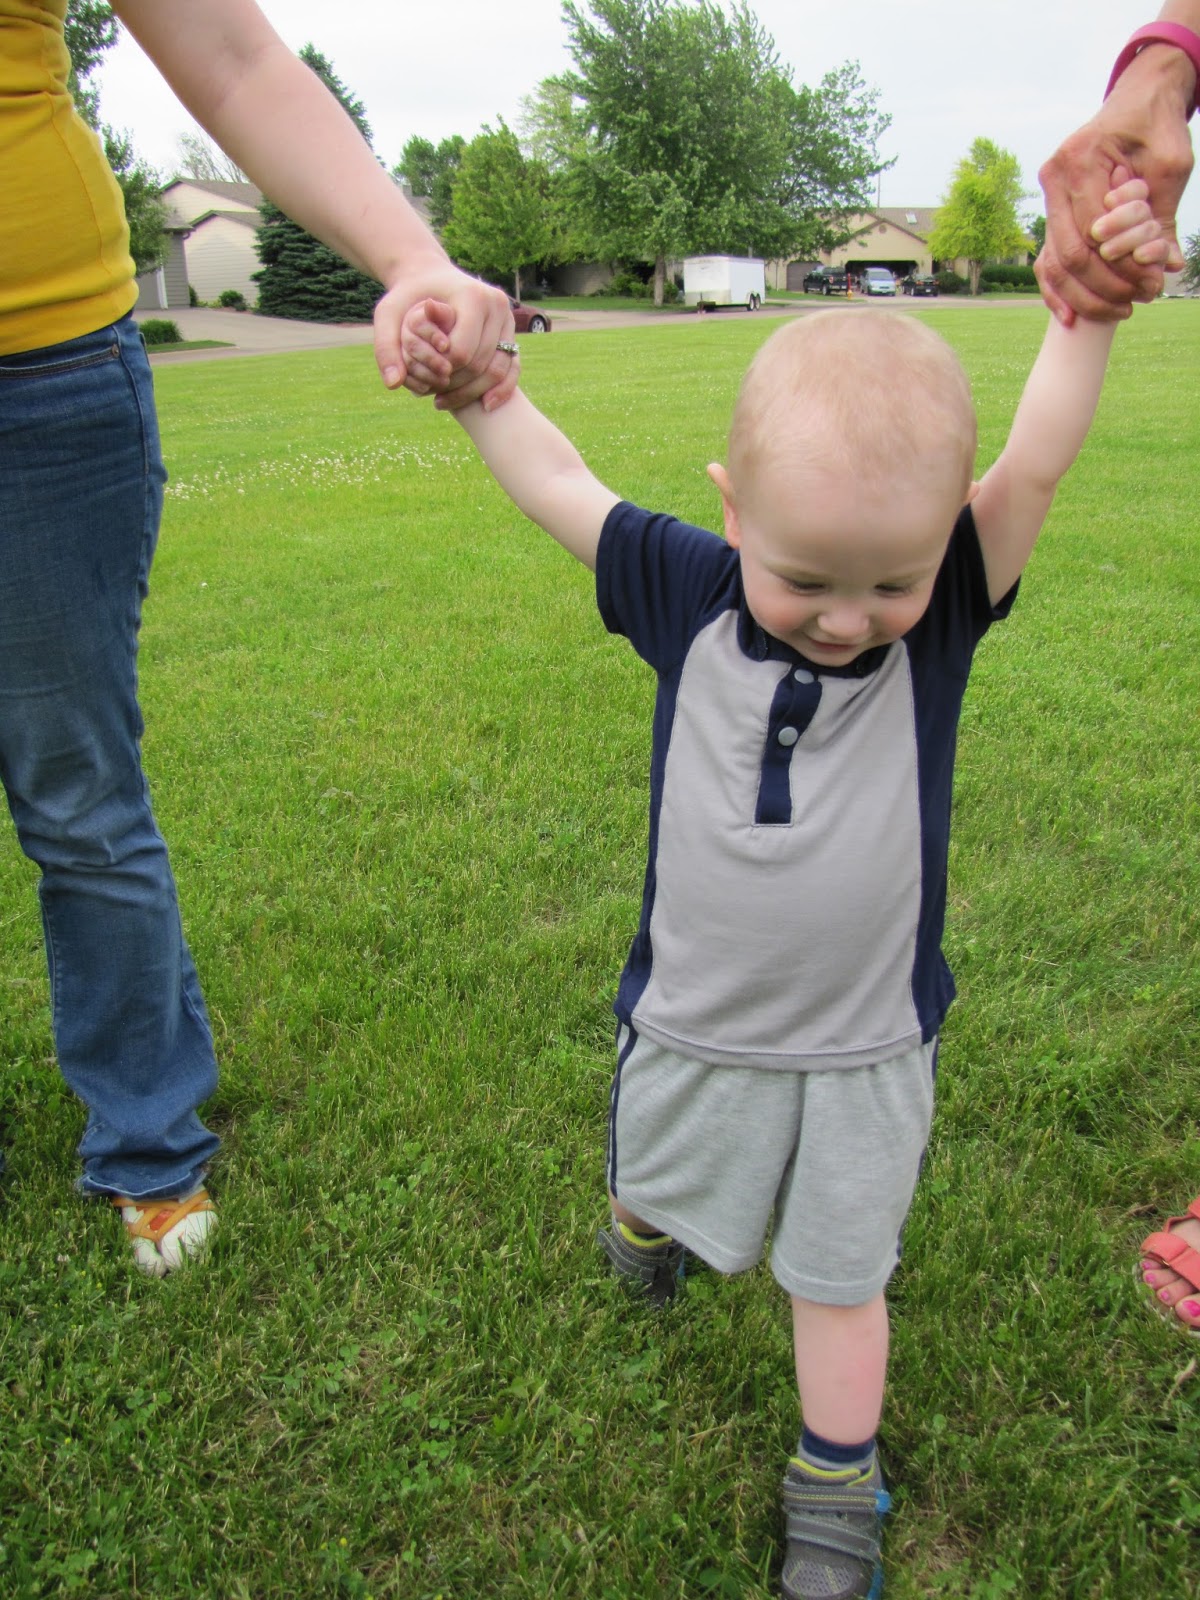
Simon's shirt was a mashup of the blue and gray and I used McCall's 6683.


I'd made the romper for him before and knew the pattern would fit.  I just left off the collar but kept the stand.  Simon measured 20 chest and 21" waist.  I asked his mommy if she wanted another onesie for him and she said no, simply because he occasionally likes to play with his belly button.  Oh the joy of being less than two years old!


It was interesting and fun to sew for the guys in my life.  They are just a picky when it it comes to fit, color, fabric weight and texture.  I'd really like to introduce some more color into their worlds but at least I didn't have to make six brown shirts.  Gray and blue was at least some variety!

Thanks for reading this very long post! Try this pattern from Thread Theory Designs, as long as your man is very slim and doesn't mind a clingier fit.  It's well drafted and looks good on a smaller sizes and shapes--as long as you aren't out of square--meaning your waistline is larger than your chest!  I'll make more of these if they ask, or maybe I'll just make more and give away to all these guys!

Sue


Sunday, January 11, 2015

Another Henley top

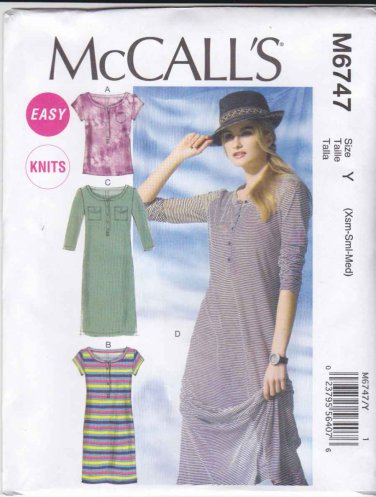
Oh, I love the simplicity of a Henley!  It can be super casual but also a little dressier depending on your fabric and how you wear it.  This is my second time through with this McCall's pattern 6747.  I'll fill you in why I love it so much!

In case you are wondering, here is what the pattern looks like, just in case you haven't seen it.  I love this maxi length version with the stripes.  How adorable and comfortable she looks!


So here is the description from the back of the envelope: Pullover, close-fitting top and dresses have button neck and front bands, and stitched hems.  A: Narrow hem on sleeves.  C: button flaps.  A, C: Pockets.  B, C, D: Fitted through hips.  C, D: Back hemline slit.  


So I made a mishmash of views by using the length of B/C, long sleeves of D but no pockets.  And, I used snaps that I applied with Kam pliers.  I didn't have enough black, so I opted for the red.  What do you think?  It gives it a little pizzazz?  Does it look like I didn't have the right color so I punted? 


This pattern is just super easy to put together.  In fact, I cut this out, sewed, and took pictures in about a 2.5 hour time and I was intently watching the Packers/Cowboys game!  Thank you Aaron Rodgers for that win!  


If you've never put in a placket before, the directions are very easy for this one.  I would recommend however that you practice on some scraps before you cut into your pretty fabric!  


My fabric (isn't it cute?) was a little stretchier than I thought so I sewed slowly and thought about using a very small patch of interfacing where the right and left bands come together, but it wasn't necessary.  


I also really like how the neckband is applied as it ends up looking nice and professional. 


I've been experimenting with putting in FBAs and I did this time with some success.  I took a Craftsy class on adjusting the bust and wow, was it helpful!  So now I am a convert and will use this method all the time!  


I love the easy fit of this dress and I really thought about eliminating the center back seam but it does provide some shaping so I left it alone and with the busy print, it works!  I hope you'll try this pattern very soon!


Thanks for reading!
Sue 

Tuesday, February 18, 2014

McCall's 6747--Wishing for Spring!

I've had this pattern since last summer and then ran out of time to put it together.  One of my New Year's Resolutions was to use more fabrics from my stash.  I'm not doing so well overall with that, but if I start with a list of fabrics I must use before spring/summer then mark this one off the list and continue my resolution as least started.  :)  

There are some super cute versions of this easy-wearing dress.  Here's mine.  Let me know what you think.  

Pattern Description: 
Misses' top and dresses: Pullover, close-fitting top and dresses have button neck and front bands and stitched hems.  A: Narrow hem on sleeves.  C: Button flaps.  A, C: Pockets.  B, C, D: Fitted through hips. C, D: Back hemline slit.


I made the length of view B, with the sleeves of D and one pocket with a rounded shape.  
I made a size medium that I completed a cheater FBA by adding 1/2 inch to the side seam at the bust line.  

Fabric used: This is a poly-lycra blend I purchased from Marcy Tilton.  It was a breeze to work with, washed beautifully, and had minimal rolling at the cut edge.  


I believe my finished dress looks like the pattern envelope.
Directions--actually they missed a few steps that make a much nicer finished garment that a few reviewers have already mentioned.  Here's what I thought about them--and yes, I did read and try to follow them.  It has been a very long time since I'd made a placket like this and I wanted to make sure I got it right.

Reinforcing the inner corners of the front by pivoting at the small circles is essential and you have to mark carefully or you'll end up with a weird looking and weirdly placed placket.  I did interface the front bands as directed with Fashion Sewing Supplies interfacing--best stuff on the planet.  I'm sorry, I don't know exactly which product I used as I have quite a few pieces of it.

Next, I slashed the front opening with my rotary cutter and a ruler, stopping about 3/8" from the lower edge.
I cut from the line to the corners by cutting on the diagonal.  Sewing the bands onto the front openings was very easy with this super straight line.  I also followed the directions to finish off the lower band of the placket by slipping the triangle piece along with the bands to the inside.  I neatened up the edge with my serger and then sewed the X onto the bottom to reinforce the area.  For not having made a placket in a long time, I am happy with how it turned out.


I stitched only one pocket on and rounded the lower edges using my SA curve.  I typically don't make curved seams on knits, but I'll have to do it more often.  The right tools make such a big difference.


Next you stitch the center back seam and I was going to try and match the polka-dots, but talked myself out of it.  I have to say, the shaping on the center back seam is really nice.  While the dress looks boxier, it could be much worse!

Per my usual construction methods, I reinforced the shoulder seam with 1/2" clear elastic serged into the seam.  I think it's the only way to roll.

Stitching on the neckband was pretty easy.  There is no interfacing in the neckband, so if you want to put button holes in the knit, make sure you stabilize it with interfacing.

Here's something else I did that I don't typically do.  I followed the directions for setting in the sleeves.  It's a knit garment, so I ask why?  It did work and it was effortless.  I didn't need any ease stitching at all, so it was sort of like laying the sleeves in flat--in an abstract sort of way.

I used my cover-stitch machine on the sleeves and the lower hemline. I feel like I am still learning how to use it with good results.

Instead of buttons, I used snaps.  I used fairly small snaps as it was the size that looked best when I experimented with which size to use.

I made my usual 1/2" sway back adjustment by wedging out the maximum at the center and tapering to nothing at the side seams.


All in all, this is a fairly good pattern if you've had experience in making a placket and sewing with knits. While the directions aren't stellar, they work.

I'm happy with my new dress.  My photographer wasn't home, so you'll have to do with the dress hanging out with Grace.  It hits me about mid-knee.  If DH doesn't like it, I might use this dress as pjs.

Thanks so much for reading!
Sue