About Me

My photo
Sewing is therapy for me. I hoard fabric, patterns, notions, and spend more time shopping for fabric than I care to admit...
Showing posts with label wool coating. Show all posts

Wednesday, January 31, 2018

A new coat! Butterick 6423

This coat pattern is getting a lot of attention....look at how cute it is!  This is Butterick 6423


I love everything about it.  Here is the description from the back of the pattern envelope: Very loose-fitting lined coat has front shaped princess seam with pocket, curved gusset under arm, lower back seam with pleat.


I choose to highlight some of the design elements, especially the shaped front seam that extends into a pocket!  How clever!  Actually, that is my favorite detail....


I used a heavy wool coating I've had in my stash for quite some time, years actually!  This past Christmas, my two beautiful daughters challenged me to actually sew from my stash--now that's a novel concept, huh?  We agreed to not purchase a single thing in order to complete this challenge--which lasts the entire month of January.  While I am happy with many of the makes I've made, I know to make a dent in my stash, I have to extend this...at least until March!  Do you think I might have a bit of a problem?  I am however very happy that I finally sewed up this fabric.  And, I made a very colorful lining with a floral 100% silk that I've also had for several years.  I think this coat is a match made in heaven for fabrics!  


Construction of this coat is straight forward.  My only deviation from the instructions was when I inserted the leather piping I used...yes, this was also from my stash!  I decided to sew together the piping, insert the piping on the princess seam, and then proceed with the directions.  If I was a brand newbie, I would wait before trying this coat, despite the 'easy' rating.  There is a lining to insert, inseam pockets, lots of hand sewing, etc.  Make sure you have a bit of experience before you try this pattern.  It isn't difficult, but it does require a bit of precision and there are a lot of steps.


Fitting this coat is a bit of a challenge, and I could have done better...I may end up taking it apart a bit...or I may end up just enjoying the easy fit.


I made a sloping shoulder adjustment along with a swayback adjustment and that's it.  I looked at the finished measurements for the bust area and decided it should fit fine and it does.  


With this big old collar, I highly recommend under-stitching it all the way around until you get to where the collar roll stops.  Since my wool is so very heavy, I decided to topstitch 3/8" from the edge. 

This was a fun coat to make, and I received some nice compliments today about it.  Isn't it great when someone comments on your me-made makes?  

Thanks for reading!
I love your comments....
Happy sewing!
Sue


Saturday, October 14, 2017

Vogue 1562--a new winter coat!

The minute I saw this red wool melton on Fabric Mart's site, I knew I had to make another winter coat.  It's only October, but with cold weather rapidly approaching, the sooner I started making this, the better.


Last year, I used a mustardy colored wool melton to make a duffle-type coat, and it was so wonderful to sew with that I went for the same type of fabric for this make.  There is still some of this candy-apple red wool available and some other colors as well on Fabric Mart's site if you are interested.


Look at those details!  Three welt pockets, bound button holes, a felt under collar, fully lined, gorgeous collar and lapels.  Can you tell I love this?  It is a Lialia by Vogue.  Directions are for advanced sewers and I totally agree.  This pattern is for an experienced sewer.  If you are a newbie, practice before tackling this.


I was a tad bit worried: this coat has six bound button holes and with the thickness of this fabric, I wondered how they'd turn out.  I practiced several and found they worked perfectly with this fabric.  Just take your time and sew carefully and you'll get a good result.


What good is a winter coat with a boring lining?  I want to liven up my winter and choose this dark brown, polka-dot fabric by Maggy London.  It is sold out now, but I believe it was a silk blend.  It was really nice to cut out and sew together.


Don't be afraid of using a heavier weight wool for your winter outerwear.  My Viking has zero issues sewing this.


I made my own shoulder pads, sewed the lining in by hand, hand hemmed the coat, so this truly was a labor of love.  I love how tailored it is compared to anything else I own.


There are a few things to be aware of when sewing this coat.
1.  Pay attention to the seam allowances listed on the pattern pieces.  The differences are not mentioned in the directions
2.  Not all the markings are present on the under collar
3.  Understitching the collar and lapel isn't mentioned but I did it as my fabric is rather thick and in all honesty, it is a step that shouldn't be skipped.
4.  Almost all pieces of the coat shell are interfaced with fusible interfacing.  If I make this again, and I might, I would use sew-in interfacing, probably hymo.
5.  I would add lower-hem facings instead of turning and hemming as I believe it would add to the lower hem lying nicer.
6.  I would pad-stitch the under collar to give it more shape.
7.   To give the shoulders and upper sleeve a bit more stability, I cut two pieces of hymo on the bias.  The shape followed the sleeve cap and continued from the shoulder seam to the notches for the front and back sleeve.
8.  I attached the lining by hand and am glad I did as it lays beautifully!
9.  I relied on an outside resource for my bound buttonholes.  The instructions are fine, I just wanted a few more details.  If you are experienced with these, you won't have any trouble.  Just make sure you measure your button hole width before you sew your garment.  My buttons are leather and quite a bit thicker than the pattern tissue indicates.


I typically make a FBA, sloping shoulder, and swayback adjustments.  I made all those but still needed to add shoulder pads.  I made those myself and covered them with the lining fabric before inserting into the shoulder area.   


Although I am not ready for winter, I am glad to know that I have a new coat hanging in my closet ready to tackle the cold weather!

Thanks for reading!

Sue from Ilove2sew!  A few parting shots of playing in the leaves!


Saturday, November 26, 2016

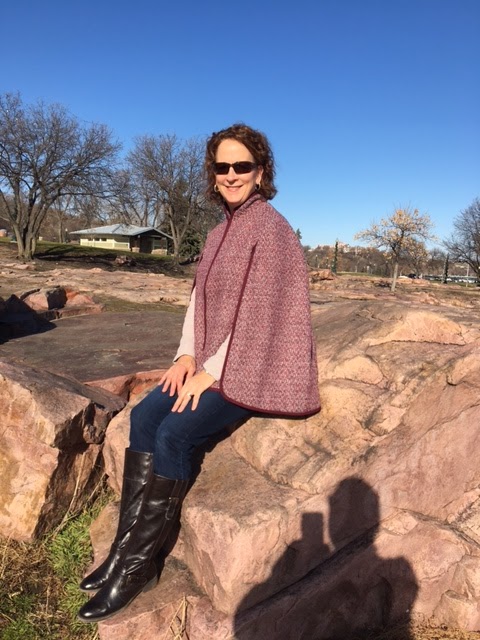
I made a cape! The Nell Cape

I've wanted a cape for like forever and I finally got this one completed!  I just love this pattern.

Fashionable cape with bound edges and inseam pockets

The pattern is described like this: The versatile cape has become a wardrobe staple.  Easy to wear over your jeans or a more tailored look for the office.  Great for cooler days the Nell cape is a must have.  Unlined with bound edges and seams gives this cape room for your creativity.  Whey not use a contrast or printed bind for an individual look?  If your prefer not to bind your cape you can use a lining and then turn it out.  


Just a note, this is a challenging sew for an experienced sewer.


I used a medium weight wool coating that was in my stash.  The floral lining is from Joann's and is a stretch chiffon.  It feels really nice against my skin.  


The binding is a Kona cotton.  I much prefer to make my own binding as it is such better quality and I can get an exact match to my main fabric.


I included the facings with this even though I choose to bind the edges.


For this cape to work, it needs to fit you at the shoulders and upper bodice.  The rest just sort of floats about your body.


See how pretty that chiffon looks as a lining?  I treated the lining and main fabric as one piece as I sewed this together.


All those bound edges were sewn by hand on the inside that is after I stitched them on by machine.  I love how polished it looks.  


If you want to wear this with bulky clothing underneath, I suggest you measure the armhole opening.  I am wearing a thermal long sleeved top and I have plenty of movement and room left over.  However, had I worn a heavy turtleneck, it may be a touch tight there.  


The most difficult part of this pattern is figuring out how to sandwich the sleeves between the front and back and also how to deal with what I call is the under-sleeve.  Don't over think it.  Follow the diagram and if you find the directions confusing, don't read them.    


Isn't that inverted pleat cute?  


I really love how this turned out.  


I added one hook and eye made for coats at the throat.  It doesn't shift around at all when I move.  


I love my finished cape!  


Here's a peek at the insides.


Here's a view of the falls in Sioux Falls.  I wish the photo captured how really pretty this place is, especially in the winter!  It was such a beautiful and unseasonably warm day we had to visit!

Thanks for reading!
Sue