About Me

My photo
Sewing is therapy for me. I hoard fabric, patterns, notions, and spend more time shopping for fabric than I care to admit...
Showing posts with label challis. Show all posts

Sunday, August 20, 2017

The Penny by Colette

I love the lines of this dress--it is classic in its styling but also has a bit of a modern twist, if you know I mean.

Here is an image of both view of the pattern.  I did a mashup of views 1 and 2.  Right?  I do love to do my own thing.

Image result for Images Penny dress by Colette

I used the bodice of view 1 without the pockets and the skirt of view 2 without the belt feature.  Think about that for a minute.   This is a fairly new release.  In fact, I couldn't find a review on Sewing Pattern Review prior to me starting this project.  


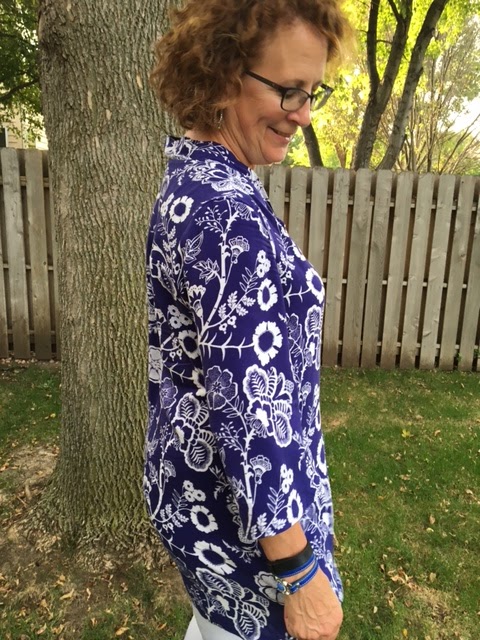
My fabric choice was a precut yardage from Fabric mart.  This is a challis that I purchased for the bold pattern and print in deep navy and white.  


It almost reminded me of a super wild bandanna print, but more sophisticated.  Is that an oxymoron?  


I made a few changes to the pattern based on the manner in which it was drafted--or at least I think that was what it was due to.  I did some flat pattern measurements and found the bodice, waist, and hips would fit great.  


Pattern placement was fun to play with for this dress.  The front and back bodice were the easy parts to match the pattern.  However the skirts were not based on the grainlines the pattern requested.  


Honestly, based on how busy the design is, pattern matching only really needed to happen on the bodice and collar sections.  The skirt and sleeves would have to be an afterthought, unless you had a solid and a lot of yardage.  Mine started at over four yards and I didn't have enough to make everything match.  Fight it or let the dress design win.  If you only have so much yardage, then the dress design has to win.  


The skirt has a lot of movement, even though I made the less full skirt.  It still has a lot of body, twirl, and flow as you move.  Also, it was super hard to get an even hem, despite leaving it be on the dress form for 48 hours.  


I do like the overall fit. Colette patterns seem to be made for girls with a bigger than b-cup bodice.  I didn't need an FBA.  I only needed a sloping shoulder adjustment and swayback adjustment.


For the sleeves however, it wasn't so easy.  The ease and length of sleeve cap is absolutely ridiculous.  I followed the directions to a T and there was no way on God's green earth easing the sleeve cap would work.  In case you are wondering, I do know that if you make a sloping shoulder adjustment, you also need to adjust the lower portion of where the sleeve attaches to the bodice.  It wasn't operator error in this case.     


What I ended up doing was to take an inverted pleat at the sleeve head to accommodate the massive amount of ease.  I just hate it when I can't get everything to work together.  I put in three rows of ease stitching about 100 pins to facilitate the amount of ease needed.  Neither was no way near enough.  After five tries, I gave up and went for the inverted pleat at the top of the sleeve cap.  It works.    


I am so proud of my pattern matching on the bodice.  May I say it looks fantastic?  I hope so as I think it does!  


I decided to wear a belt with this dress.  Here is the reason why.  The lower portion of the facing that accommodates you putting on the dress as well as taking it off had zero buttons.  There is at least a six in span of fabric that needs something there otherwise you will get gaping. In the photo below, you can see the bottom portion of the dress where I added two button and buttonholes.  The buttonholes  do need to be functioning in order to get the dress on and off.  


My pointer finger is at the waistline and my other fingers span the area between it and the second buttonhole I added.  That isn't even the bottom of the placket.  That is a pretty large span if you ask my opinion.  At some point in time, someone will see whatever you decide to wear as undergarments.  Don't think it won't. You will be disappointed.  


I really like the lower sleeve detail as it is fun but hard to see based on my busy print.  I really like my finished dress.  It wasn't difficult to sew by an means but if I can be completely honest, I am disappointed in the pattern.  I expected a better fit in shoulder and sleeve area.  I am however happy with my finished result.  

Thanks for reading!
Sue  

Wednesday, September 21, 2016

The top that should have been a dress or Simplicity 8216

How stinking cute is this pattern?  The moment I saw it, I knew I had to have it!  Luckily it was on sale at JoAnn's so it was a great deal!  

Simplicity Pattern 8216 Misses' Mini Dress or Tunic

Did you ever wear a bow blouse back in the late 80's or 90's?  I wasn't a working girl at that time as I choose to stay at home and be with my four little ones but I did have a bow blouse or two.  They are feminine, pretty, and graceful.  


But the big difference between then and now is the size of the bow.  Then the bow was HUGE!  Now, the bow is simple and understated, perfect!


Let's talk fabric first.  Isn't this just fun?  I purchased it from either Fabric.com or Fabric Mart.  I wish I could remember!


Sometimes I purchase fabrics and realize something like--wow, I've gotten a lot of blues lately....


I don't wear a ton of blue, but something about this rich cobalt color was so striking to me.  I believe it is a poly/rayon challis.  Really lovely to work with.


A note or two about the pattern.  I made my usual size 14 since that size fits me so well through the shoulders and upper chest.   This pattern has plenty of ease through the chest so I didn't make my usual FBA.  Another note is that the line drawing makes this pattern look very gathered along the back yoke along with the shoulder areas.  Neither have much gathering.


I did however make a sloping shoulder adjustment.  I love how that area fits me.  


If you sew this neckline and bow area precisely, you'll end up with a great result!


 I tagged this the top that should have been a dress because I found to holes in my fabric as I was sewing it up.  I ended up hacking about 3.5 inches from the bottom of this tunic and realized there was another hole about five inches above that one.  Grrrr.............I fixed that by appliqueing a small leaf over the hole and it worked.  Dang, I wish I would have examined the fabric more carefully before cutting into it!

I am happy with my finished result.

Sue :)

Sunday, July 31, 2016

StyleArc Amber Woven Top


Have you seen this pattern?  I've had it in my stash for over a year and finally got around to stitching it up!

Fashionable slip on top featuring interesting details

Can you see all the details?  Darts, piping or trim along the front band and front and back neckbands. It also has darts at the shoulder seam making it a 'real' raglan sleeve.  What makes this top special is the finishings on the inside.  Everything is so tidy and neat!

The best thing to do is just show you what it looks like and then explain


This is the inside at the neckline.  There are no facings!  The facings are made with the front and back neckbands and also the front panel.  Those decorative pieces are sewn wrong sides together and then flipped to the right sides.  You stitch down those panels on the front and that is how the neckline is clean finished.  At the shoulder seams you use bias strips made from the fabric and everything is just gorgeous inside!  


This fabric was from my stash and I believe it is a rayon challis.  It looked so different on the right and wrong side I decided to turn the fabric to the wrong side for the garment and the right side for the panels.  The rick-rack is from my stash as well.  I purchased an entire box of it at an antique store several years.  The price tag on the package was 15 cents.  I should have done a better job matching the zig and zag part of the trim to it was even all the way down.  


I was showing the hubby where i wanted him to focus the camera.  It was on the topstitching, not on my chest.  I think he's hopeless.


I like that the design wraps around the back of the top.  


This is pretty boxy but overly so.


From the side, you can see that I made an FBA and a swayback adjustment and it was needed.


I like this top.  It isn't my favorite but it was a fun sew just because of the way the the panels create a clean finish.  Fabric choice is critical.  I think my rayon may have been a bit too heavy.

Thanks for reading!  
Sue 

Sunday, March 27, 2016

McCall's Hippy Shirt!

Another tunic you say?  Yep!  Here is the top my hubby dubbed the 'hippy' top.  Do you agree?  I'm still not clear if it is the print or the shape that reminds him of the hippy era.


Sorry about the wrinkles!  I wore this to Easter dinner at my parent's home which is about 40 miles away.


So here is the pattern I used (McCall's 7357):


And, here's the description: Loose-fitting, pullover tops have neck band, self-lined yokes, applied tab, side-front and side-back seams, three-piece sleeves, shaped hemline, and narrow hem. A: Short sleeves and contrast panels. A, B: Stitched hem on sleeves. B: Three-quarter length sleeves, and front sleeve and side slits. C: Purchased trim. C, D: Long sleeves gathered into binding.
Includes separate pattern pieces for A/B, C and D cup sizes.What? Separate cup sizes?  SCORE!

 So I made a mis-mash of B and D.  I used the length of D and the slight bell sleeve of B with the 3/4 length.  
This can go together really quick, despite the many pattern pieces!  I however made it more time-consuming by using french seams almost everywhere and also applying the minty green rick-rack on the front and along the sleeve seams.  I really like the trim!  

The instructions for this are very good and despite using this colorful fabric that shifted everywhere, I am very happy with my results!  I wore it today and received many compliments!  Don't you love that?  

My only very minor complaint regarding this top is the narrowness of the sleeves.  If you typically make an adjustment for full biceps or arms, you'll want to do that here as well.  In fact, you'll most likely want to pin the tissue together and see if the sleeve will fit over your arm at all.  
I love this top!  The fabric is from Hancock's.  Isn't it just so pretty, and doesn't it scream happy spring? 
Thanks for reading!
Sue 

Tuesday, September 29, 2015

Edith Top to color up my fall

I made a new top and wow, so colorful!  The fabric is a viscose challis from Elliot Berman and from France!  Aren't I all fancy with this!  I've never used EB fabrics before and it was just wonderful to sew with.  And look at those vibrant colors!  Sometimes a girl just needs to treat herself to a very pretty and lush fabric!


This is a new pattern for me: Edith top from Style Arc. The pattern was a freebie with an order placed in September.  I like the design lines.  It has the hem bands, the placket, the patch pockets with flaps, and the neckline.  I see I managed to iron a big crease in the front pocket.  :)


While this looks like a rather simple sew, it did present challenges, mostly with the instructions but with StyleArc, you get a great design and drafting and have to put up with the less than easily presented directions.


I made a size 12 with long sleeves.  I simply love the sizing on this top.  It fits fantastic through the shoulder, neckline, and bust.  I made zero alterations in those areas.  My usual swayback adjustment was completed (1/2") and I love how well the back hangs. While the drawings make it look overly boxy, I don't think it appears too boxy on me.  Perhaps that is my softer fabric choice?


My only disappointment was in the sleeve length.  My sleeves are about 1" too short making them bracelet length.  This really isn't a huge deal but this is one thing to check before you cut this out.I solved the issue by cuffing them twice.

I made just a few deviations from the instructions.  One was on the placket.  I decided not to turn under the facing portion to the inside and topstitch.  Even though I used interfacing, my fabric was a bit soft and I simply didn't want to wrestle with it.  The other deviation was to make a bias band for the collar instead of sewing the two piece one together and praying it would lay nice and flat like I knew would happen if I made my usual bias one.


I know this top is colorful but I love it!  I wore it to work today and received several compliments on it!

Another winner from StyleArc!

Thanks for reading!
Sue