About Me

My photo
Sewing is therapy for me. I hoard fabric, patterns, notions, and spend more time shopping for fabric than I care to admit...
Showing posts with label Faux leather. Show all posts

Wednesday, February 28, 2018

Butterick 6410 a cocktail dress!

Hello all!  I so enjoyed creating 2 dresses for Elizabeth's day and night challenge seen here: day-night dress challenge 


I choose this pattern, Butterick 6410, for my night dress.  I love super simple styles like this one that you can embellish to your heart's desire!  I had fun creating this dress.


Of course, I couldn't make it as designed without some tweaks, right?

As you can see above, I installed/adhered some swarovski crystals along the upper bodice front.  They were so very hard to photograph!  This was mid-way through the final placement. I so enjoy adding this embellishment--in moderation.  I always feel like when you are embellishing a garment, moderation is key.


Here you can also see that I added a faux leather collar, cuffs, and piping along the yoke edges, both front and back.  I am so pleased with how this turned out!


I really wish it would have been warm enough outdoors to take photos, but it was so cold I just couldn't do it. 


My fabric is one of the #precious fabrics from my stash.  Both the brocade and the faux leather were from Fabric Mart.  I have been waiting a long time to use these and this was the perfect opportunity. 


I really love how this fits me.  I made my usual swayback adjustment, which by the way, is very difficult in such a hefty fabric.


I also made a FBA, and swayback adjustment.  I just love this dress.  I am going to make this pattern multiple times.  Can't you see it so many ways with so many fabrics?

Thank you to Elizabeth for hosting this challenge.  I can't wait to show you my Coffee dress!  

If you haven't seen this challenge, check out the link above!

Sue


Monday, March 2, 2015

Finally--a moto jacket!

I can't believe it took me so long to make this awesome jacket!  I guess the stars had to align so that inspiration and the right fabric merged!  Which is crazy to think about since I've had this pattern for months and the fabric for at least a month!


I guess cleaning up my sewing room and coming across the two things together made me finally jump on this and wow, I am thrilled with the results!


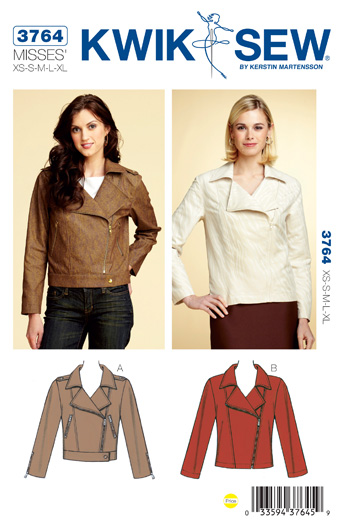
So this is Kwik Sew 3764 and I love everything about it!  The description from the back of the envelope is this: Unlined jackets have collar and overlapping fronts with zipper closure in left panel seam.  View A has epaulettes, waistband, pockets with zippers, zipper with gusset at bottom edge of sleeves, and snap or button closure on epaulettes and waistband.  View B has hemmed bottom edge. This is designed for medium weight woven fabrics.


I made a modified view A meaning I didn't include the epaulettes, but otherwise it is straight up as the pattern is written.


As other reviewers have mentioned, the directions are VERY well written and VERY well illustrated! Most Kwik Sew patterns are awesome, but this one is exceptional and I truly mean that!


I LOVE this fabric I choose which was made by P&B textiles and is listed as a faux leather.


It is made from Polyurethane, polyester and viscose.  It's hand wash, you then roll the garment in a towel to squeeze out the excess water and let dry.


It was actually fairly easy to work with although a little heavy and I didn't really struggle with it until the two sections of the collar and the facing were sewn together--that's three layers!  But I went slowly, used my walking foot and it all turned out pretty--if I do say so myself!  This fabric has an embossed quality to it.


The directions for the zippered welt pockets and the sleeve zippers and gussets was just brilliant!  If you follow those directions carefully and mark your fabric carefully, sew with precision, you will love your results!  Having said this, this isn't a pattern for beginners.  You need some experience before tackling this.


Another finishing detail that is very nice is how the top portion of the zipper is finished off.  You most likely will have to cut it down and don't be afraid of it!  If you use a metal zipper, there are so many tutorials on how to remove the extra teeth using a pair of needle nose pliers and pull.  If you have a plastic zipper, you sew the fabric piece to the top, wrap it and cut off the excess.  It looks professional, neat and tidy. I like metal snaps and attached one to the waistband using my dritz pliers.They worked great!  No issues at all.


I made my usual 1/2" swayback adjustment and that's it!  I was a little concerned I might have to make an FBA but it really wasn't necessary with the weight of the fabric and how this fit.


Next time, I will make a deeper swayback adjustment.  I'm 5'7" and the sleeves were perfect!


I am very happy with how this turned out and I hope you'll try this too!


Thanks for reading and I so love your comments!

Sue