About Me

My photo
Sewing is therapy for me. I hoard fabric, patterns, notions, and spend more time shopping for fabric than I care to admit...
Showing posts with label Named Clothing. Show all posts

Monday, April 22, 2019

Kielo Wrap Dress by Named

Ever feel like you are one of the last people to create a pattern?  I am typically late to the party, but I do eventually arrive.  Here's the uber popular dress I am referring to:


Here's the description from the website:
  • Very simple maxi dress with an interesting shape
  • Sleeveless design, you can download a free sleeve add-on for the dress here!
  • Wrap tie closure at the waist
  • Slim skirt and a vent at the back
  • Choose a light and drapey fabric with approximately 20 – 60% stretch. For example jersey or stretch chiffon. The sample is made up in a silk chiffon with some elastan (Eurokangas).
I totally agree with this description.  Very simple with a totally interesting shape.  You don't feel sack like in this at all.  

Here's my version: 


Sorry about the indoor photos.  The day I took these, we were having a raging blizzard.  It was technically spring, but school ended up being called off for yet another day. Blah.


Here's what the dress looks like upwrapped.  


This dress is so light and comfortable to wear.  


I RARELY shorten anything.  This dress was shortened by about 2 inches.  For reference, I am 5'7".  


This fabric is a designer jersey knit by Halston from Fabric Mart's site.  This was so wonderful to work with.  This is a 'go-to' color for me.  It will work with so many jackets and sweaters I have.  


I do love this.


You need a super drapey knit for this to look right.  Anything that doesn't drape will throw off the look of the front.


I made my usual alterations for lengthening between the shoulder and apex, and bust curve. 


Here you can see the shaping the back darts give and that cute walking slit.

I can't wait to wear this dress!

Thanks for reading!
Sue


Monday, July 7, 2014

Named Clothing Kanerva Button Back Shirt 2


Ok, so me being on the repeat roll that I am, I simply had to make this blouse again from Named Clothing.


 I love my first version, seen below.


It's different, cute, comfortable, and I love any blouse with buttons up the back.  I think it takes me back to my adolescent/young adult years?  Whatever the reason, this pattern lured me back in and I am glad I listened to that call to repeat this fun blouse.


This pattern company originates in Finland.  I purchased this as a PDF and what I really liked is that it is environmentally friendly and only a few pages printed at a time.  The pieces overlap on the sheet, much like a Burda Style magazine but with my less 'clutter'.  I traced off each piece on the pattern tracing cloth and now have a permanent pattern for this blouse.  Another tactic that I simply love is that you have the option to print off the range of sizes you want for this download, not all of them which makes tracing a huge bonus in my book.


After choosing the pattern tiles you wan to print and trace off, next is fabric.  I had purchased this beautiful fabric from Emma One Sock specifically for this top.  It is so beautiful, colorful, and just fabulous to work with that I wish I would have ordered about 10 yards of it.  I have some left over, not much mind you, but I do intend to use every tiny scrap for something, anything in future projects.  I mean, can you blame me?  Look how vivid the colors are!  Look how plentiful the color is!  It is a cotton that is a wonderful weight, pressed beautifully, sewed amazingly....can you tell I love it?  DH said my finished top was wonderfully hippish and cool.  I think that means he likes it!

Enough on the fabric, if you don't stop me, I will go on for quite a while about the fabric so let's move onto the pattern.  The pattern pieces all matched up and seemed to be well drafted.  All notches and marks lined up.  The directions are very detailed, especially if you are a beginner and haven't sewn before.  Everything from the grainline and pattern notches are explained--a bonus if you haven't much experience.  I found this pattern super easy and a beginner would have a certain measure of success with this top given a little time surrounding closures.  I used snap closures and my KAM snap pliers and loved the entire process.  The only modification I made to the pattern was a 1/2" swayback adjustment which is usual for me.  I also added another concealed snap just below the waistline pleat to help with overexposing my backside when I raise my arms over my head.


One thing you do have to note about the pattern directions is that there are 1cm seam allowances or 3/8".  If you don't read the directions, or at least skim them, this could totally alter the fit and you could end up completely dissatisfied.  One of the beauties of this top is that there is enough ease you can slip this on and off over your head without using the button closures at all.  Love this!


Since this is my second time through, I really don't have anything else to add other than I do highly recommend this pattern.  I am working hard to support more indy patterns and this is a company I will look to more often.


Thanks for reading!
Sue

Thursday, June 19, 2014

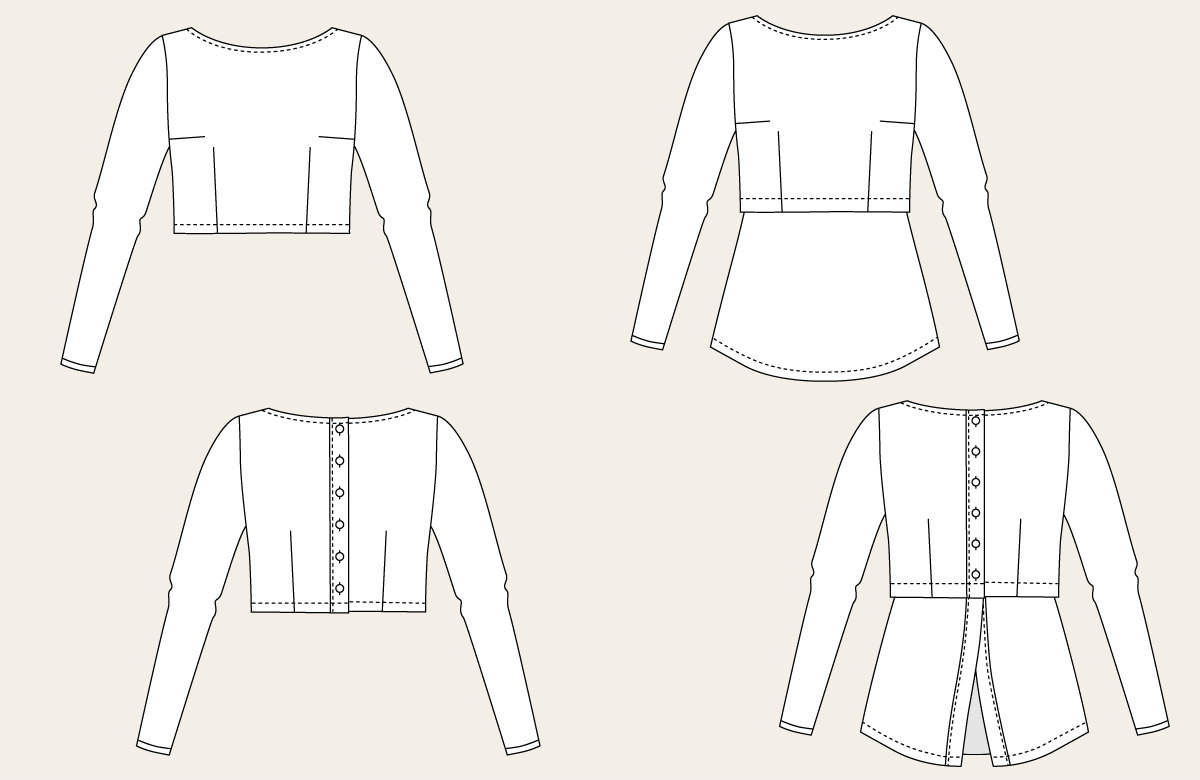
Named Clothing--Kanerva Button Back Peplum Blouse


 How cute is this little top from Named?  This is their Kanerva Button Back Peplum Blouse.  I ordered this pattern yesterday, downloaded it, and had it taped together in about an hour.  What I really love about this download is that you can choose which size you want  to print rather than have a range of sizes from zero to 14 in one.  I mean, I will never be a size zero, so why should I have to mess with it?  I printed off the size range I wanted and am very happy I only had two cutting lines to deal with and sort out.  :)   


This pattern in rated as either simple or average depending on if you add the peplum or not.  I don't think the little skirt on the top added to the difficulty at all.  In fact, I would rate this entire pattern as simple.

So back to the download.  This was an environmentally responsible download.  There were 12 pages and the pattern pieces overlap one another.  After taping together, which went very smoothly as everything lined up perfectly, I used pattern tracing cloth that I purchased at either Joanns or Hancocks and using a permaenet marker (sharpie?) drew all my lines and markings necessary.  Next came choosing fabric and I choose this pretty little blue and white number from my stash.  Actually, this was a recent addition.  It is a vintage find from an antique store not too far from my home.  Since it was only 36" wide and I had only two yards, I had to shorten the sleeves, which is okay by me for this version.  I think it is fun to use vintage finds once in a while as I can't imagine how some of the dresses were made.  This fabric is from the 1940's!  It was in beautiful condition but as you can imagine a little fragile.  I will tell you how I managed that in a bit.


After cutting out and beginning to sew, I did pause and read the directions.  They were clear and concise and there was a great deal of helpful information if you are a beginning seamstress.  I found the actual steps to creating the top clear and concise.  The visuals are helpful as well.  I do believe there is one mistake as far as the visuals are in step five.  The task is to sew the back waist darts on the top but the image shows the bust dart.  If you are new to sewing, you may wonder where the heck that dart is that you are supposed to be sewing!


Other than your fabric, you need very little else to complete this top.  One inch strips of the length of the top is needed of fusible interfacing as well as six button closures.  Luckily I had all this stuff in my stash including the matching snaps I used instead of buttons--yippee!  I just needed a few hours to sew today not another run to the local fabric joints for a few measly notions!


Ok, so here is what I modified from the original pattern.  Oh, and isn't it cute?  Remember when I mentioned my fabric was a little fragile?  Well, while handling the fabric's cut edges, they tended to fray quite a bit so instead of turning and hemming the neckline and sleeve hems, I cut bias bands of the tiny bit of self fabric left over and serged that to the edges, turned those and topstitched about 1/8 inch from the seam.  It feels much more secure that way to me, especially as I continued to handle it.  Also, the directions didn't mention staystitching the neckline but I thought it was necessary so I added that step as well prior to attaching the neckband.  Instead of using buttons, I did use plastic snaps and my Kam snap pliers to set them and am very happy with the results!


So, I like the result of this little top.  The button up back is darling and the peplum is so sweet and cute.  There is enough ease that I can slip this on and off over my head without having to use the snaps--another like!  Everything went together well and I can't wait to try this in a beautiful floral cotton I purchased from Emma One Sock.  I did measure the location of the snaps prior to putting them in and feel like the bottom most one needs to be a tad lower so it more closely matches the model.  I will hopefully remember that for next time!


Thanks so much for reading my post!
Sue