About Me

My photo
Sewing is therapy for me. I hoard fabric, patterns, notions, and spend more time shopping for fabric than I care to admit...
Showing posts with label stretch cotton. Show all posts

Tuesday, February 26, 2019

Oslo Stole by Oraguse

Hi guys!  
Up today is a FREE pattern from Oraguse, an indy company from France.  This is more of a set of directions than pattern pieces but it's so easy to put together, you won't miss the pattern piece!  

Here's an image from their website: 


Here's my version: 


This fabric has been in my stash for ever!  Probably one of the longest of all pieces!  I thought it was wool but is actually stretch cotton.  It looks like wool and has a feel of wool, so it may be a blend.  The tag from when I purchased it was only partially attached.  Hard to tell!  


The back 'collar' is only partially stitched down the front of the garment.  The back is left to hang out, if you know what I mean.


This is a bit wrinkled.  I didn't get a change to take photos until after wearing it to work.


One thing you'll notice is that the closure on me is high up while the model shows the closure much lower on her body.  I double checked my measurements and they are correct.  For reference, I am 5'7".  Height may be a factor.  


This is very comfortable to wear and surprisingly warm, even though this isn't wool.


Here are some details--I like how the corners are finished.  


Here's where the collar is stitched down.  If you look closely, you'll see where I did some zig-zag stitching to strengthen and stabilize the back side seam intersection.  This tiny portion of the garment isn't finished as it is a cut edge and I thought the zig-zag would reinforce it a bit as well as give me a more solid surface to attach my pin closure.  

Thanks for reading!  Do you have any free pattern resources?  Please share them if you do!
Sue


Wednesday, August 8, 2018

The perfect summer dress? Vogue 9184

Oh my, I purchased this pattern as soon as it came out and it has been sitting in my stash for two years.  Two years!  What?  What was I waiting for?  Have you ever done this?  I find myself doing this too often.  

Here is the pattern.  

Image result for images Vogue 9184
The design is basic, simple, and classic all at the same time.  Don't you agree?  Sometimes I get turned off on a pattern by a super simple line drawing.  I much prefer a photograph of a real garment on a real person.  


I must say, I put a lot of effort into this simple design.  I measured just about every point on my body you can measure, compared it to the tissue, made alterations, pin fit the fabric, and stitched it up.  The results, to me at least, were well worth it.


First I must say, I started with the shoulders and worked my way down.  For some reason, the shoulder area can be difficult to fit.  So many peaks and valleys!  I've suddenly realized I need more room from shoulder point to shoulder point across the back as well as apex to apex.  I'd never thought of that until I took a fit class this summer.  So helpful!


After fitting that area, I moved to the bust, mid back, waist, hips, etc.  You get it, right?


What I love about this pattern is that it fits so well in the bust area that according to DH, "Your chest isn't the first thing to enter the room."  In fact, I think it minimizes the girls.


When I began fitting the back and waist area, I've come to the conclusion that a garment isn't going to fit me well there unless I add a horizontal waist seam.  It just helps with my hollow area at my waist.  I try swayback adjustments but I still seem to get 'fabric' there.  If there's a waist seam, I can totally take care of that mess.


Of course I made my own bias tape from the garment fabric.  If you've never done that before, do try it.  Super easy.  It only takes a few minutes longer than using purchased bias tape and it's a perfect match to your garment.  What other convincing do you need?


My invisible zip turned out lovely.  Is that okay to say?  I used bright yellowish-green, a color in my fabric.  I love a well-inserted zipper.  I see I forgot to hook the eye and fabric loop for the photo.  Forgive that error!  It does line up perfectly!

This pattern needs some attention and love people.  A nice light-weight wool under a cute little jacket would be fabulous for cooler months.

Try this pattern!  I think you'll love it!
Thanks for reading!
Sue 

Monday, October 10, 2016

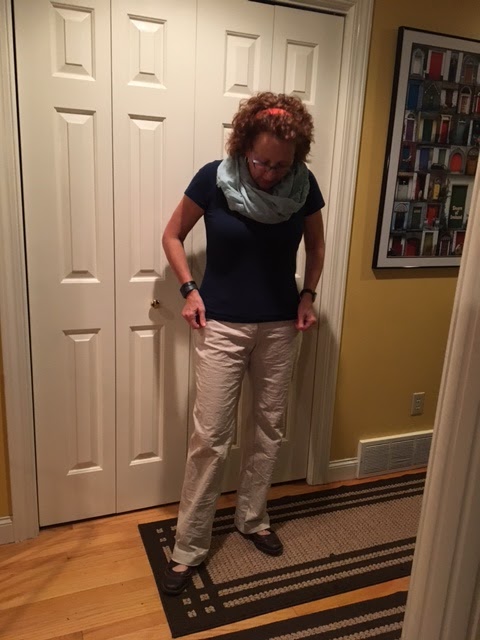
The Jasmine pants!

So I am really, dreadfully, awfully far behind in my blogging.  I have been sewing but just haven't taken the time to post which is really too bad since I feel like when I see actual photos of me wearing garments I've made, I get a better idea of whether it is a hit, a near miss, or what was I thinking when I wore this in public???

Image result for Images StyleArc Jasmine pants

I am on the fence with these pants.  I like them but the fit isn't great.  It is okay, but this is the first time I have had to take a pattern in along the hips and thighs in a while.  Maybe all the running I am doing it starting to pay off?


I have had this pattern in my stash for a while and have also know for a while that I need more work pants.  So, I put these together in just a few hours.  It is a pretty basic pants that fit okay.  The legs are wider than I am used to and what makes this pattern a touch unique is the back yoke.  If my derriere wasn't so flat (I am working on that) I would wear these with a top tucked in so you can see the details.  


I know, I know, it is hard to see in this light.  I tried to get dressed in these prior to the sun setting, but it just didn't work out.  


I like these much better with my shirt un-tucked.  


Directions for this pattern are really, really difficult to follow.  You all know how much I love SA patterns and even for me, these were bad!  There are tutorials on their website that I have utilized before and know they are helpful.  I have made so many pants that I really don't need directions.  I just like to glance at them to see if there is another technique I need to learn.  


Having said that, if you've made a pair of pants with a real fly front, you won't have any issues creating these if you consult directions other than what is included with this pattern.  


The only fitting alteration I make to SA's pants patterns is a fish-eye dart at the back upper leg.  This is a slight dart and hers is how I do it.  In the photo above, I cut along a perpendicular line along the upper back leg, just below the crotch line.  

In this photo, I have taped the pattern piece back together.  If this had been tissue paper you could have seen what I did much more clearly.  You will just have to take my word for it!  The overlap in the center of the leg is 1/4" which amounts to a total of 1/2".  It makes a difference.  If you used very stretchy fabric, you could make the dart extend all the way to the side seams and then stretch the back to fit the front.  My fabric wasn't nearly that stretchy so I had to taper to nothing on the sides.  


These pants are comfortable and have a nice wide waistband that sits at your natural waist.  


I wanted you to see a close-up of the fabric I used as it isn't visible in the photos above.  Isn't this cool?  I believe I purchased it from Fabric Mart.  


Thanks for reading!
What are you sewing to wear to work?  Do tell!
Sue 


Wednesday, June 22, 2016

Cara top, I mean dress!

Do you love sewing as much as I do in that you can make something truly your own?  That's what I did today.  I made this top into a dress, perfect for summer!

Fashionable off-the-shoulder top

Is this not just about the cutest top ever?  I was a little worried that I might be too old and look rather ridiculous in this, but DD1 and the DH assured me it was okay, despite being 53 years old!


 After seeing the photos, I agree with them that it is cute.


This top is described like this: This on-trend top gives a gorgeous look with its flattering, gathered, off the shoulder neckline with a floaty raglan sleeve.  The elastic at the back neckband keeps the shoulder line in shape.  Wear it with jeans or dress it up with a fabulous print to wear to a special occasion.


I used this j-crew fabric I purchased from FM quite some time ago and since I had enough, I decided to try this in a dress.  If I hated it, I knew I could chop it off back into a top.


Construction of this dress is pretty straight forward and moderately easy.  I really like how the neckband is constructed and attached to the bodice front and back along with the sleeves.  If you cut this out making sure you mark all your notches on the bands and top your gathering will be gorgeous!


Typically I made an FBA, sloping shoulder adjustment and swayback adjustment.  Well, given the shape of this top, I made zero alterations to the pattern tissue.  Although I did mess with the elastic back as this slid so far down my shoulders!
Just a note, I won't consider wearing this without a belt.  If feels like a mu mu!


The pattern calls for 15.5 inches and I cut it back to 14.  I also decided to add a piece of elastic to the front band as well just to help the dress feel like it would stay put and it did just that!


If you want a super fast project (unless you have to make a lot of alterations) this is it!  Have fun with your fabric choice and enjoy making this!!!


Thanks for reading!
Sue


Friday, June 3, 2016

Summer sewing is going on here!

I wish I had a catchy title for this post, but honestly, this is an accurate description of what I have been up to or dreaming about.  And, since we are talking honesty here, I've had both these garments completed for quite some time but just haven't taken time to take photos!  Here is my review for two StyleArc pattern: Cyd top and Georgie Pants.  I love both garments so much!


First, let's review the Cyd Top.  I made this for the first time last summer with a chambray and coral with lace piecing in the back.  I still love my original version so much and KNEW I need a stark white top as well.  I simply LOVE white tops, especially white tops that aren't clingy all over and are fun--both of which this top is for me.

Fabulous pleated peplum top

I love the peplum part of this top and the fact that you can embellish the crap out of it.  I can see this color-blocked, with unusual fabric choices and an exposed zip down the back.  What do you see when you look at this pattern?  I am curious!


The design lines are what makes this top fun to sew and fun to play with.  You can also make this sleeveless!

My pants are from the Georgie pattern which are an uber popular style in the current sewing world. They have many 'regular' jean details but with sort of legging styling meaning they simply pull on and off.  Use a stretch fabric such as mine which is a stretch denim and you'll love them so very much!
Pull on stretch woven jean with hidden elastic waist

This is my second go at the pants pattern.  My first pair was made with a faux leather technically called a stretch bengaline I purchased from the StyleArc site.  I love both pairs--this one made from a gray/white leopard print and my first from the faux stretch leather look bengaline.


I have worn the heck out of both the top and pants.  I love the fit and style of both.  I think they are fun, if I do say so myself!


What are you sewing for summer?  I'd love to know!

Thanks for reading!
Sue

Sunday, April 24, 2016

A new StyleArc dress and the challenge of a windy day

Fitted panelled dress with extended shoulder
From StyleArc's site: This simple unlined panelled dress is a gorgeous fit. The design lines skim over the body creating a flattering line that continues down into a slight “A” line hem. The extended shoulder line covers the shoulders giving a cap sleeve effect. Make this beautiful dress in an afternoon, teamed with the Sienna jacket this would make a great outfit.

First of all, please note the wind!  Such a blustery day!  


Those design lines!  Aren't they just so cool?  This dress fits just as described...the design skims over the top half of the body and then creates and a-line hemline, that is very, very slightly flared, at least when compared to the top half. 


Even though I made this dress a few weeks ago (I am so behind on blogging!) I still remember how much fun this was to cut out and put together.  And yes, I said this once before, but just look at those design lines!  For some reason, I simply love sewing convex and concave pieces together.  Maybe it is the challenge I think is fun?  


The fit on this dress is really awesome, although it doesn't quite match the line drawing.  To me, the line drawing appears much more fitted in the waist and hips, but this isn't.  It literally starts flaring from just below the bust, a bit above the waistline, and then just continues with that path. 

For my normal alterations, I make a swayback adjustment and sloping shoulder adjustment.  I made both of those and I also took this in at the waistline and hipline.  I am still considering taking it in more at the hips and waist, but DH really likes the dress as is, so I might end up leaving it. 

The manner in which the facing is attached is one of the best things about this pattern.  You construct the dress but leave the shoulder seams unsewn, but the rest of the dress is constructed.  After attaching the facings, you turn them to the inside of the garment and then stitch the shoulder seams.  It seems complicated at first, but once you think about it, the method is entirely genius!


What I like most about my dress is twofold: the fabric of course!  It is a stretch woven from fabric mart and I love how vivid the colors are.  2.  I love how 'invisible' my hot pink zipper is.  check it out!  


This was a fun little dress to put together.  I will probably make another is a wool for next fall as the fit is lovely and it looks really cute under jackets of all sorts.  


Thanks for reading!  How about you, do you love the challenge of an invisible zipper?  
Sue