About Me

My photo
Sewing is therapy for me. I hoard fabric, patterns, notions, and spend more time shopping for fabric than I care to admit...

Saturday, December 20, 2014

It's Holiday Sparkle Time!

Oh the holidays--they sneak up, you have some events to attend, you need some sparkle, what's a girl to do?
Well...you find a pattern and fabric, that's what you do!


So, along comes Vogue 8950 a simple tunic with tons of style and color blocking options!  How adorable is the version above?  I thought about color blocking but the word sparkle kept popping into my head so...
I found a lovely fabric at-hold onto your shorts here-Joann.  I know, I know, Joann and I don't speak much these days and Hancock didn't have what I was hoping for so along came this lovely sparkly fabric that was so soft and had just enough heft to it that I decided to go for it.  And, you know what?  I wasn't disappointed!  That doesn't mean I am going to be a regular-except for patterns, thread, zippers, etc.  It just means that if I do find a fabric that looks and feels awesome, I will at least consider using it.  :)
It's pretty, right?  I think so!


Ok, so where was I?  Back to the tunic....
I chose the Very Easy Vogue pattern which is described as semi-fitted.  I think it is a little roomier than that, but that's okay.  I made view C which is longer and a solid or no color blocking.  This pattern does call for a fabric with quite a bit of stretch, no?   


I made only a few tweaks to this pattern.  I made a straight 14 based on my high bust measurements.  Even though it is semi-fitted, I still feel like it is roomy and for next time, I'll make at least one size smaller.  I took in the shoulder seam at the neckline a good inch as it seemed to hang on me and I make my usual 1/2" swayback adjustment.  Since I don't like folding over the neckline and stitching in place, I added a narrow band and topstitched it on the right side.  In fact, I topstitched all the seams on the right side just to keep the seam in place.  Sorry about this picture being upside down!

I did sew the sleeves into the armhole instead of flat which was incredibly easy and no, I didn't need to ease stitch.  I just pinned the crap out of the sleeve cap and it worked beautifully.    


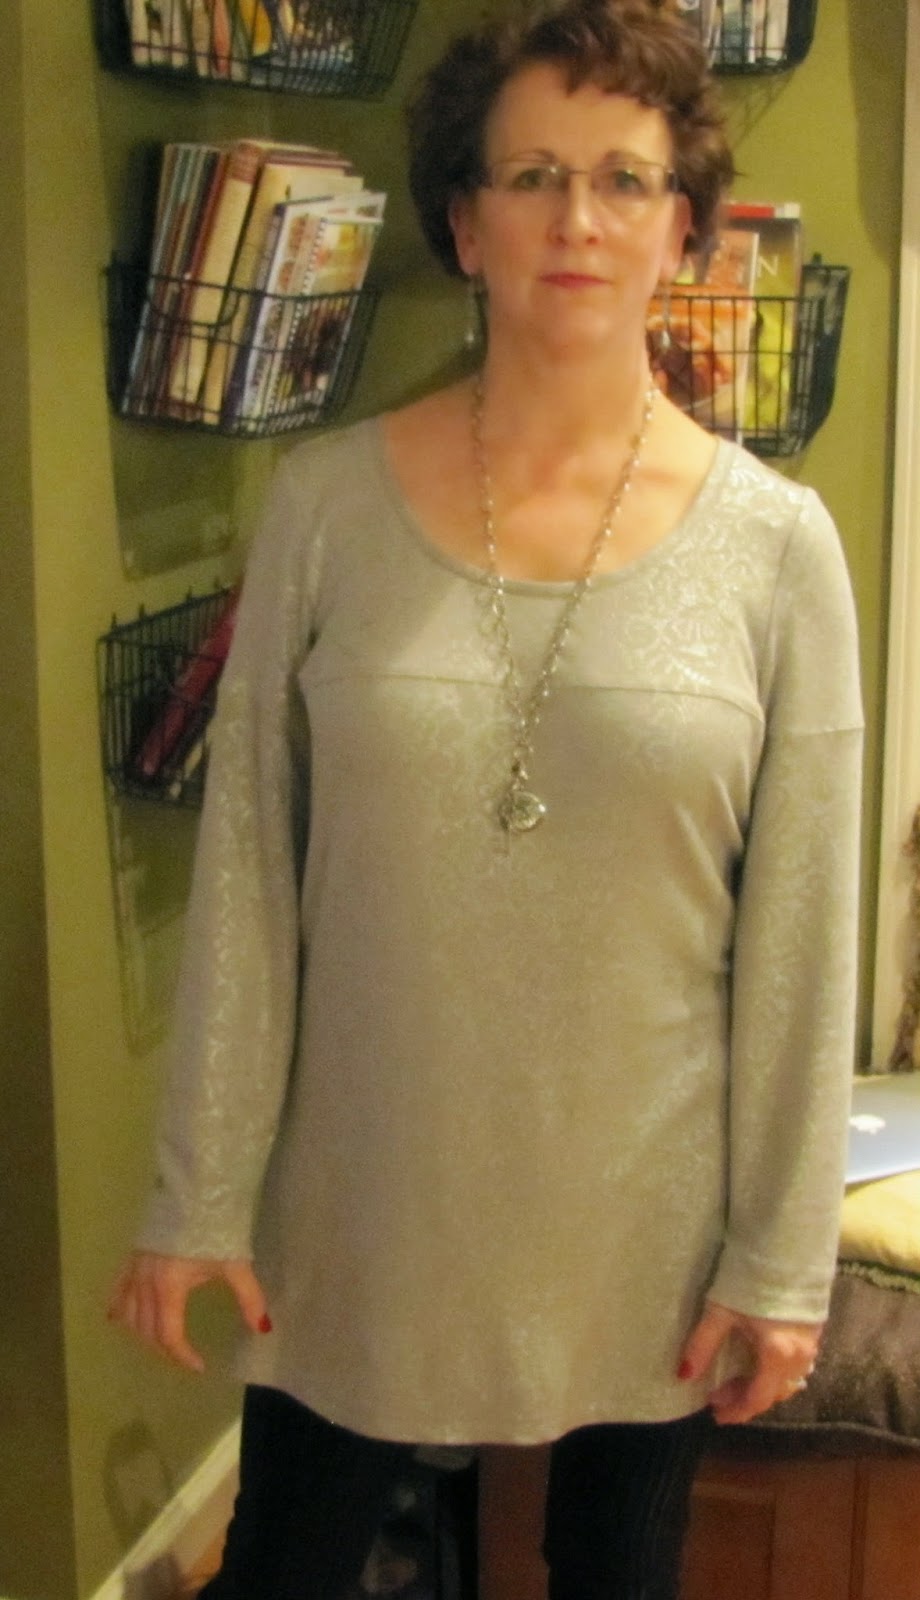
Alright, enough!  Here it is on me and I am ready for the party with some dear friends!
I wore this with some striped leggings which are tone on tone and I love my black boots.  I have worn the crap out of them but they still have quite a bit of life in them.


See, no FBA needed with this top!
I do however recommend a muslin which I did make.  That is where I discovered the need to take in the shoulders at the neckline.


The sleeves were a little long and I just took them up a bit at the hemline.  Length is great for a tunic as I don't want any wardrobe mishaps!

Other reviewers have mentioned there are not finished measurements on the pattern tissue or envelope but that isn't such a big deal to me, especially since I am a recent convert to making a muslin.

I do like to stabilize the shoulders with clear elastic and did so.


I think I am ready for the holidays, how about you?  I think I have a new TNT...more versions to come before I decide for sure!

Thanks for reading!
Sue 

Thursday, December 18, 2014

A new top!

McCall's 6796 is my new top.  Although, I must say, it isn't exactly new, I made it a while ago, didn't take any photos and hadn't worn it until last week!  What is up with that?  Argh!

Here is a photo from the McCall's pattern website.  

M6796, Misses' Tops

Here is the description from the back of the envelope: Close-fitting, pullover tops have collar variations and narrow hem. C and D: button trim.

Simple but also sort of accurate?  


 I made my typical size 14 with a swayback adjustment--and that was it!    


This is a fast, easy, and fun project especially with that cute collar!  I don't think it fits *that* close, maybe it is just my version? Everything went well together and fast!  The directions were just fine and although I don't think I read them verbatim, I had no issues whatsoever.  


This lovely fabric was from my stash and if I remember correctly, it was a purchase from Marcy Tilton.  It feels like a ponte and I really love the print.  It washes and drives beautifully as well.  What more could you want?  I do have buttons on the collar as a trim but they are hard to see in these photos.  I am still searching for a place indoors where there is decent lighting!  


I had to include my Christmas tree in the background.  While some have a beautifully matched tree, mine is anything but!  I have ornaments from my grandmother, precious ornaments the kids made as very young people and as adults as my two daughters, daughter in law, and girl fiend to my only unmarried son, have an exchange--which is super fun!  So, my tree is quite eclectic.  


Thanks for reading!
Sue 

Wednesday, December 10, 2014

Coco take 2!


COCO

Of course I had to make another Coco....can you blame me?  It is so comfortable, endless creative possibilities and an instant gratification project...I see more of these in my future!

So just to refresh your memory, here is the description from the pattern envelope:
Simple to sew, Coco is easy fitting, with no fiddly fastenings. The classic design features boat neckline, choice of top or dress length, three quarter or long sleeves, side splits on the top version, optional sixties-style funnel roll neck, rolled cuffs and patch pockets. 

This time I choose to make the darling funnel neck with two hip length pockets and full length sleeves.  My dress version looks longer on me that Tilly in her adorable version seen right.  


I still love the pattern....no issues with it at all and if you are new to knits, the instruction booklet has fabulous photos and written directions, you'll love sewing with this!  There aren't any markings for where the pockets are placed but that is even better as before I sewed up the side seams, I put this on over my head and placed the pockets where I wanted them.  Easy-peasy!  


Oh, I have to tell you about this fabric.  It is a hemp and organic cotton blend that is heavenly!  I purchased it from Fancy Tiger Crafts in Denver.  It washed and dried beautifully and the hand was dry and easy to work with.  I just learned what dry meant--so if this is incorrect, please let me know!  It isn't slippery at all!  The cut edge behaved beautifully and didn't roll at all--another bonus!  What I didn't think about is that I needed a slip for this dress and luckily I had one that worked perfectly.  :)  


The funnel neck was really fun to apply.  It doesn't even take that much fabric and it fit into the neck opening so very well!  I topstitched the seam on the bodice front and back edge to keep it from flopping around and it adds a cute little detail.  I also decided the pockets needed a contrast so I used this grey ponte.  Next, I decided to add the contrast edges on the sleeves.  I like the simple detail it adds.  


I can't tell you have fun this is to wear and honestly, it is so comfortable I felt like I was wearing pajamas all day!  Who doesn't love that?  


I wish DH would have told me he was snapping another picture...I would have smiled!  

Thanks for reading!

Sue

Oh yes, I love asking questions and reading your comments--what patterns have you made recently that you MUST repeat?  I'd love to know as I may need to add them to my list!

Monday, December 8, 2014

Coco!

It's been a while....hopefully I am done traveling for work for a while and can get some sewing (therapy) time in!

On one of my recent travels out of town, I ended up finding the Coco pattern.  This pattern has been reviewed all over the blog sphere and I was so pleased to purchase it!

Isn't it darling?  The photo below is taken from Tilly's site called, Tilly and the Buttons.  You can make a top, dress, or funnel neck top.  I made a modified version of the dress.

COCO

This is a pattern designed for knits and the directions and visuals are excellent.  If you haven't sewn many knits, you'll find the directions easy to follow and simple to understand.  


didn't find anything missing from the instructions--which I usually like to add a few things!  For this, I used this lovely bamboo and organic cotton jersey from Fancy Tiger Crafts in Denver.  WOW, this is an amazing shop with equally amazing fabric and some great Indy paper patterns for sale!  I wish I had brought a bigger suitcase so I could have taken more fabric and patterns home!  


So, back to the pattern...this is an instant gratification project.  I added ribbing to the neckband and used it at the cuffs as well.  I love the length of the sleeves.  Being 5'7", sometimes they are a tad so short but this is perfect!  My only minor complaint is the neckline is simply folded over and hemmed. That isn't my preferred method of hemming necklines and I didn't have enough fabric to make a neckband to add so...I found this black ribbing at Hancock's.  I also thought that I needed to break up the stripe a bit so the pockets were necessary.  


I added the double pocket at the chest simply because I made a stupid error when sewing.  My first pocket placement was too high and I made a small hole in the fabric <insert frown and maybe a few four letter words> so I added the smaller pocket under the larger one to cover the hole and allow me to continue to wear this. 
  

It is so comfortable, I love the fit, and it's awesome with leggings and boots! 
I only made my usual 5/8" swayback adjustment--that's it! Otherwise it fit perfect out of the envelope based on my measurements.  Hurrah!  
I see many more of these in my future!  I love this pattern!

Thanks for reading!
Sue   

Tuesday, November 25, 2014

A slouchy, comfortable dress!

New Look Misses' Knit Dress with Neckline & Length Variations  6298


Misses' easy Just 4 Knits dress is what you are looking for this season! Knit dress with options that include v or scoop neck, long or three-quarter sleeve, pockets & cut lines for length variation. 


I made view B--straight up!  


Ever since I made my Lola dress (you can see it here) I have been wanting another comfy, knit dress to wear to work.  I've had this ponte for quite a while and wondered what the heck I was going to do with it.  I mean it's pretty and all, but the print is pretty wild and hard to match, so I did what I thought would work and pick a pattern that would work with the fabric, instead of vice-versa.  


This ponte is nice, and the print is fun, especially if you like florals, which I do!  Pontes are so nice to work with and sometimes you want more than a solid colored garment.  I hope manufacturers will continue making more prints out of this wonderful fabric!  


So back to the pattern.  As I said previously, I made view B, without any modifications to the style but of course I made a few standard alterations to the fit.  :)  I made my usual 5/8" swayback adjustment and could have done just a tad more.  Also, after making my Bronte, one of the ultra helpful readers suggested a FBA using this tutorial.  Well, I finally did it!  I finally made a FBA that worked!  This was super easy to do and I don't have any wrinkles or drag lines.  Mind you, this dress isn't as fitted as the Bronte, but I think I am onto something with the way to make a FBA without adding a dart in a knit.  Not that it is that big of a deal, especially on a busy knit, but I don't always like it on a solid.  I will be experimenting with this technique more often!  


So, with the instructions, I did glance at them and I only deviated from them slightly as I thought it would be much easier to hem the sleeves prior to attaching them to the dress.  I knew the sleeves would be the correct length, or very close to it based on just trying them on.  I also had to take it in about an inch and a half from the armpits down.  I could have taken it in more but felt like I would loose the 'look' of the dress.  


This is really low cut and I will always being wearing a cami or tee underneath.  I like wearing layers, so it's okay.  I really love the patch pockets!  Awesome!  


I do like this dress but can't quit comparing it to how much I LOVE the Lola!  Honestly, I am not sure it is really worth the cost of the pattern if you have a casual knit dress pattern you already like.  

Thanks for reading!
Sue :)  

Thursday, November 20, 2014

The Bronte Top from Jennifer Lauren

Oh goodness!  My first Bronte top!  I sometimes feel like I am the last one to the party but this time I just feel like I am sort of fashionably late.  :)  I had a lot of fun putting together this great top with such clever details!

From Jennifer Lauren's site: Bronte is a 40's inspired knit top that you can make with long or short sleeves. What makes her stand out amongst other knit top patterns is her 40's inspired shoulder detail. The back pattern piece sweeps over the shoulder creating a 40s style shrug sleeve which you can then either leave plain or decorate with buttons or other notions of your choosing. I've always loved and been drawn to 40s patterns that feature the shrug style shoulder, so it only made sense to incorporate this beautiful detail into my favourite type of top.

You can use a contrast binding around the neckline or keep her simple by using the same fabric you're making up the body with.


It's adorable!  It uses little fabric and those shoulder details are awesome! 

The fabric I used was from my stash.  I sewed a straight 14, based on my measurements.  I love how it fits but notice that annoying little fold of fabric at the bust.  Hmm....any advice for me?  


I love the shaping of the pattern and the neck bands are awesome and go together easily and professionally.  The sleeves are an awesome length--I folded mine up two inches--twice with one inch each and used a stretch stitch.  For the lower hem, I turned 3/4" and hemmed using the same stitch.  


Start to finish was about one hour--seriously!  This is an instant gratification project with awesome results.  I love that I used stash fabric and that it matches my favorite gray jeans!  
Yes, I will be making more of these!  

Thanks for reading!
Sue 

Sunday, November 16, 2014

Another pair of Vogue pants!

So, you haven't seen me make a pair of pants for a while and I decided it had been too long since I pulled out my beloved Vogue 8774.  I can't express how much I LOVE this pattern!  While this is my fifth?  Sixth? time I've made these, I still need to make some tweaks until I feel like I have mastered the fit of these awesome pants!  


I like making pants, it is a challenge and sometimes I feel like tops and dresses are sort of a fitting cop-out. Know what I mean?  There are so many things to consider when fitting pants: crotch depth and length, rise, inseam, any sort of swayback adjustment, pulling in any areas, waist-to-hips ratio, the dreaded fly, need I go on? 


So back to my creation that was sorely missing in my closet--a khaki colored pair of pants with jean styling I could wear to work.   


I was very happy with my last pair which you can see below and I tried to tweak further but I am just not totally satisfied and yes, you guessed it!  I'll be making more.  


So, how did I do all this? 
1.  Flatness--I had a suggestion to create a deeper crotch curve to help take care of the pooling I get at the upper thigh.  I'm not so happy with how this made my current pair fit!  I wish I would have tried to fold out a 1/2" at the upper back thighs as I have read on line.  I guess I see another pair of my pants in my near future!   
Because of the flatness, I had to rotate the back inseam to the front by 3/8" to get the inseams and outer seams to hang properly.  


 I don't even want to show you this next picture as I feel like I need to immediately do 1,000 lunges to perk up my derriere!  


I added rivets to dress them up just a bit as they are plain, khaki pants after all!  The rivets were super easy to add.  I have a Awl that I use to punch the holes in the fabric and then a kit from Hancock's I used to set the rivets.  They do give just a hint of something, right?  


Another thing I did was to make a swayback adjustment.  I completed that by 14" in the yoke and another 1/4" at the waistband.  I like spreading the adjustment out as I think it looks better and feels better when you wear the pants!


Wide upper thighs--pretty self explanatory, right? 
Crotch curve issues....ah, the crotch curve!  I get these annoying little lines at the front crotch that I pinched out and took about an inch seamline.  No more lines!
Back crotch curve was a different matter.  With that seamline I made a 'j' seam by taking in an additional 5/8" from the back seamline which you can see below.  Although I did create an even deeper seamline than what is pictured!  I scooped out another 1/2".   


Length is a challenge for me with this pattern.  Being only 5'7", I didn't think I would need to lengthen them but I did by about 1.5". 


Any suggestions for me with this pattern?  I feel like getting the 'perfect' fit is a challenge that I must master!  

Thanks for reading!
Sue :)