About Me

My photo
Sewing is therapy for me. I hoard fabric, patterns, notions, and spend more time shopping for fabric than I care to admit...

Friday, August 14, 2015

More spankx anyone?

I've always thought this dress and top, McCalls 7046,  was just adorable!  The ruffle on the hemline of this dress is just too darling!  I'm thinking that a 52 year old grandma is just too old for the double ruffle, but the single, that still works and so I went for it!


M7046, Misses' Tops and Dresses
Line Art

Am I right about the ruffle?  It's cute and all but I think I am a little old for the double, if you know what I mean.


Just look at the ruching!  It is done with 1/4" elastic stitched to the side seams and careful matching of dots and squares, all of which are marked on the pattern tissue.  Not a difficult step at all!
This is such a Bod-con fit.


I went one size up from my regular size 14 in the big four and am very glad I did as I haven't been exercising as much as I normally do for this time of the year--hence the need for spankx!


I do love the fit of the dress. I made a few design modifications.


 What were they?  Only to add bands at the neck and armholes  This alteration was only because the fabric was soft and stretchy and my coverstitch machine tended to make deep tunnels when I simply folded the fabric to the inside and hemmed.  


Dang!  So, I cut crosswise bands about 20% smaller than the opening, stitched them on with my serger, and then topstitched with my Bernina using a triple stretch stitch. Easy peasy and with the pink thread I used this is a nice compliment to the fabric.


I did end up using my coverstitch for the hem on the skirt portion.  To make this work, I used tear-away embroidery stabilizer under the layers of fabric separating it from the feed dogs.  I wasn't entirely sure if this would work or not but decided to sally forth and it worked great!  I'll have to remember this for future coverstitching on thinner fabrics, or those with a higher lycra content.


I made an FBA on this dress which you can see in how I prepared the pattern tissue.


If you ask me how I know how much additional width to add, I must say that it depends on the heft of the fabric you are using and the pattern.  I have to say this comes with trial and error.  I tend to use quite a few McCall's patterns as I like how they fit me.  I've come to figure out how much width to add at the bust based on my experience with these patterns and the fabrics I tend to sew often.


 All in all, a successful dress, provided I get my behind in gear running/biking as I should and it will fit as I want.  This is a fast sew with great results and one of those instant gratification projects we all need once in a while!  I just love the bold colors for summer!  It will also work as a transition piece for fall.  I can just see this with a denim jacket, how about you?

Thanks for reading!!!
Sue 

Fall transitional jacket starring StyleArc Livia :)

Fall has to be my most favorite season of the year.  In South Dakota typically the weather is at its best, the trees, flowers, shrubs are filled with color, and the cool evenings and warm days are delightful.  What's a girl to do besides sew some garments that take us from summer to fall and even winter?

  Classic jacket with pocket treatment

In swoops a gorgeous suiting from Fabric Mart in black/blue and ivory novelty weave  with great body, weight, and I knew it would be perfect for the Style Arc Livia jacket.  The colors stated were black and white, but I think the black has a lot of blue in it and found my leather pieces, also from Fabric Mart, were a perfect match!  More on that later!


This pattern was a freebie from July's StyleArc order.  You may remember that I made the StyleArc Sierra Jacket in a plaid suiting, also from Fabric Mart, and when I ordered the pattern, I simply had to state my size in order to receive the free Livia jacket pattern.  I love the clean and classic lines and the simple fit.  Not too boxy but not fitted either. 


I wanted a jacket that would work with jeans for casual Fridays or a skirt or dressier pants for the work week.  


Cutting and sewing the pattern was simple!  There are only nine pattern pieces which include the front and back facings, two sizes of patch pockets, two piece sleeves front, back and side back.  Seriously, this took about 30 minutes to cut and I am a slow poke when it comes to that step!


I love the patch pockets on the front.  I mentioned I used garment leather for the top portions of the pockets.  The leather is hand washable and the suiting fabric is washable on gentle.  I think this will be a win-win fabric combination.  


Sewing this up is fast and easy as well.  There are minimal seams to put together which is a bonus.


Look at those sleeves.  Are they not hanging beautifully or what?  I added 1/4" shoulder pads and found that they rounded out the area perfectly and help the sleeve hang just like it is on a hanger or dress form.


This jacket is unlined and look at how beautifully the fabric is suited for this!  Sometimes I feel like I nail it for fabric and patterns combos and yes, this is one of those times!


Here is a glimpse of the hook and eye type of treatment I used at the neckline. This was in the button section of JoAnn's fabrics and I thought it would be a tad bit nicer than a regular hook and eye the pattern calls for.


I love this fabric, I love my jacket so pick up some suiting fabric from Fabric Mart, match it to pattern and show me what you've created!

Thanks for reading!
Sue


Friday, August 7, 2015

A Little White Dress, cuz everyone needs one!

Before we begin, how about a few inspiration photos?  I love all three of these dresses!  Cute, stylish, fun, and totally open to accessories!  Winter, fall, spring, and cool summer days will work for these!  
              love the dress & buttons, just hate wearing white.


I would change the accessories and make the vest gray, but this dress is gorgeousDo you have a LWD or little white/off white dress?  If so, don't you love it?  If not, get one!


I love the simplicity of all three dresses!  You can accessorize to your heart's content and wear great shoes!

I choose Vogue 9092 for my version:  

You can see from the line drawings there are MANY possibilities!  I made the dress but simply added the sleeves from A and left off the little flappy things for the faux pockets.  This is a very easy custom fit pattern and I really love these patterns!  No guess work on the bust adjustments.  Some brilliant person already did the math and now we get to reap the rewards!


Since I had made this pattern before, and that it is very simple, I decided to make a few changes just so I can continue to improve my sewing skills!


First, I lined the entire thing by cutting white lining fabric I purchased at Hancock's and treating both layers as one.  Do me a favor and don't do this, ever!  What a pain in the butt!  I'm wondering if I should take the entire thing apart and redo the lining.


Other than the addition of the lining and sleeves, I did the same neckband application I used the first go around.  The pattern calls for purchased bias tape that is applied and acts as a facing.  While this can be just fine, I don't like it nearly as well as other finishes and I decided to use the neckband.  This is hand-stitched on the inside to keep it in place.  


Let's talk about all the frustration these darts caused me!  Since I had two layers of fabric and I thought I had so very carefully cut both layers so they were the same size and since I used a mountain of pins to make sure everything stayed put, well, it didn't and these darts caused me to want to burn this thing!  I had dimples at the darts no matter how well I pressed, resewed, etc.  I finally decided to sew the lining darts separate from the main fabric darts and hope for better results and I got just that, better!


The ivory fabric is a suiting from Fabric Mart.  It was a designer fabric and lovely to work with!  It's washable and dryable too!  Yippee!


I guess I should clarify that my dress is off-white, or winter white.  I do plan on wearing this in the fall and winter as the weather allows!  How cute with boots, tights, and a jean jacket!  Are you feeling this like I am?

I think I really like my winter white dress.  It's comfortable, and can be styled up or down with reckless abandon.

Thanks for reading!
Sue  

Thursday, August 6, 2015

Eleonore, take 2!

Jalie Eleonore 3461  


I love my first Elenore from Jalie and now here is my review of the 2nd pair I meant to post weeks ago but have finally gotten to!  What took so long?  Well, two silly things actually!


One was the pockets were too low in the back took about 5 minutes to take off and reapply and secondly, I had to get over making this a cropped jean.  I wanted full-length but with the twisting I had at the lower leg, I was just stumped!


Plus, I have been trying to build up my running distance and pushed it too far too fast and now have shin splints and because of this, I swear I've gained five pounds!  These pants are tighter than I remember when I made them!


These are SO comfortable!  The fit is perfect right out of the package and the length is perfect, even if my legs are twisted--more on that later!


Start to finish these took about 2.5 hours.  Not bad!  While this print may be busy, I really like it!  


This is a stretch woven I purchased in January from Fabric Mart.  


Please don't look too closely at my deck flooring.  We are currently painting our house (ourselves) and hope to work on the deck after the painting is done.  


Since the legs are twisted, I merely rolled them up but in the photo below you can see what I mean by them twisting to the front.


This was very perplexing and I took these apart in the legs several times and resewed.  I triple checked I cut them on the grain and I did.  DD1 and I were discussing the twisting and she mentioned that there is an online tutorial on why pants twist and that you need to cut the legs parallel to each other only turned 180 degrees.  Gosh, I hope that makes sense!  


My old dog, he will be 13, was really having issues with me taking photos today and felt he needed to be part of the picture!  Now that I've finally taken photos and my shin splints are better, I can do two things: run tomorrow (yay) and hem these pants to the rolled up length.  :)  

In conclusion, what a great pattern!  I will be making more!!!  Thanks for reading and happy sewing!

Sue & Hobbes!

Friday, July 31, 2015

A valiant save for a pretty overnight bag!

How do you use those lovely home decor prints that are everywhere?  Every fabric store I enter has eons of them...so many pretty colors, textures, and the heft is just awesome, especially if you want to make something that will withstand some wear and possible tear...enter the overnight bag!

This is a cute little pattern from Simplicity, 2274, to be precise.  I've made it before for the men in my family.  The girls were a little chuffed to say the least.  Where I spied this pretty home decor print on Fabric Mart's site, I knew it had to be and now one lucky lady would get her own bag!


For the guys, I used a similar pattern for the bag anyway: Simplicity 2600.

!

And here are their bags!  


For the guy's bags, I used all cotton.  I choose a theme based on their interests.  Air force for Andrew who is in the AF reserves, Kevin, an avid outdoors-man and Dr of wildlife conservation, Daniel who simply likes space, and Kevin is a full-blown star wars nut!  Guys aren't all that careful with their stuff and I wanted washable fabrics for their bags.  Plus, these can double as a gym bag if needed.

I wasn't something different for the next go around with the ladies and up popped Home Decor fabric!
Home decor fabric is lovely to work with.  I used two yards of it for the bag and enough left over to make a little matching clutch that you'll see in a few photos below this one, to use for whatever the lucky daughter or daughter-in-law likes.  The colors are vibrant and the design is woven into the fabric.


This bag holds a LOT!!!

I followed the directions for the bag pretty much as written but since it is a bag I am creating, I chose to eliminate a few of the outside pockets and to line the insides with a pretty orange lining I also purchased from Fabric Mart.  It sort of gives a satiny feel to the inside of a bag, which in my mind makes it girly and sort of glamorous!  Oh, and I almost forgot, I did a few rows of quilting in parallel and perpendicular lines to anchor all the layers together.


When working with home decor fabric, I like to serge all the edges prior to assembly.  So, I layered each piece with the the batting, lining, and of course my pretty geometric pieces and serged the edges. I just find this makes life easier when making a bag such as this.  If you don't own a serger, a simple zig-zag stitch will do the trick.  


The contrast fabric on the handles was from my stash and is a simple cotton print that highlights the green.

There is batting between the outer fabric and lining and as well as all these fabrics sewed, I had zero issues.  I did use my walking foot which I love to stitch the layers together.  Don't have one?  No worries, you can still get a great result when sewing home decor fabric, you'll just want to pin carefully and abundantly to match your edges and keep them straight and even.


I wanted to highlight the contrast on the bags and decided to use a decorative stitch to attach the straps to the bag.  How fun!


I even used the same decorative stitch to hold down the zipper facing.


So, what about the save?  I had a major, major mistake that I didn't realize until I was 100 percent finished with the bag.  I had one of the handles twisted!  How on earth did I do that?  I carefully pinned those things and checked them twice but somehow, someway I was foiled and ^*%$#!, I had what could become a three-hour unpicking session....deep breath......


There just had to be a way to fix this and yes!  The handles have a seam in the middle, I unpicked the binding about 12 inches worth, unpicked the seams on the both sides of the handle and also the seams on the binding.  Another deep breath and I untwisted the seams, sewed them together the correct way and put the entire thing back together, flawlessly in about 45 minutes.....disaster averted!  My sewing fairy godmother was looking out for me today!!!

I enjoyed making this bag!  Using home decor fabric might be something you hadn't thought of but try using it in unconventional ways.  Jackets/vests,


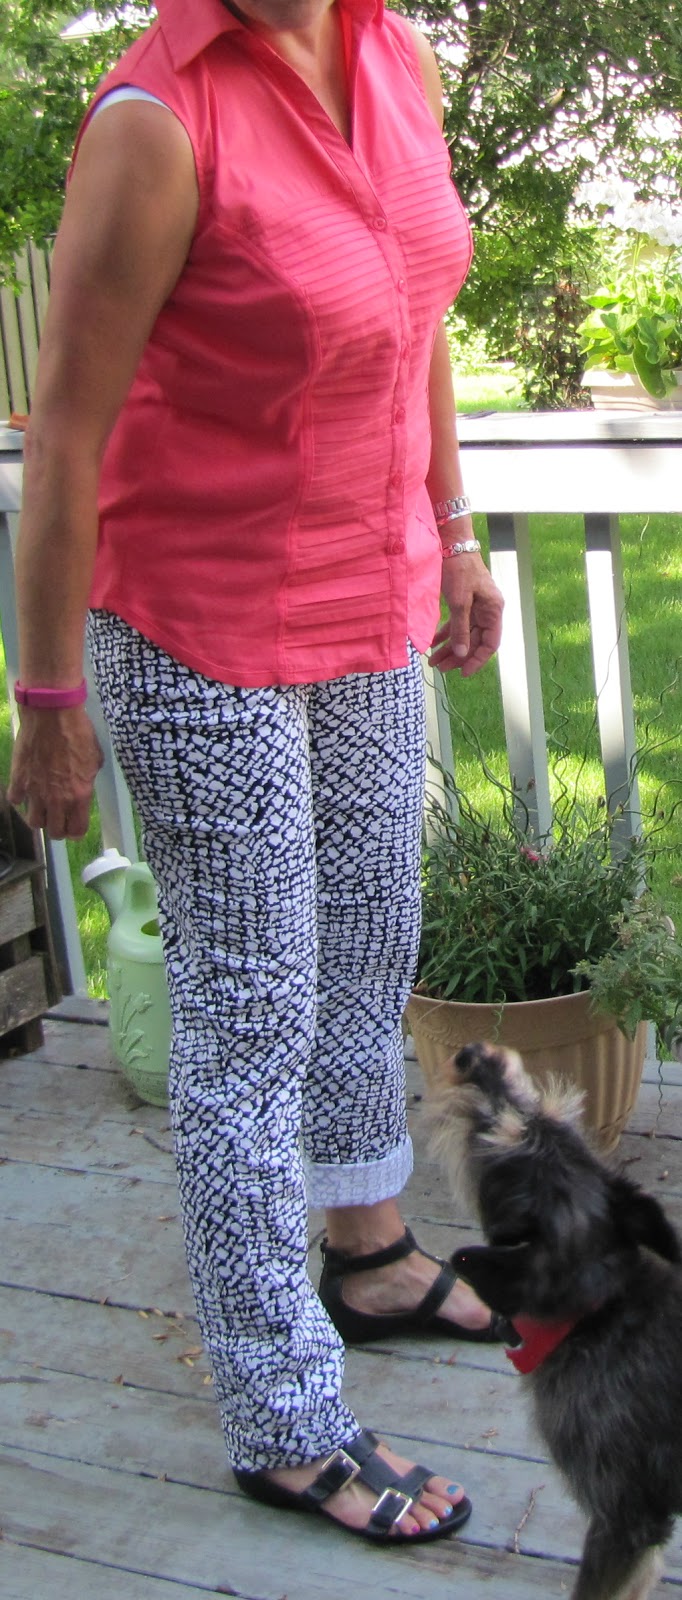
 pants--DD2 loves to refer to these as my 'drapery' pants,

 
skirts, purses, totes, overnight bags, and even home decor items are all great uses for this fabric!  

Thanks for reading!

Sue

What sewing disasters have you averted lately?  I'd love to hear about it!