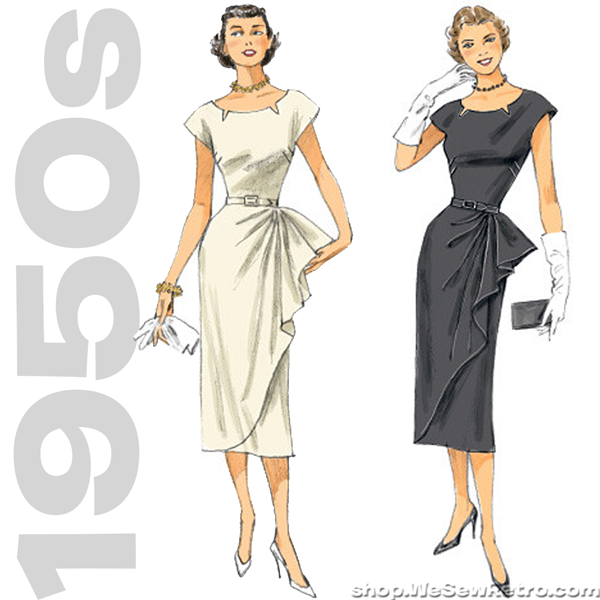
So here is how the pattern is described on the back of the envelope: Misses' dress: lined dress (loose-fitting through bust) has semi-fitted skirt, side back seams, self-lined overlay with left side tuck, side zipper and self belt. I do think that the description fits the finished garment but if you look at the pattern drawing on the front envelope, you'll see that it looks very fitted, especially though the bodice.
So, lets talk about fabric for a minute. I purchased this lovely linen blend at Hancocks. I threw it in the washer and then realized it was dry clean only! Luckily it washed and dried beautifully! There must be some poly in it as it barely wrinkled.
This pattern is somewhat of a hog as it needs four yards for 45" wide fabric and if you have 60" wide, you'll need 3 and 3/8 of a yard. I purchased this (on sale) not knowing what I would use it for and barely enough.
The drape or overlay as the envelope describes it is backed with the same fabric. It makes it pretty heavy and puts some stress on the tucks.
I used lining from my stash that wasn't the nicest stuff in the world but it worked and since it was left over from another project, I consider it to be free! Total cost of this dress was about $27--not bad in my book!
This pattern is listed as easy and don't let that fool you if you are a beginner into thinking this will be a pattern to tackle for one of your first projects. There are quite a few darts--double at the bust and at the back waist seam. Those sneaky little v-cut outs at the neckline can be a tad tricky if your fabric doesn't behave well. The floral was awesome, but my lining, behaved very badly! As I was giving the dress a final press, I noticed that the seam I so carefully clipped had shredded and there were little threads poking through the seam line. I remedied this by adding another small piece of interfacing on the lining side and restitching the seam a little deeper and wider at the v. It looks just fine and you'd never know if I hadn't told you!
One nice thing about this pattern is there is a scan area on the front where you can read it and view a youtube tutorial from professor pincushion on how to make the dress. I barely skimmed it, but it looks helpful if you don't have a lot of experience.
 | |
| No bra show! |
Also, I didn't like the order of construction as it is written. I should say however that Butterick did simplify this dress by having only 34 steps and that includes covering the belt. Not bad! I completed the directions as stated to construct the bodice from the floral print and also as written for the lining, but next, the directions tell you to turn under the lower edge's seam allowance and press. You attach the lining to the bodice and stitch the necklines, both front and back. After that you stitch the armhole edges and turn everything and press. Think you stitch the bodice front to back at the shoulders and slip stitch the shoulder seams of the lining. I was happy with everything until I figured out that I had to hand sew. Not that I mind, but I worked to see if there was a cheater's way to sew by machine. I managed to get one shoulder seam sewn by machine but the other I did have to slips titch the lining.
 |
| Maybe I should have completed a sway back adjustment? I still can! |
Constructing the skirt was very easy. I found it to fit just great with enough ease so you don't have to worry about sitting, walking, or straining any of the seams. I wondered if it might be a tad too loose, but DH thinks it is fine.
Instructions have you stitch the skirt lining to the dress and then slip stitch the bodice lining to the skirt. I went ahead and attached the skirt lining to the bodice lining by machine and it worked great.
 |
| My pedicure DH thought needed photographed :) |
 |
| My matching purse! I forgot to grab it for the pictures! Dang! |
My zipper is an invisible zipper and I guess I prefer that so that you don't see a regular center application. I hemmed the skirt by using my blind hem stitch on my machine and cut the lining about 2 inches shorter than the finished skirt length and simply finished the edge by serging.
So what do you think of my dress? I love it with my sparkly shoes and I have a silver purse to match. Do you think this is dressy enough for a wedding that is requesting the guests to wear cocktail attire? I've never been invited to a wedding requesting cocktail attire, so I am unsure if this is dressy enough!
 |
| Isn't the drape just lovely? |
Thanks so much for reading this very long review. I do love my dress!
Sue


Very pretty dress Sue. Gorgeous fabric. Love the overlay/drape and the interesting neckline detail. Perfect dress for a wedding.
ReplyDeleteThanks Margy!
DeleteDid you line the overlay. Your overlay looks unlined. I'm worried about bulk if using the same material to line underlay.
ReplyDeleteOops I meant overlay. Donna
DeleteSorry I can see you've lined it in same material. It doesn't look bulky tho. I'm a heavier build so am worried about extra bulk. Oh and dress looks amazing on you.
Delete