About Me

My photo
Sewing is therapy for me. I hoard fabric, patterns, notions, and spend more time shopping for fabric than I care to admit...
Showing posts with label knits. Show all posts

Thursday, June 6, 2019

More from Simplicity 8375--ripe for hacking!

One of my goals is to purchase block (basic) that I can adapt or design to whatever I want.  How realistic is this?  Not very but a girl can dream, right?  Here's my base pattern that I am talking about using as a block: 


How sweet is this?  Plus I really like that it's a bit more boxy than my beloved McCall's 8668.  

I recently made two tops from this.  Both are entirely different and equally fun and so suitable for summer!  Here's top 1: 


I found the inspiration for this top as a RTW online.  I didn't exactly copy it, but the styling is there.  


I hope to be able to take some photos of me wearing this soon!  Both fabrics were from my stash.  Up until recently (couple of years), I shied away from wearing yellow.  With the absolute awful weather we had this past winter, anything bright and cheery is so welcomed!

You can probably tell what I did by looking, but with the lace, I simply overlaid it with the lace, cut, and then added the ruffle.  I did roll hem the ruffle since that is what the inspiration photo had.


For this one, I obviously made sleeveless and then chose the scooped back.  Across the back, you'll see what I did.


I love tunics like this for summer.  So cool and comfortable to wear.  This fabric came from JoAnns.  I love the mustard-y yellow with the white and black.  


I just put a single strip across the back.  The neckline wasn't drooping and the shoulders were staying put.  I just wanted a little something there.  

So there you have it.  Two yellow tops from the same pattern that look totally different! 

Thanks for reading!
Sue

Sunday, January 6, 2019

Pattern hacking--Simplicity 8375

Do you hack?  I do sometimes, but when I saw this Simplicity 8375 for $1, I knew I'd hack it to bits. 

Simplicity Pattern 8375 Misses' Knit Dress or Top with Multiple Pattern Pieces for Design Hacking


I was especially intrigued by the lace up back.  Now this wouldn't be hard to do without the pattern, but for a dollar, I purchased it so all the thinking was done for me.  Cop out, right?   


I really wanted to make a tunic or dress but I didn't have enough of this mustard yellow textured knit.  I did have enough to make a long-sleeved top with the lace up back.  


I can see this pattern getting a lot of love, especially from me.  When I compared my measurements to the flat pattern, I made very few alterations to the pattern tissue.  Here they are, and BTW, these are usual for me.  


1.  Lengthen from the shoulder seam to the apex.  
2.  Lengthen the bust curve
3.  That's it, however since I did modify the front of the pattern piece, I also had to lengthen the back but I added the length below the waistline since the measurement from my nape to waistline was spot on.  


The instructions for this appear to be well written, logical, and well illustrated.  If you don't have a serger, the directions are so thorough for use of your regular machine, you'll be fine using that.   You can also see the topstitching I use on typically use on the hems and bands to stitch in place.  It reminds me a lot of the underside of a coverstitch machine.  It's my go-to finish.    


Above you can see how the lace/ties are attached on the inside.  I followed the directions for this and use simple plastic rings typically used in making draperies.  I sewed them on by hand.  As you can see, I try to use matching serger thread when it's available.  


I really like this top.  This may not be the best color for me, but whatever.  I like it.  I paired this with my most recent pair of Georgie pants by Style Arc. 
I won't review these again but will tell you that my fabric is super stretchy and a telio stretch woven. I purchased both fabrics from fabric.com.  


Thanks for reading!  I hope you are sewing some fun things!
Sue 

Friday, February 3, 2017

Delila top by Angela Wolf

How cute is this style?  How comfortable it looks to wear and what a great pattern to showcase some great fabric!


For my muslin, I made view A.  There are only four pieces to this pattern and I made the simplest of the tops because it simply isn't warm enough to wear split sleeves or short sleeves right now.  


I've only made one other Angela Wolf pattern and I enjoyed it a lot.  It was well drafted and the instructions are so easy to follow.  The fit on this is pretty forgiving as well.  I made a medium.


My fabric has been in my stash for a while and I finally decided to just use it and this pattern came to mind.


My only modification to the pattern was to stabilize the shoulder seams using stay-tape.  


This is a great length--both the sleeves and the hemline.


You can let this ride up by your waist, or pull it down a bit.


I enjoy wearing this a lot!  It's comfortable and I think stylish!

Thanks for reading!
Sue

Saturday, April 9, 2016

The Angela Wolf Rachel Twin Set

For this month's Fabric Mart blog, I choose this gorgeous textured knit in coral--this is one of my most favorite colors to wear!  Julie also asked if I would be willing to try this new pattern by Angela Wolf, called the Rachel Twin set and after checking it out, I was delighted to say yes!  


rachel-back-page.jpg
So before diving into this lovely fabric, let's talk about the pattern.  This is a multi-sized pattern and it ranges from XXS to XL for one sizing option and XXL to 5X for the other.  I carefully checked my measurements to the sizing chart and read though Angela's suggestions on choosing your size and the amount of stretch your fabric has.  My fabric was a more stable type knit so I choose a large size for comfort and ease of wearing.  I also made a muslin as this is my very first Angela Wolf pattern and her sizing is a bit different from the big 4 pattern companies.  


Angela has all sorts of suggestions for modifying this pattern to your personal taste.  I decided to make it 'as is' since I like the overall length and styling.  


The sleeves are really nicely drafted!  Look how well they hang!  


I love how the upper back fits with this pattern and in this knit.  


The sleeves are also the perfect length as well.  I left off the ruching on the sleeves as I really didn't think it would look that great with a heavier knit.  So this is the 3/4 sleeve length sans ruching.  Just perfect in my book!  


That cascading part down the front is achieved by having the front lower panel extend past the bodice.  You join this piece onto the front band.  You can see in the above photo how that piece is attached and how it makes the cascading.


I rolled hem the edge and used a variegated thread so it had a bit of fun!  
It is a subtle effect but I really like it!  You can also see the texture in this pretty fabric!  Below is a view of the right and wrong sides of the fabric.  


In case you are wondering, here is how the tank fits.  I just love that there is no gaping at the armholes and no bra showing!  


The neck band is really well drafted and lies nicely against your chest.  This is so work-appropriate I am giddy about it!  I didn't use any variegated thread on the tank.  I choose to keep it super simple and use matching thread and a triple stitch to keep the banding seam in place.  For the lower hem, I used Emma Seabrooke's stay tape, 1/2" wide.  It pressed beautifully onto the fabric and made hemming easy-peasy! 


Here you can see the other side of the tank and it is the same--no gaping or bra showing!  I also don't mind that the tank is snug.  I intend to wear this as a layering piece.  


It was a little chilly modeling this outside today, so I hope more spring-like weather will show soon!


And also note how the back of the tank snugs up to my neckline.  No gaping! 

This fabric washed and dried just beautifully!  I love textured knits!  

Thanks for reading and I do hope you'll try this pattern from Angela.  I think it is a winner!

Sue  

Friday, July 3, 2015

June's forgotten garments and a new Jalie top!

How could I have forgotten to include Kwik Sew 3703 and from the same fabric for June's wrap up? 


McCall's 7064?  My fav of the two is the Kwik Sew tunic!


Onto July sewing!  I received Jalie Dolman top pattern--3352--in the mail and made it up the next day!  It's super easy, fun, and stylish!  Who knew you could get all that in one package?


You can make it casual or dressier, depending on the fabric you choose!  I had to go to Joann's and pick up a spool of thread and low and behold, I saw this fabric--a BIG voice in my head screamed WARNING!!!!  THIS IS JOANN'S and her fabric tends to be well, crap!  Yes, I know, but I reasoned that recently DD1 said things have been much better and she's purchased some fabric that was actually nice.  Hmmm....it is pretty, and it's a knit, and it's 50% off so well....next thing I remember is that I am cutting out this top.

First of all, let's talk about how FREAKING AWESOME this pattern is!  The newer Jalie's have color-coded lines to cut out the sizes.  So easy!  So well drafted!  This is my fit straight from the envelope and I cut a V for a bust of 37:


Not bad!  I do think I need an FBA andI just realized I didn't take a photo of the back!  I liked how it fit.


Directions are straight forward, easy to follow, and great visuals!  Although let's face it, this is a super simple top and if you've sewn a tee before, you don't even need the directions.  A beginner could stitch this up with success!  Jalie also tells you have to create this top if you don't have a serger.

I choose to make a neckband and the directions are very good for this step as well.  I made a silly mistake and put the neckband seam at the center FRONT, not the BACK where it belongs.  That's what I get for sipping a glass of wine while sewing--in other words, don't do it!  Now I could pick it apart and resew, but honestly this fabric isn't worth it.  I'll make another.  I didn't even notice I had sewn the neckband on incorrectly until I had it on and wondered why the front neckline felt 'heavy'.


Chalk that up to a mistake to never make again!!!

I also didn't notice the fabric was only 45" wide.  Who does that with a knit?  I purchased 1.5 yards and had to cut the back a little shorter to accommodate the pattern pieces.


I used my serger and coverstitch and this came together in about an hour.  I did topstitch the neckband after applying it, according to the pattern directions.


Love, love, love the pattern and will make more!  Just avoid crappy fabric.  It isn't worth it!!!

Thanks for reading!
Sue

Thursday, June 25, 2015

One fabric, two looks!

Don't you just love it when you purchase a fabric that is even prettier in person than the you thought it would be?  For me, that is this summer-screaming four way knit from Fabric Mart.  It has so many of my favorite colors in it: purple, various greens, blues, black, and white!  It is so soft on your skin too, bonus!

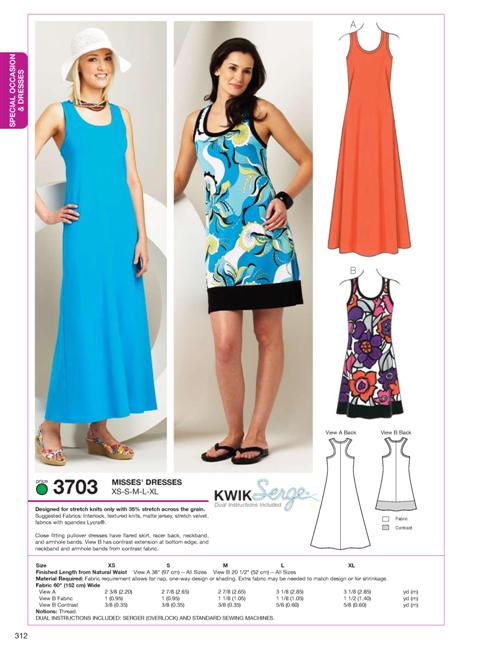
Garment one is Kwik Sew 3703. What took me so long to purchase and make this pattern up?  Such a classic style and who doesn't want to look comfortable and chic during the summer?


This image from SPR seems to have come straight from Kwik Sew's catalog!  

Obviously I made view B although don't be alarmed, the pattern is really that short, this is my wearable muslin and I opted to leave the contrast bottom band off.  


I knew I would wear this with leggings and I think it is a great tunic length!  


Sewing the neckline and armhole bands was a little futzy.  For one thing, I had decided my coverstitch had been in time out for long enough and I broke it out at a semi-private sewing class to finally master the thing or put it up for sale.  I knew I would have time to construct this on my serger when I was at the class.  I just didn't bring my regular Bernina so I could baste the bands before serging.  


The first armhole, I simply pinned it in four places around the opening and stretched until it fit.  The second, I pinned so I had more stretch at the depth of the armhole and less at the shoulder seam and this seemed to work better.  I did coverstitch the hemline and around the neckline and arms to give it a decorative element.  I won't show you a close-up as I still need some practice on getting this as perfect as I'd like but at least the coverstitch and I are speaking now, me much more appropriately to what I hope becomes a workhorse in my sewing room.  

My only regret is that I didn't use elastic at the shoulder seams...I had a tiny bit of puckering there...I think the elastic would have helped with that.  


This is a great little pattern!  I hope you'll try it.  I hope to make the maxi next. And, it looks like a need a slight FBA...I heard a very wise seamstress once say...the item you just made prepares you for the next one.  Very wise, right?   


Next is a little top that I was hoping to make a dress but cut wrong...I hate it when that happens but I do really like this little top and will wear the heck out of it, probably more so than another dress.  
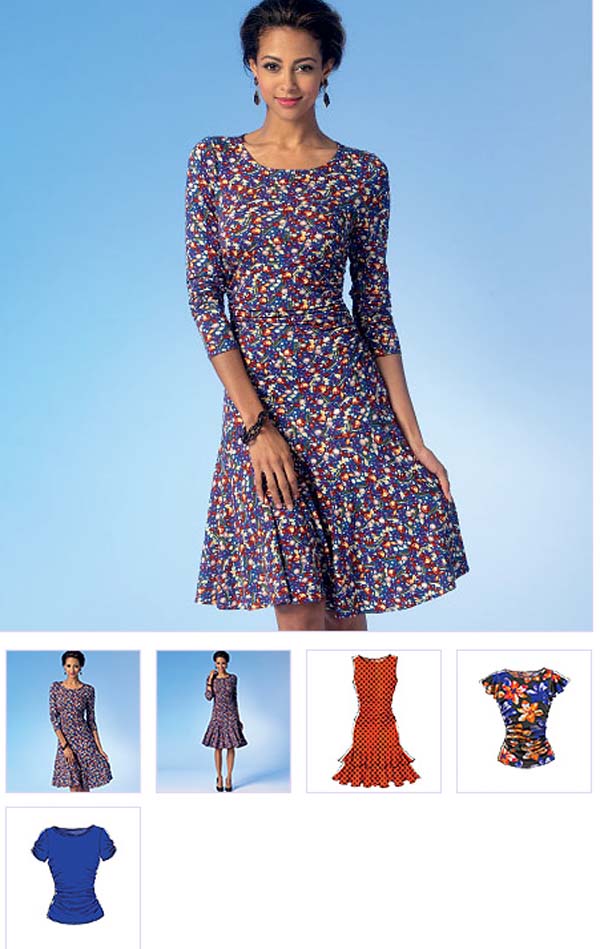
McCall's 7064 is such a fun little pattern!  I wasn't sure about the ruching at first but now that I've made it, I LOVE the effect! 


It is simply close fitting--as if you can't tell by the photos, and has no buttons/zippers.  You can vary the sleeves, go without sleeves, or make it into a fun little drop waist, ruffly dress.  It really doesn't take much fabric either--less than two yards for the long sleeved dress.  


This went together fast and easy and I think it is darn cute!  I put a band at the neckline and made an FBA.  This pattern has negative ease and since I didn't want it that fitted, I went up a size.  Normally a 14 in patterns is just about perfect for me, but this time I made a scant 16 and am very pleased!  

I coverstitched the hems on the top bottom and sleeves and I think I am falling in love with that blasted machine!  

I hope to made dress D for fall and that it will accommodate tights and a jacket for winter.  I just love multi-purpose clothing!  

Thanks for reading!!!
Sue