About Me

My photo
Sewing is therapy for me. I hoard fabric, patterns, notions, and spend more time shopping for fabric than I care to admit...

Wednesday, February 27, 2013

Vogue 1315 Rebecca Taylor Dress


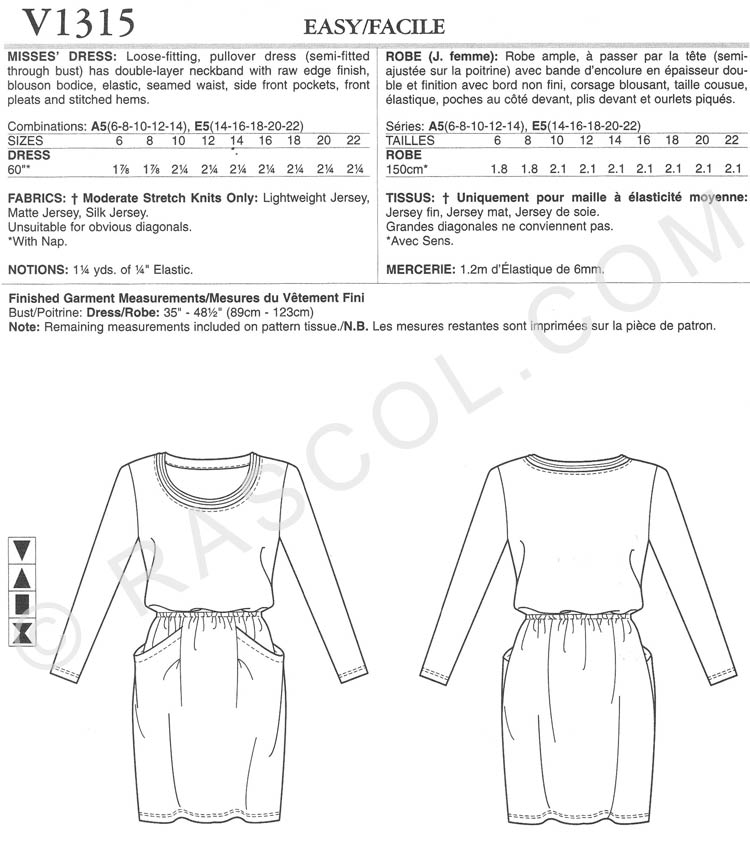
Here is the pattern description that you can barely make out above: Loose-fitting, dress (semi-fitted through bust) has double-layer neckband with raw edge finish, blouson bodice, elastic, seamed waist, side front pockets, front bleats and stitched hems. 

This dress doesn't take too much fabric, for a size 12 just 2 1/4 yards.  Maybe that is due to the scandalous length it is!

This calls for moderate stretchy knits only such as lightweight jersey, matte jersey, silk jersey. 
You really do need a light weight knot for this, mine isn't as light as it needed to be.  :( 

I believe my finished dress looks quite a bit like the pattern envelope. 

I used a yummy ponte from Marcy Tilton.  It is such a pleasure to sew with a quality knit!  I do think it is heavier than the pattern intended, but it is a done deal now. 

So what did I like/dislike about the pattern?  This is an easy yet fun pattern.  The front pocket detail is just too cute and so very clever!  I can't believe I am saying this but the raw edges on the neckline is just fun!  My fabric however didn't roll and curl like the pattern photo, but I still like the look.  My fabric is flat black on the reverse, so I played that up by using the solid black as one of the necklines. 
No dislikes, except it is scandalously short!!!!


This pattern is rated as easy, and yes, it is easy.  The instructions and diagrams are well done. 

What did I change?  Well, I did my usual 1/2 sway back adjustment which isn't really visible with the blouson top.  I lengthened the skirt by 3.5 inches and wish I would have had more fabric to eek out a few more inches.  I plan on wearing this dress with tights and boots, so I think I will be okay. 
Since I used a solid black for the second neckline, I decided to play that up on the sleeve hems and also the length.  I simply cut strips, serged them to the hem with right sides together, turned the seam to the inside and then ran a topstitch on the outside.  I can't believe I am typing this, but in addition to leaving the neckline edges raw, I also left the sleeve and lower hem raw as well! 
I felt like the skirt was too baggy, but that may be due to my fabric choice.  So, I made the pleat longer and wider in front (1/2 inch on each side and also 2.5 inches longer) to take up some of the extra ease.  Next, I made three small pleats on the back waist edge that are about 1/4 inch wide and 2 inches long, tapering to nothing. 

I eeked out this dress with just under 2 yards of fabric and am pretty pleased with the result.  It is super comfortable and I like it.  DH thinks the pattern envelope resembles nothing that a 50 year old should be wearing so we had a brief discussion about pattern alterations....it was brief since he tuned me out after the first 50 or so words of the explanation.  :)

I highly recommend this pattern and may try it again in a lighter weight that will fit the fluid style more. 

Have fun, but measure the skirt length!

Sue

Sunday, February 24, 2013

McCall's 6525

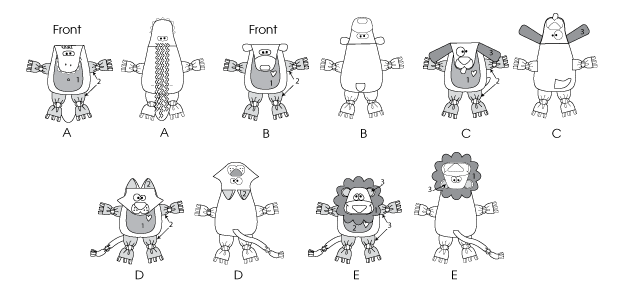
Oh my, these are SO cute!  I found out a few weeks ago that I am going to be a grandma for the first time and I got busy!  The baby isn't due for about 6 months or so, but I have a stack of patterns to whip up for the little one!

These are smaller than you'd imagine, just right for cuddling.  I think the best description I can come up with on my own is that they are like a stuffed animal, without the stuffing.  Here's a description from the back of the envelope: Blankies: Five 9.5" W X 24" long animal blankies.  Alligator Blankie A., Bear, B., Dog, C., Cat, D., Lion E.  All views have contrast sections and belly.  So you can see the relative size compared to a child, I found this photo online. 


These blankies are designed for medium weight fleece.  You need some batting, and some contrasting cotton for the appliques. 

This pattern doesn't have a rating, but I would rate it as easy.  A beginner could pick this up and complete all the animals with no difficulty.  There are however quite a few pieces for a few of the animals such as the lion.  The gator has the fewest pieces.  I would estimate for me to cut out and create all five animals was about 8 hours.  Not bad, I am not the fastest sewer in the world.  If you are speedy, you could do this in much less time.  The gator only took a little over an hour while the lion was over 2. 

Instructions were very easy to follow with great illustrations. 

I made a few modifications based on fabric choices.  For the cat, I used minky.  Wow, it is so unbelievably soft!  I wish I would have made all the animals out of minky!  The others I used fleece.   
The alligator's teeth are made of jumbo white rickrack.  How clever, huh?  The alligator also needs rickrack for his back.  The pattern envelope calls for ribbon for the toe nails, but I used bias tape as I couldn't find ribbon I liked.  Plus, I hope these are well loved, and I would presume bias tape would last a little longer than ribbon.  You can hand embroider things like the eyes, lion's mouth if you'd like, but I either appliqued black fabric for the eyes and machine stitched the mouth so I didn't have to hand embroider.   These are baby safe as there are no buttons to swallow or anything loose. 
For the lion's mane, I used some of the left over minky.  It makes a nice contrast with the fleece's soft yellow color. 
I had a lot of fun searching through my stash for the perfect contrast fabric. 
I used 100% cotton batting for the insides.  You only line the body and head with the batting. 
Best of all is that these are completely machine washable!  Yahoo! 
I included a picture of the animals I created.  Can't wait to give them to my little grandchild!
Thanks for reading!
Sue

Wednesday, February 20, 2013

McCall's 6513

Here is my latest creation: McCall's 6513.  This is a Palmer/Pletsch pattern, or pattern that fits.  There are various reviews on Sewing Pattern Review that seem to be both positive and negative.  I loved it! 

Here is my review and experience with this pattern. 
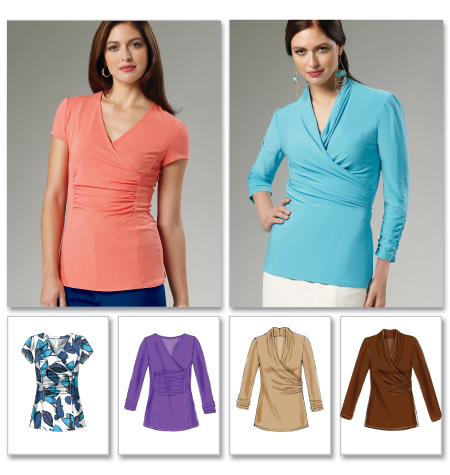
Here is the picture from the envelope.  I will save my comments for later.  :) 
Back of the envelope says this: Misses' tops: Close-fitting, pullover tops.  A, B, C, D have gathered front and narrow hem.  B, C, sleeves and C, D, back collar.  Elasticized. 

Fabric recommendations are for Jersey, cotton knit, spun silk knit, matte jersey.

I chose to make view D, long sleeves, draped on the side.  I used a soft and sparkly knit from Gorgeous Fabrics.  This was a selection from my first purchase from that site and I am pleased! 

Palmer/Plestch give an extraordinary amount of directions for such a simple pattern.  As other reviewers have noted, it is rather silly to pin fit the tissue on your for fitting when the finished garment is made of a knit.  Hmmm....if you are really concerned about the fit, make a muslin and skip all that nonsense. 


Everything went together well, fast and easily.  all the notches match up and the pattern is well-drafted. 

I think the top looks super close fitting on both the live models pictured above.  I made my usual size or a 14 and expected it to fit too tight, but I think it is not as close fitting as this pattern would lead you to believe. 

Like other reviewers, I didn't set in the sleeves but sewed them flat and then stitched the sleeve and side seam in one fell swoop. 

I am 5'7" and love the length.  If you are shorter or taller, check the length of the sleeves and hemline. 

I really like the neckline drape.  It is comfortable and didn't seem to gap.  I hope that stays true as I move around a lot at work. 

I highly recommend this pattern!

Thanks for reading!
Sue  

Vogue 8857

Vogue's 'easy' Misses' top and tunic: Fitted blouse or tunic has front tucks and button band, shaped hemline and narrow hem.  A, B, C: Bias neck binding extends into tie ends, flounces (wrong sides show) with unfinished hem.  A, D: Stitched hem on sleeves.  E, F: Pleated sleeves.  B, C, E, F: Seam opening on sleeves with button cuff, thread loop (B, C).  D, E, F: Collar band.  D, F (Collar). 


Here is a photo from the front of the envelope and yes, they used an actual cute photo! 

Here you can see the line drawings of all the views.  I went out on a limb and sewed View C.  I made a size larger than I normally do,  but had to take it in quite a bit.  For some reason, I am into tunics and this one is so awesome!


This pattern is rated as easy and not so sure that it is truly that easy....I mean it isn't difficult, but with some of the design features, I'd feel bad if a beginner picked this pattern up and expected to get awesome results. 

I used a rayon blend fabric I purchased from SR Harris in Minneapolis last summer.  I had been waiting for the perfect top and the color is so similar to the envelope, it was just meant to be. 

What I liked, disliked about the pattern?  I think the directions for this top are great.  There are lots of great visuals that guide you through the neck band with attached tie ends, the tucks, and the hemline.  Also, the order of construction is great.  I love that you hem the top prior to attaching the button band. You get a very professional looking finish using that technique.  I will have to remember that trick next time I make a top with an attached band. 

All the notches and dots seemed to line up well on this top so nothing caused me any sort of head-scratching. 

What I disliked is that the neckband with attached times is so narrow it is fiddly with a softer fabric like I used.  The seam allowances are only 1/4 inch wide on the neckband and prior to attaching it to the top, you staystitch and then trim the seam allowance to 1/4 inch.  I believe this would have been fine had I used something with a crisper hand. 

I took a leap of faith and actually left the edges raw on the neckline flounce.  It is cut on the bias so even though is has an unfinished look, I don't believe there will be much if any sort of raveling after it is washed. 
I do think the cuffs are just a tad small, I have fairly small wrists and felt it is just a bit snug on me.  You may want to measure your wrist before cutting out this piece. 

Design changes/modifications I made: as I hinted at before, it was too large so to remedy this, I ended up taking a center back seam and added some shaping by taking it in about an inch at the waistline and hip area.  Sorry I am not modeling it, I have ignored 'Grace' lately so she is the star tonight. 
I also made my usual 1/2 swayback adjustment. 

The first button is rather low so thank goodness the tie neckline will help keep things appropriate for work. 

I think my finished garment looks quite a bit like the envelope.  I am not 100% satisfied with how the tie ends look at the neckline, but maybe I am being too critical.

I highly recommend this top.  Check your measurements and how you'd like it to fit.  It has quite a few options: length, sleeve length, flounce, tucks, etc. 

A fun and satisfying pattern!

Thanks for reading!
Sue

Sunday, February 17, 2013

Vogue 8831--welcome to the jungle!

Vogue 8831 the perfect choice for this incredibly cool cat print from Marcy Tilton!  Here is a photo of the pattern: How cute is that? 

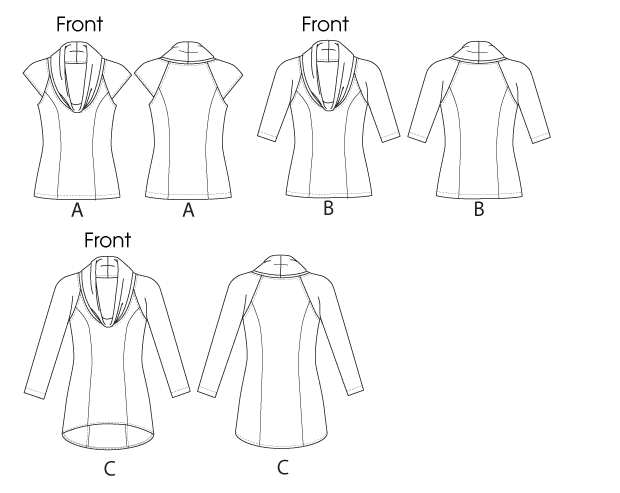
Here is the description from the back of the envelope: Misses' top and tunic: Close-fitting, pullover tops and tunic have double layered, draped collar, side front and side back seams, stitched hems.  C: narrow hem, back longer than front (wrong side shows).  A, B, C, D cup sizes. 

This pattern calls for two-way stretch knits: rayon, spandex, cotton spandex, wool spandex.  This pattern is rated as very easy, and it certainly is!

Sizing for this pattern runs: A5 (6 to 14) or E5 (14 to 22).  I made a 14. 

I believe my finished tunic looks pretty much like the envelope.  I think the longer hemline in the back is far more pronounced on my tunic than the photo shown above.   

As I said earlier, I used a fantasticly yummy knit from Marcy Tilton.  I only had two yards and the tunic with long sleeves required 2 1/8 yard.  I really wanted the tunic so I made the sleeves 3/4 length to compensate for my lack of yardage.  I also had to cut the center back piece without the fold, so I do have a seam that runs right down the middle of the back.  I am ok with it, it doesn't really show that much with the busy print I used. 

This pattern is really well drafted and everything fit together well.  In addition to having to cut the center back piece as two halves rather than on the fold, I made my usualy 1/2 sway-back alteration by taking fold in the pattern piece at the waistline.  Since this is a rather stretchy knit, it was easy to just stretch the front to accommodate the back's shorter length.

Like kidmd, I found the neckline to be a little low, but nothing that a lace cami can't take care of.  I like the contrast of the lace with the roar of the cat print!

This is going to quickly become a tnt for me.  It feels good as I wear it, fits well, and is a great length for a tunic.  With the three sleeve lengths, there is enough variety for all seasons. 

Snatch up this pattern!  This is one of those patterns with a somewhat dull looking cover, so don't pass it up because of how boring it appears to be!

Thanks for reading!
Sue  


Wednesday, February 13, 2013

Vogue 8854 Tunic

Here is my rendition of Vogue 8854.  This is such a great pattern, it has so many possibilities!

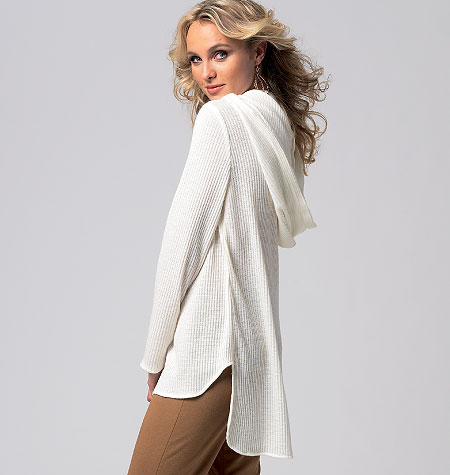
I really like the version on the model:

If it wasn't for this picture, I would have never even considered purchasing this pattern.  Look at the boring envelope:
The lines are great, yes, but jazz up your envelopes, please! 

Pattern Description from the envelope:
Loose-fitting, pullover tunic has have (I believe they meant half) collar or hood, shaped hemline, narrow hem and snap closing.  Topstitching.  Wrong side shows on hemline and hood.  B.  B, pocket.  B. C: Button and self loop.  Yes, I have B listed twice, but that is another typo.  Proof read your work people!  What isn't listed is that B has a kangaroo pocket.  Pretty cute! 

This pattern is listed as very easy and yep, it is just that!

Fabrics: Moderate stretch knits.  Jersey, sweater knit.  I highly recommend using a drapey fabric to get the right 'look'.  This fabric is rather thin, just meant for layering. 

Notions: A, B:Interfacing, four snaps.  C: two-snaps. B, C: One 1 1/2 inch button 

Sizes: Y (XS, Small, Medium) ZZ (large to X-Large)

I made view C in a size medium. This is loose fitting, so I highly recommend measuring before cutting out your fabric.

What did I like? Dislikes? This pattern seems drafted well.  Instructions were more than adequate.  The hood is really big and long.  If you are petite, check the size on it as you don't want it past your waistline, or at least I wouldn't! 
What  I didn't notice at first is that the hood is not cut symmetrically.  I cut it symmetrical but it was too large for the neckline--even though step 27 clearly shows that one side of the hood is smaller, I simply didn't pay attention to that as I was cutting it out.  The pattern piece has it clearly marked where to cut for the smaller size.  Definitely operator error!  Once I figured it out, it was of course an easy fix. 

Dislikes?  Just the say they wanted you to set in the sleeves.  I ignored that step and sewed them in flat and then sewed the side seam.   

Fabric used: This fabric was from my stash and is a rayon crepe.  I love the deep purple the way it hangs, and how light weight it is.  I purchased it from Fabric Mart a while back. 


Modifications? I made  my usual 1/2" sway back modification. I pinch out 1/2 inch at the back waist line and taper to nothing at the side seam. I had the back longer than the front, just like the pattern view, but thought it looked funny on me.  So, I chopped it off so the front and back are even steven.  My serger was in the shop, so I ended up using french seams on the entire garment.  It worked beautifully! As other reviewers have noted, the sleeves are really long.  I am 5'7" and usually RTW sleeves are slightly too short for me.  These sleeves however are really long.  I shortened them an inch.  


Recommend to others? You bet, this pattern is super easy, has enough variety with the types of fabrics and the three different views.  Just use your imagination! 

Conclusion: This is super easy, fast, has great directions (both written and visual) and is fun! If you want something with a little more shape, taper in the waist line. It won't be difficult at all to make this modification.

Thanks for reading!
Sue

Monday, February 11, 2013

Kwik Sew Vest 3731

Here is a vest I created some time ago and realized I didn't review it! 
This is for a super easy, stylish, and fun furry vest. 


Yes, it is rather straight and shapeless, but that is what belts are for, right? 

I really like the scarf and hat, but haven't dived into those yet. 

Pattern Description for the vests are: Vests are lined and have no closure.  View A vest has V-neckline and View B best has round neckline.  Description for the hat and scarf is: Hat is lined and has elastic on inside.  Scarf is lined and has an opening in one end for other end to slide through. 

Fabrics: designed for fake fur, fur, berber fleece. 

Sizes: XS to XL are included in one envelope. 

I made view B in a size medium.  This is loose fitting, so I highly recommend measuring before cutting out your fabric. 

What did I like?  Man, this is an easy and fast fix if you want something to whip up quick.  I love the burrito method of sewing in the lining to the vest.  There are so few steps in these directions that you really want to keep flipping the direction sheet over to make sure you didn't miss anything. 
Dislikes?  Nothing about the pattern.  I would have liked to make something a little more fitted, but when I ignore the shape of pattern pieces and cut anyway, it is my own fault, right? 


Fabric used: I have to say, I don't remember where I purchased the giraffe-like faux fur.  It is just the right weight, not too heavy, not too light.  It sewed and cut great.  No dislikes at all! 

Modifications?  I didn't make any other than my usual 1/2" sway back modification.  I pinch out 1/2 inch at the back waist line and taper to nothing at the side seam.  If I do create this again, I will consider raising the armholes.  I think they are a little large and loose. 

Recommend to others?  You bet, especially if you want instant gratification and had a super fun furry type fabric. 

Conclusion: This is super easy, fast, has great directions (both written and visual) and is fun!  If you want something with a little more shape, taper in the waist line.  It won't be difficult at all to make this modification. 

Thanks for reading!
Sue

Sunday, February 3, 2013

Butterick 5857

<b>Pattern Description: </b>
This is a Misses' close fitting top with neckline variations, elasticized shoulders and upper sections, and narrow hems.  A, B, Overlays.  B, C, sleeve slits.  D: Upper sections cut on crosswise grain. 


<b>Pattern Sizing:</b>
This pattern comes in sizes Y (XS to M) ZZ (Lg to XXL)
I made a medium. 

<b>Did it look like the photo/drawing on the pattern envelope once you were done sewing with it?</b>
Yes, it resembles the drawing.  I made a few alterations/modifications.  :)  I made view D. 

<b>Were the instructions easy to follow?</b>
Instructions were just fine.  I glanced at them and then did my own order of sewing.  More on that below. 

<b>What did you particularly like or dislike about the pattern?</b>
Like: unique styling of the sleeves and the open back.  It makes a funky, cool t-shirt.  Dislikes, nothing really.  However if I do make this long sleeved version again, I will narrow the lower sleeve width.  That however is just a personal preference on my part and nothing to do with the pattern at all.  Even with my larger than I'd like chest, this top has enough ease.  I didn't make any changes to the bodice to get it to fit. 

<b>Fabric Used:</b>
I used some sort of knit from JoAnns.  It was okay to work with.  I specifically purchased it to create this top.  It is a little light weight but since I choose it for the color and pattern, weight wasn't a major consideration.  I am thinking of putting a moratorium on any purchases from Joann until further notice.  Fabrics just haven't been performing as I would like them to. 

<b>Pattern alterations or any design changes you made:</b>
Here is where I had some fun with this pattern, but first I will lead you through the order of construction. 
There really aren't that many steps to this top as it is pretty simple.  However when I got to the step where you insert elastic at the shoulder seam, I thought it would be easier to hem the sleeve slit/opening first.  After hemming the slit I inserted the elastic. 
At that point I also thought it would be easier to press and get the lower sleeve ready for hemming.  I used this opportunity to attach lite steam-a-seam.  I sewed the underarm seam and then hemmed the sleeve opening. 
I didn't use the elastic at the seam where the bodice and lower top meet.  The directions call for it, but I didn't think it was necessary. 
The only other modification I made to the directions was to hem the lower edge prior to attaching it to the upper bodice. 
Here are my modifications.  I plan on wearing this to work and it slipped off my shoulders several times so I attached a tie on each side of the neckline so I can make a cute little bow.  That meant I had to tack the crossover at the back at the critical point so it laid flat. 
The sleeves were really open (no kidding, right?) so to keep it funky I used hair elastics in a turquoise and black buttons and attached those at three places on the slit.  I like the effect. 

>Would you sew it again? Would you recommend it to others?</b>
Yes, I do think I will sew this again.  I would consider using a smaller piece of elastic at the shoulder seam so it gathers more like the picture on the envelope.  I do recommend this to others.  It is easy, goes together quickly and could be dressy or super casual. 

<b>Conclusion: </b>
Another great pattern from Butterick with an extra unappealing line drawing on the front.  I actually choose it based on the photograph on this site: B5857