
About Me

My photo
Sewing is therapy for me. I hoard fabric, patterns, notions, and spend more time shopping for fabric than I care to admit...

Wednesday, January 7, 2015

My first Merchant and Mills Dress Shirt Pattern


Oh, I have been in love with this pattern ever since I first saw it on Pinterest.
sewing pattern - the dress shirt pattern :: Merchant & Mills , now available http://www.atelyeah.info/
I tried to find it to purchase and when I was in Denver for a business trip, I found the pattern at Fancy Tiger Crafts but with the multiple bolts of fabric I had in my hand, the patterns I had and the very limited room in my suitcase I decided to put the pattern back....but I still ached for it, incredibly so!


I had to have it and so I did the only reasonable thing a girl can do and ordered it online.  Finally, it was in my possession!
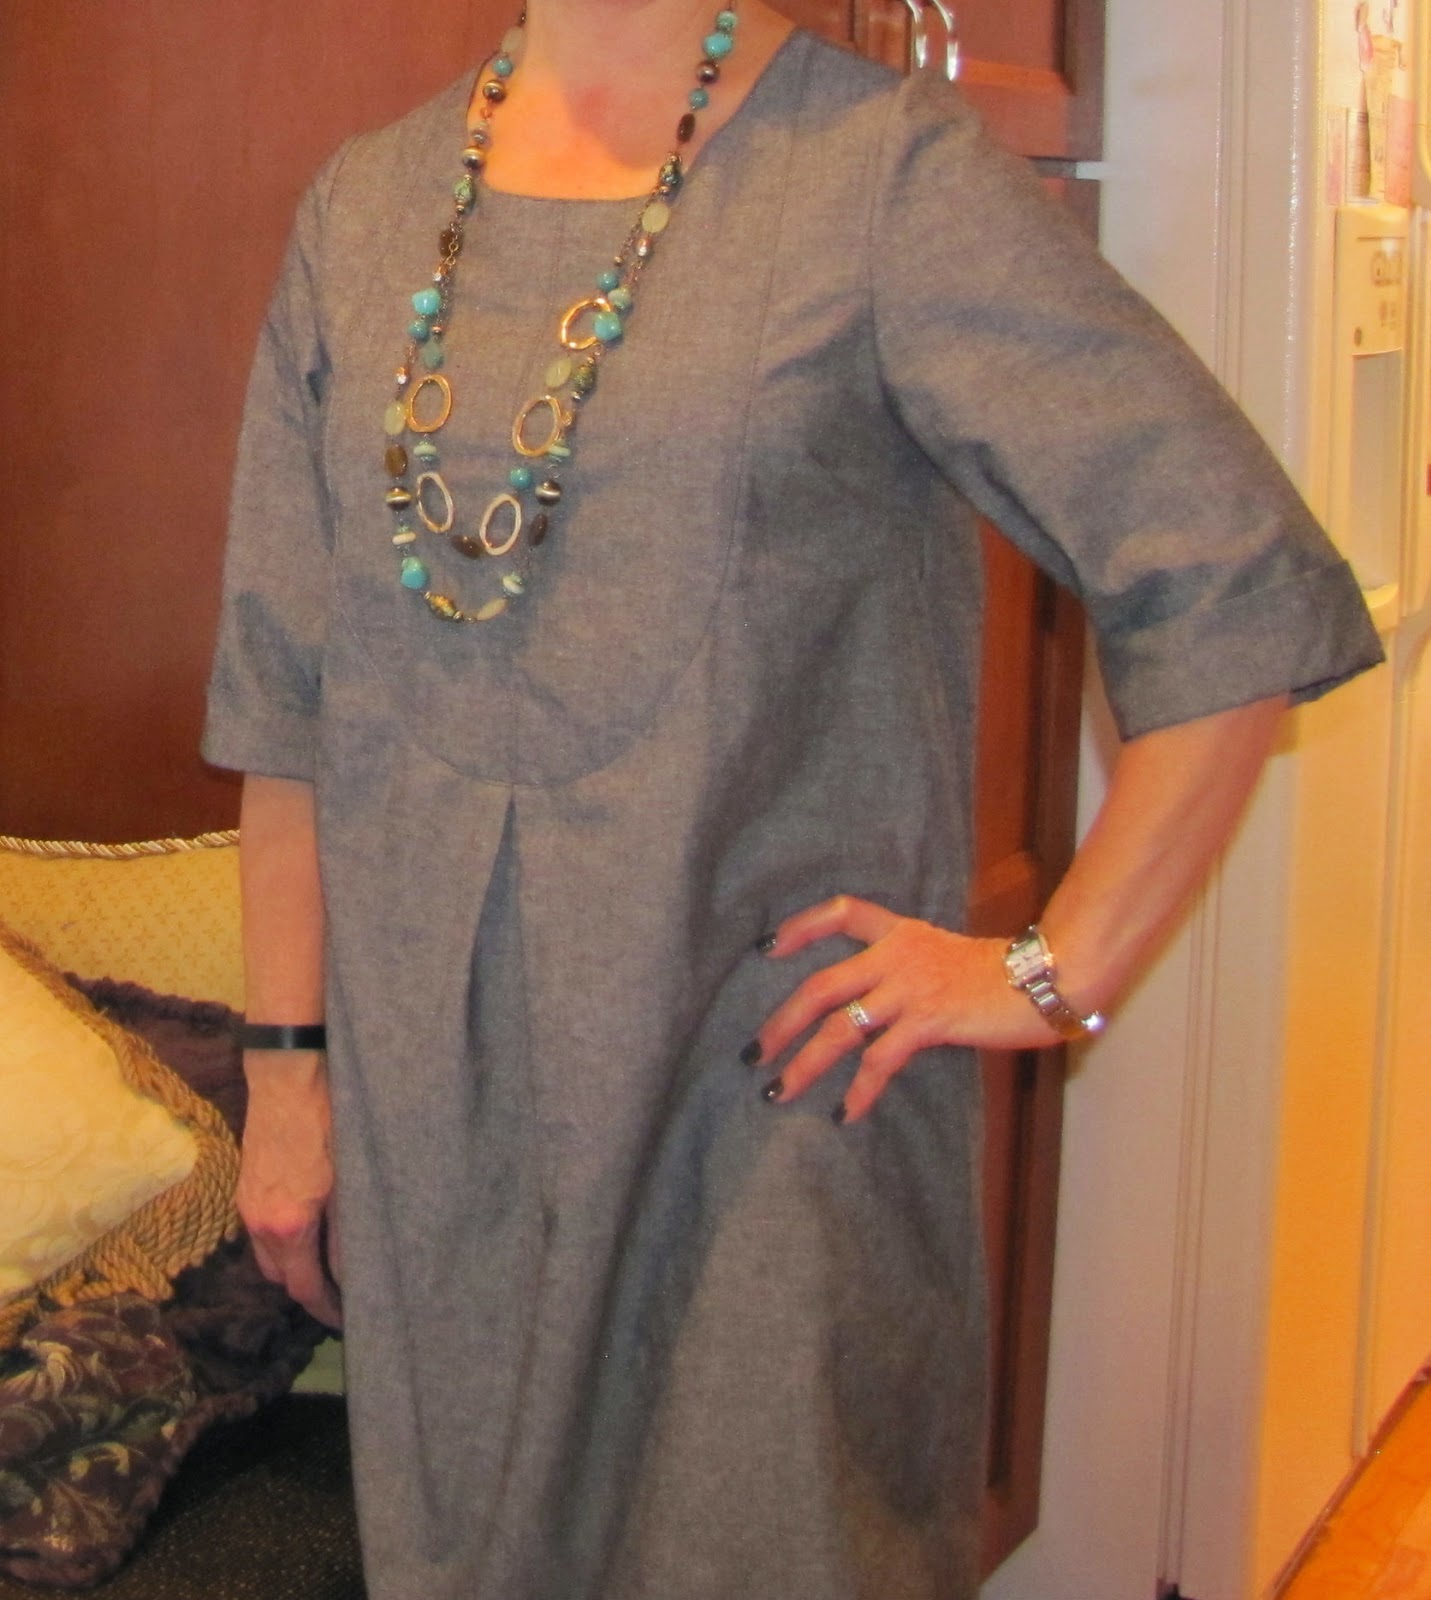


This is my wearable muslin.  There is something about the simplicity of this pattern and the easy fit that just really draw me to it.  If you haven't heard of Merchant and Mills they are based out of England.  The description from the back of the envelope is this: The Dress Shirt is relaxed, loose and absurdly comfortable.  Its signature silhouette is inspired by a classic gentleman's shirt.  


Suitable fabrics include cotton, linen, lightweight denim, washed silk and baby whale corduroy.  It is noted to choose a relaxed fabric that will make a nice pleat down the front.  You are encouraged to use the bust measurement to fit the dress as it is an easy fit.


Based on my measurements and high bust, I made a size 12.  The dress doesn't call for a dart, but I put one in and am glad I did.  It lies so much better down the front.  I should have taken a before picture but forgot!


I choose to make the version with the rolled sleeves, and there is a short sleeved view as well.
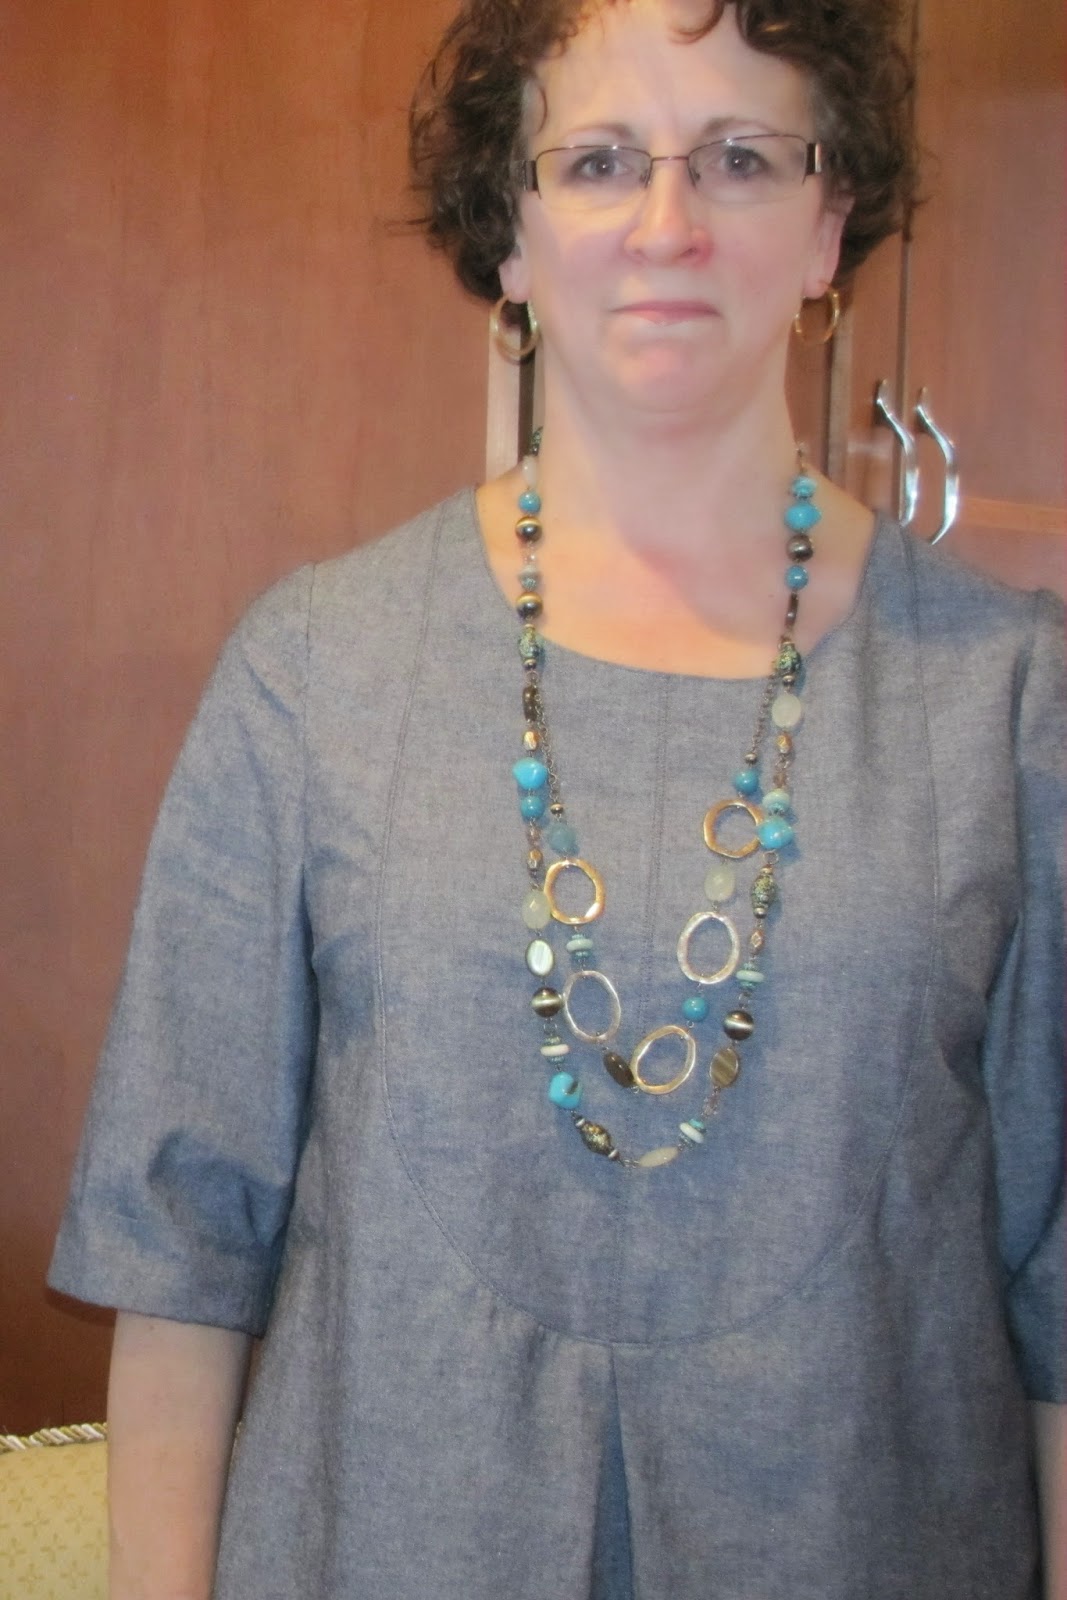
 

I used a black chambray I purchased from Fabric Mart for my muslin.  This picture shows the details of the front which I really like!


I am so pleased with the finishing on this garment.  The manner in which you finish off the back yoke, the shoulder seam, and facings is just lovely and will make me want to purchase many more Merchant and Mills patterns!


I found this easy to put together even though a convex and a concave piece are put together.  I found the directions completely adequate for this and to me this made perfect sense.  Some other online reviews mentioned the directions for this stop were a little confusing but I didn't think they were at all.  I did notice that I made the pleat incorrectly!  It should not have been inverted.  Oops!


I really like the easy fit of this pattern and the look especially from the front but I thought the back was too roomy and wide.  I messed with adding some pleats, taking in the side seams, and such but decided I didn't want to loose the look of the front and the front details as that is what initially drew me to the pattern.  So, I decided to make a casing for elastic to cinch it up in the back.  I sort of like this but wonder what else I could have done.  Any ideas?  You can tell by the amount I cinched it, that it was very wide in back.  Perhaps this pattern is more suited for a girl with a more athletic build?

I do like this and will wear it and I will make it again.  I choose the black Chambray just because it seemed like the right fabric choice.  It would also be fun in a tiny floral, rather subdued, print as well.
]
\What do you think?  The casing looks a little low in this picture..I'd better reevaluate where I added that!

Thanks for reading!
Sue

McCall's Fitted Tunic

I really wanted to make a more fitted tunic since so many of them are less than fitted but I just love everything single one of them!  So, back to McCall's 6750.


And--you're right!  It isn't even a tunic but that doesn't mean I can't make it one!


I was drawn to the style and fit of this top.  It has quite a few darts in the front and back making it so much more fitted than my fav TNT the Archer by Grainline.  I decided I should probably have a few TNT blouses so not all of them are boxy or looser-fitting.


This top has three options that revolve around the sleeve length as everything else looks exactly the same.  I wanted a long sleeve version since it is flipping cold outside right now and I need more long sleeves in my wardrobe.


I used a fabric from my stash that I think I purchased from Marcy Tilton that was labeled as a denim but is very lightweight, much more like a Chambray.  There is a white thread that runs through it that gives it a bit of definition.


This top is my wearable muslin.  I still think I have some more alterations to do to this top but it is fine as is and I will most likely wear it in public, but with the sleeves rolled at least once!


I made a size 14 and I do have to say I think this pattern runs a little large.  I also made my usual 1/2" swayback adjustment and felt like it should have been more like 3/4 to 1".  I also lengthened this top by 6 inches to make it tunic length and I like the fit-and-flare shape of the bust to waist and waist to hip ratio.  I did end up taking this in quite a bit at the upper back and even extended the pleat at the upper back and radiated it to meet the innermost dart. I do however love the fit of the shoulder seam and where it lies on me.  Just about perfect!  I also like the collar and how it is formed with the front facing but ends at the shoulder seam.


Directions are really great as this is a Palmer-Pletsch pattern and I followed all the directions for tissue fitting prior to cutting out.  No matter how good the tissue fits, it just isn't the same to me as a moldable fabric is.  Fabric shows the drape whereas I don't think you get the same from tissue. Maybe it is operator error and I need more practice tissue fitting?


I do like my finished blouse and will wear it.  I may end up tweaking the fit a bit more but I do believe this pattern deserves another remake, nut what do you think?  I promise, it isn't tight or pulling at the bust.  I think the static in my house is causing the fabric to stick to my bra!


Thanks so much for reading!
Sue

Saturday, January 3, 2015

Stash buster Saturday McCall's top

M7018, Misses' Tops and TunicOh today was just perfect for re instituting my former stash buster for a Sat or Sun--which ever day it gets done!   It is uncomfortably cold with a wind chill of below zero and a blizzard going on, perfect for not wanting to set foot outdoors!

So the rules for a stash buster are that EVERYTHING must be from your stash--you can't go anywhere for anything at all, button, thread, zippers, nothing and you've had to have all materials on hand for at least several weeks--notice the huge leeway!  Any fabric that is more than a week old is considered 'stash' and any pattern purchased over a month ago is also 'stash'.


So, when I was deciding what to do, I have been just so excited to create McCall's 7018 and see if I liked it or not and I had the beautiful chili colored knit left over from this Vogue tunic I made and I had the buttons from my stash as well.  Winner, winner, chicken dinner!  Hence the birth of McCall's 7018.


What I love so much about this top is the shape and the fact it is so very on trend right now.  Everywhere I go I see tops of this shape and style and decided I want one--no make that I need one!


Line Art
Here is a description from the back of the envelope: Misses' Tops and Tunic: Loose-fitting tops and tunic have front button closure, back yoke, sleeve, pocket and collar variations, and narrow hem.  A, D: Sleeve with buttoned tab and side slits.  A: Pockets with flaps.  B: Contrast collar and cuffs.  C: Left front pocket.  E: shaped hemline, wrong side shows.  F: Sleeve with buttoned tab.
I made view D, which is the one the model is wearing.  And, thank goodness I was set on that view as I had to squeeze that out of the fabric I had remaining with some very creative laying out thank you very much!  Since I loved the fabric so much I am glad it worked out and there weren't any scraps worth salvaging--I used all of it on this top and my Vogue tunic which you can see here.  I basically consider this top to be FREE!  Amirite?  I already had the pattern (which I purchased for a buck 99), left over fabric and buttons.  Free!


So this pattern is rated as easy and it is easy to put together.  In my on-going quest to figure out the FBA so it works for me, I added a slash to the pattern piece where I would need a dart, spread it 1/2" to try and accommodate my needs.  :)  I still see wrinkles on the front of the top but then again, the model has those too!  My only thought is that I'd need an actual dart?  For you fit experts, am I on the right track?


 My only other alteration was to make my usual 1/2" swayback adjustment.  I completed the remainder of the pattern as it was designed.


The directions are easy to follow and it was sort of logically written.  I like to put the collar or neckline on before sewing up the side seams and did that step out of order of the pattern.  And, I did manage to set in the sleeves by pinning them in and not putting in ease stitching.  I probably could have gotten by with putting them in flat but I thought I'd give it a whirl with setting them in and am happy with the result!


So this is an instant gratification project--oops and I almost forgot an important point!  The center front is folded over twice with no interfacing.  I was a little concerned that sans interfacing would stretch out the button holes so I took a precautionary measure and put stabilizer I use for embroidery between the garment and feed dogs.  I tore it away when finished and it worked like magic!  I will say the embroidery stabilizer I used is meant to be torn away.  Not sure if it would work with any other type.

So this is a comfortable top with so many styling options that I can't wait to make this pattern again!
Thanks for reading and I hope you too will take on a stash buster at least once a month!

Sue


Thursday, January 1, 2015

McCall's Jacket--first garment of 2015!


So here's to the new year!  And, here is to a new jacket which I started in 2014 but finished up and am posting about today!  I am so digging these McCall's jacket patterns!  They have so many RTW details that make them fun to create and even more fun to wear!  
I like all the views, but I was especially drawn to view C--the one with the collar--see those pleats in the collar and drawstring and cord stops?  I had to make it!  


I ordered this silk suiting from Fabric Mart and I just love the colors!  It sewed up really nice but I will say that my awesome Bernina serger, that has sewn like a champ through everything I've asked it to and begged for more, had some trouble with two layers of this fabric.  I had to sew s-l-o-w-l-y in spots and most of the time I simply finished off the edge of a single layer of fabric.  That said, I am happy with the result but will plan on making another version from a lighter weight fabric in the near future.  


  So, back to the pattern.  Here is a description from the back of the envelope: Misses' jackets: Semi-fitted lined jackets have french darts, button front, in-seam pockets, side panels. two-piece sleeves and back waist cording.  B: Contrast sides and under sleeves.  C: Pleated stand-up collar with drawstring and flaps.  What isn't added is that the sleeves all have a little vent at the seam and View C has the inseam side pockets with mock pocket flaps.  


I made a straight up size 14 but took it in quite a bit!  I just love it when that happens!  The French darts give a lot of room for the bust and I added about 1/2" to the darts and lowered the bust point about an inch.  This seemed to work well and I did this because I was (finally) smart enough to make a muslin.  Where I really took it in was the waist and hip line by about 2 inches each.  This was such a shock as I haven't actually been keeping myself away from the Christmas Cookies and hitting the treadmill/stair-master like I should be.  That's what resolutions are for, rite?  

I love how I set in the sleeves.  I didn't sew the ease stitches but pinned the crap out of it and it worked like a dream!  I love this technique that I learned from a fellow blogger, Dina.  


I lined the jacket with Olive colored lining that I purchased from Fabric Mart as well for a dollar a yard!  I love stock up sales like that!  This jacket cost less than $25!  It was so flipping cold outside that when it came to the shoulder pads, I decided to try and make my own and it worked!  Look how nice those shoulders are filled out!  


I thought long and hard about two things: the drawstring at the back waist and the closures on the front.  I was concerned that with a drawstring waist, the fabric might weirdly bunch and I didn't really want cording and stops hanging on the inside of the jacket.  My other concern was putting button holes in the heavy fabric and having them look nice.  So, I experimented with elastic at the back waist and decided it was the right way to go and I found heavy duty snaps at Hancock in a bronzy color that I could live with.  I just wish that they would have had cording and cord stops in the same bronze color!  


So, I really like my new jacket.  The collar was fun and easy to put together.  Just carefully mark the pleats, so them neatly and it will fit well with the other side.  You see just one side of the collar is pleated and it folds in half lengthwise to a non-pleated side.  There is lining that is sandwiched between the front and back half which wouldn't be necessary if you eliminated the drawstring casing. I really like that added detail at the neckline.  

For the back waist line casing, I experimented with the placement before I found a position I liked.  


My only other alteration was to make my usual 1/2" swayback adjustment and that's it!  The sleeve length was perfect for my 5'7" and I really like the overall length of the jacket.  I am beginning to realize the only time I need to worry about length of garments is when I make pants.  

This is a fun pattern with some awesome RTW details.  Pick the right fabric and you'll love it!  I plan on making more of these as there are so many possibilities with fabric choice, combining colors, using the collar (or not).  

Thanks for reading!
Sue 

Sunday, December 28, 2014

2014 in review--the good, the bad, the downright ugly!

So here it is again, that time of year to reflect on what we've done and make goals to be a better person for the following year!  No, I won't bore you with my new year's resolutions to eat better, exercise more, etc.... but I will will let you know what my thoughts are related to sewing!  Isn't that why you're here?


The good---I made quite a few garments in '14 that I am very proud of and love wearing!  I also made many wads that didn't even make it to the charity pile but rather went right into the good old dumpster.  I hate it when I waste time and fabric on wadders but that's how I get better!  Wadders are typically due to poor fabric choices based on the pattern or a pattern style that simply doesn't look good on me.

First let's look at my top favs!
1.  Sewaholic Minuro jacket!


This is a great pattern and I love the water resistant fabric in gray and the colorful lining!  The orange zipper was a must!  I wear this coat every change I get!  You may notice I added side seam pockets.
 :)


The lady skater--what a great and easy to sew pattern!  I know the pink floral is bright and somewhat obnoxious, but I LOVE this dress!

The grainline Archer pattern.  I made five tops last year out of this pattern.  A winner!  I just love this floral fabric and the peplum!  

Jeans--Vogue 8774 which I made five times and plan on many more until I can perfect the fit!  This is a great pattern and I love the theory denim I used for this pair.  

This McCall's jacket--so very RTW with all the details!  I wear this quite a bit!  I love the contrast of the red against the army green.  

My version of the Scout Woven Tee.  I repurposed thrift store finds to make this one of a kind top.  I just love it!  

This Butterick jean jacket pattern is a favorite layering piece!  


I made this BRIGHT yellow Robson Trench coat in about two days!  I added a lining and I wear this as much as I can!  It's a fun pattern to put together.  

I discovered Tilly and the Button's Coco dress and just love both versions, but this one is my fav!  I used an amazing fabric and I like the contrast I added at the sleeves and pocket bands.  


Lastly, Vogue Tunic--I made this twice and I love tunics and this fabric so much!  I received so many compliments when I wore it that I felt like a model or something!  Yay!  


Wadders!!!


We all have wadders--here are some that I actually blogged about!
I still love this fabric!  Ugh!  This was a Style Arc pattern.  What was I thinking?  It's awful!


This is a McCall's dress pattern that is pretty cute but I think my fabric choice made it a wadder.  The front is fine but the back has issues at the neckline and the hem!


I don't even know what to say about this!  The top is cute--just not on me!  It is way to big and I feel like someone threw up all over me!

So, plans for 2015? I think I am going to narrow this down to five so the goals are more obtainable this year.

1.  I dabbled in bra making but didn't really give it a fair shot.  I need to work on that more, especially after all the patterns and supplies I purchased!
2.  Continue working on fitting pants!
3.  Perfect the FBA.  I need one and have been delusional that I can get by without it.
4.  Try more specialty fabrics such as leather, neoprene, silk, etc.
5.   Finish my quilts from 2013!


Thanks for taking this sewing journey with me!  I so appreciate it when you share your thoughts!
Happy new year everyone!
Sue