About Me

My photo
Sewing is therapy for me. I hoard fabric, patterns, notions, and spend more time shopping for fabric than I care to admit...

Sunday, January 6, 2013

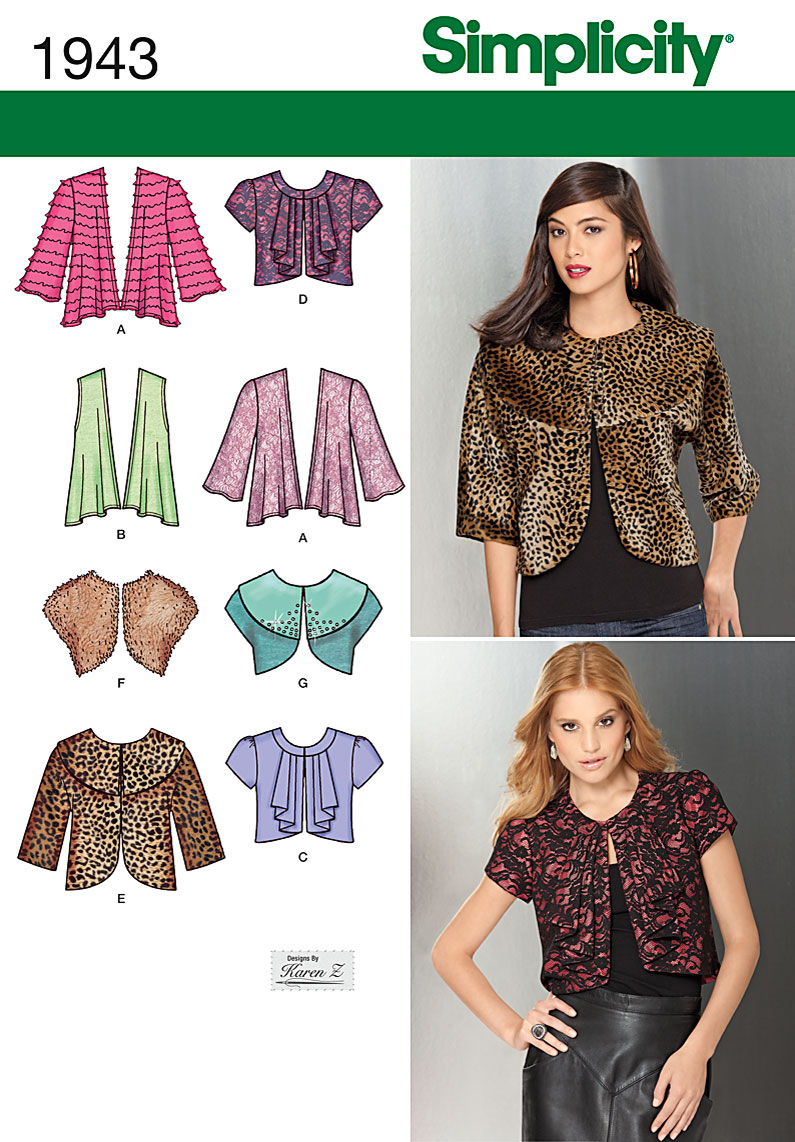
Simplicity 1943

This is such an easy little jacket that I made for DD2.  This is for a store display and DD2 liked the shape of the jacket, so I let her pick out the fabric. 

Here is the description from the back of the envelope: Misses' knit and woven jackets.  That is it!!!  Here is my equally brief description: There are six variations on this jacket with different sleeve lengths, jacket lengths, shapes, etc. 
 
Fabrics: A, B sized for stretch knits only: Cotton interlock, jerseys, lightweight double knits, stretch velvet, Novelty knit fabrics.  C, E, F in damask, pique, sateen, linen,. etc. 

I was required to make view F, which looks like a little bolero jacket.  DD2 choose a silky print that was very spring-like.  It really wasn't ideal for this pattern so I adapted and cut a layer of organza and used it as a second layer of fabric.  I love the berry colored lining fabric she choose.  How fun will this be to wear? 

I believe that my creation looks like the pattern envelope. 

What did I like?  Dislike?
This was so unbelievably easy it was just embarrassing.  It is nicely finished off with all inside seams are covered by the lining. 
What I didn't like, and this is minor, is that there is a center back seam that does nothing for garment shaping.  It isn't needed at all.  Since this was the store display and I will be teaching others how to make this jacket, I cut and sewed it as the pattern was written. 
I also don't like how the side seams are stitched.  I just think there is a better way to get a nicer finish.  I will have to experiment with that. 

Changes: DD2 is rather petite so I shortened the jacket by 2 inches.  I used her measurements and compared those the the envelope to determine how much to shorten it.  She wasn't here for a final fitting, so I hope it works!  I am about 5 inches taller than she, so I didn't think I would be a good model for her. 
I understitched the lining so it wouldn't roll to the outside and show.  That isn't mentioned in the instructions but really should be added. 

Conclusion:
This is just super easy, can be made in a variety of fabrics and has some nice design choices on the envelope.  For those of you with teen or 20 something daughters, they will love it!  It would also be very cute over a spaghetti-strap dress if you need a little coverage. 

Wednesday, January 2, 2013

Voge 8863 Failure!

Here is my latest creation--well, almost a creation.  Read on, if you are intrigued! 

Here is the photo, cute, right? 
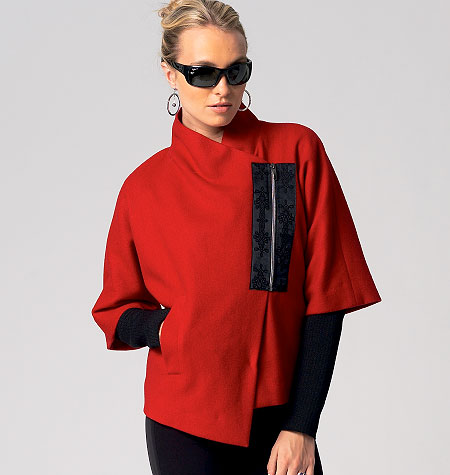
Here is the description from the back of the envelope: Loose-fitting, lined jacket has front extending into standing back collar, underarm gusset, right side welt/pocket, lower sleeve attached to lining, exposed zipper, uneven front hemline, and purchased applied trim.
What isn't included is that the upper sleeve is unhemed.  Katherine, on her blog, encourages you to upcycle a sweater to use for the lower sleeves.  Which I did do and you can see those below. 

Here is my first creation:
Did it look like the photo?  Yes, I think it does.  But guess what, I just don't like it.  I don't think that it is me.  So, since I invested a fair amount of time on it. I decided to see if I can revise it to make it more my style.  See more info below on that. 

How about the directions? 
Directions were easy to follow except I did a little head-scratching when it came to the collar.  The right front piece is cut with the sleeve and collar piece attached. That is a picture of the piece above.  It is sort of like a puzzle at first, until you start messing with the collar and then it makes more sense. 

There are a few typos/mistakes when you reach step 33.  The directions tell you to pin the front edge of the right front lining to the facing.  What they don't tell you to do is go ahead and stitch, which is what the illustration shows.  Also, in step 34, you are instructed to sew, but the illustration shows that you sew from the top to the small circle and then it looks like you leave an opening and sew from the bottom to another mystery dot.  I didn't sew from the bottom up.  It didn't make sense to me. 

What did I change? 
First things first....for round 1, there was no way I was going to hem a fleece jacket by hand, so I ended up bagging the lining by wrapping the front and back of the jacket up burrito style and sewing the lower edge.  Thank goodness I didn't sew one of the sides up to a small inch or so opening.  If I had done that, I don't think I could have gotten the entire thing flipped right side out! 
You can see how that looks here:

In step 37 you are supposed to sew the neck seams together loosely by hand....no way.  I pinned everything together and stitched in the ditch on the collar seam so that it all stayed together.  Maybe if I had used wool or something nicer than fleece, but I am not hand sewing. 

Round 2..since I just didn't like this jacket, this are my attempted changes. 
First issue for me, I just didn't like the exposed zipper.  It is attached to ribbon trim per the directions, only couldn't find any ribbon I liked.  So, I used a fat quilting cotton that had both purple and grey in it.  I hoped it would tie the lower sleeves, jacket body, and grey zipper together.  No one liked it, not me, DH, or DD2.  Dang.  So, I took the zipper off and attached three purple buttons and three hair elastic bands.  Better?  I thought so.  Then I decided I needed to tackle the lower sleeves.  With the print trim removed, the dark grey didn't look right.  I purchased some purple knit that matched the jacket fleece and it didn't look right either.  Sorry, I don't have a picture of that. 

Next, before wadding this up and burning it, I decided I'd try and extend the sleeves.  Well, as you can see from the photo above, I don't think that it looks right.  So for now, the jacket is going to hang out on Gracie until I either need her for something else or until inspiration on how to fix this hits hard.  :) 

Fabric used: Deep purple fleece I ordered on-line.  I think I purchased it from Fabric Mart? 
The lining was a failed dyeing project my daughter and I attempted.  It is cotton and works great for this. 

Alterations: I made my usual 1/2 inch sway-back adjustment. 

Would I recommend it to others?  Well, yes, if you really like a funky style as this.  I thought I did until I put it together.  Sorry Katherine Tilton, it didn't work for me.  The welt pocket came together well and the pocket is nice and deep, perfect for a jacket. 

Conclusion: If I can figure out a way to make the sleeves work, I will try to salvage this.  If not, I spent about 6 hours between cutting, stitching and scratching my head.  All down the drain.  Bummer, I hate it when that happens.  I hope you have better results than I!

Thanks for reading!
Sue

Tuesday, January 1, 2013

My acceptance! Wow!


I simply can't believe it, I was awarded this wonderful honor by a sewing friend with the pen name, art attack.  Here is her link:myartattack.blogspot.com With all the bloggers out there, I am just thrilled that she thinks I am inspiring!  Wow, how cool is that? 
My art attack

Well, in following the rules of this esteemed award, I will pass this onto some of my favorites that are out there!  First step is the review the rules:

1. Thank the person who nominated you
2. Add The One Lovely Blog Award / The Very Inspiring Blogger Award to your post.
3. Share 7 things about yourself.
4. Pass the award on to 10 nominees (or a few less if you are short on time)
5. Include this set of rules.
6. Inform your nominees by posting a comment on their blogs.

 
So, here are 7 things about me that you would have no way of knowing:

1.  I consider my greatest accomplishment is to have raised four beautiful, smart, creative children that are well-adjusted and just all around great adults.  :)   On second thought, maybe some of you do know this as I tend to brag about my greatest accomplishment! 

2.  If there is one thing I could do all over again, it would be to have taken up the violin instead of the piano. 

3.   I am a special education teacher for children birth to five years old. 

4.   When I was a kid, I would spend all summer playing school with all the neighbor kids.  I was the teacher, or course! 

5.  I used to sell Tupperware.  It was a mistake, I know! 

6.  I am afraid of being lonely as I grow old.

7.  I really wish I would have had two more children.  I always wanted six! 

And now...the envelopes please! I would like to pass the love on to the following blogs:
 
My oldest daughter, Emily, has a wonderful blog that she calls cosmosandcashmere.  She knits, sews, spins her own yarn, etc.  She is such a risk-taker when it comes to creativity.  I really admire that in her.  http://cosmosandcashmere.blogspot.com/
 
Marcy Tilton.  Enough said. Yes, I know it probably isn't fair to nominate a professional seamstress and pattern designer, but what the hey, I can nominate whomever I'd like.  :)   http://marcytiltonblog.blogspot.com/
 
Jilly Be Joyful.   She is always smiling and it is no wonder why, her creations are lovely!  http://jillybejoyful.blogspot.com/2012/12/bring-on-rain-soho-raincoat.html
 
Miss Celie's pants.  She is cute, takes great pictures and makes some lovely outfits.  http://missceliespants.com/2012/12/28/burda-magazine-92012-130-purple-friday-side-gather-pullover/
 
That is it for now.  There are many other worthy nominates, is that a word?  However some of my favorite sewers don't blog.  They just write sewing pattern reviews. 
 
Have a wonderful and creative year!
Sue :) 


Vogue 8839

This is such a cute Marcy Tilton jacket.  The picture below is one I swiped from Marcy's blog.  I think her fabric is just gorgeous!  See for yourself:

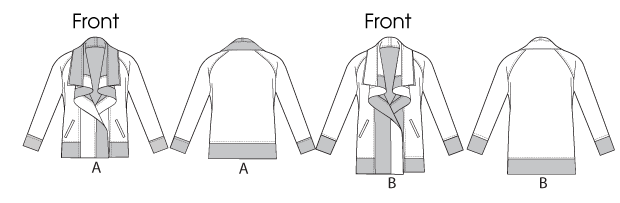
Here are the line drawings so you can see some of the details more clearly. 

On the pattern envelope, the jacket is described like this:
Misses' jacket: Loose-fitting jacket has contrast reverse side, front extending into collar, front, sleeve, and lower bands, side front seams, welt pockets, darted sleeve cap, no shoulder seams and topstitching.  Bands are cut on crosswise grain of fabric. 
What isn't mentioned is that the edges are left naked--my new term for unfinished edges.  Also there is a double collar.   

This pattern comes in two different size combinations: Y or XS to M or ZZ L to XXL. 
I started with a size medium.  More on alterations to follow. 

I chose this fabric from none other than Marcy Tilton's website.  I love the color combination. 

This is a wool double knit.  Not only do I love the colors, but the drape and quality is wonderful!  It sewed like a dream, is not itchy like some wools are and I machine washed and dried it! 
I also choose it so that I could use the reverse side for the contrast bands that are pretty darn cool on this jacket.  It worked beautifully to just reverse the fabric for the contrast bands. 

This jacket is designed for moderate stretch knits: Wool Jersey, sweatshirt fleece and double knit.  The only notions needed are some remnants of fusible interfacing for the welt pockets. 

I choose this pattern for the front collar, overall shape, and the combination of using the contrasting fabric.  I found the pattern easy to put together meaning all the notches and pieces worked as directed!  I am not sure I would rate a pattern that has a welt pocket as 'easy'.  I wouldn't want a beginner to pick up this pattern and feel like this would be a success.  It isn't difficult by any means, it is just that welt pockets can be a little finicky, especially in a knit. 

So what did I like, dislike? 
I love the styling.  I choose to make view B, which is longer than view A.  I wanted to wear this with leggings and boots.  It just covers my hind-end so the boots and leggings work. 
I really love the styling and the way this is put together.  There are just enough designer finishes and creativity that you feel like this is more than just your ordinary garment.  The sleeves are also really long.  I don't mind that at all, I like them rolled as you can see in the picture. 

Dislikes:
Raw edges in a sweater knit.  Since I couldn't bring myself to leave the edges raw, I used my rolled hem on my serger with black thread and liked it a lot.  It gave me just the little bit of assurance I needed. 


This jacket was much boxier than I had hoped for.  Although it should have been expected, I  mean look at the model.  What was I thinking? 

Changes I made:
I took this is a lot through the side seams--almost four inches.  I also took it in two inches at the front side seam.  I could have alleviated this problem by cutting a smaller size.  I made a medium.  I should have started with a small. 
I opted to not use the welt pockets.  I just don't like pockets in a sweater knit.  I never use them, so I left them off. 
I also made my usual 1/2 " sway-back adjustment. 

Conclusion:
I think this jacket has some fun possibilities.  Fabric choices are pretty much unlimited--I think this would work well in a stretch woven, provided it has some drape. 
I will most likely tackle this again in the future but will start with a size small. 

Thanks for reading!
Sue
Vogue 1275

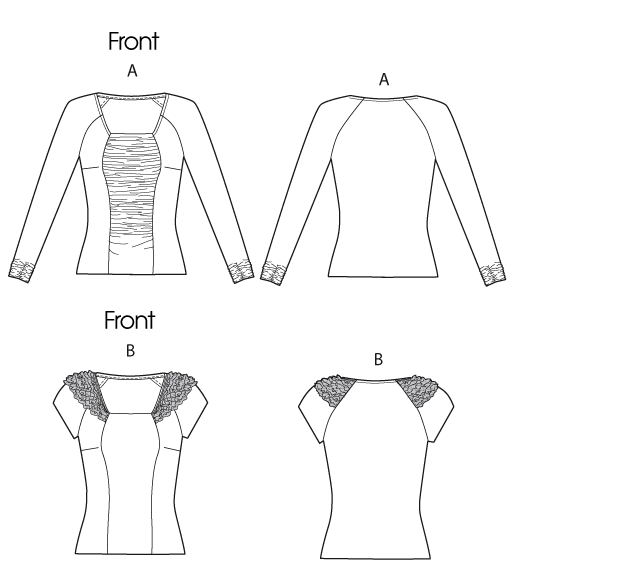
Sandra Betzina's Misses' top: is close-fitting, pullover top has neck binding and optional stitched hem on lower edge.  A: ruched front and elastic forms ruched effect on sleeves.  B: self-lined sleeves with ruffles. 


Sandra's sizing is different with A-J all included in one envelope.

The top has a princess seam with dart, shirring and trim details and the instructions are written by Sandra. 

Notions needed are Steam-a-seam lite and optional double needle and wooly nylon.  For view A, you need 3/4 yard of 1/4" clear elastic. 

This doesn't take that much fabric: 1 5/8 yard for size E (long sleeves) .  You must use a knit for this top. 

I purchased this knit from Marcy Tilton.  I love the colors.  Purple is one of my favorites and this has a wonderful plumy-purple in it.  It is super soft, drapey, and the cut edge only slightly rolls.  

It really feels great on your skin! 

With Sandra's sizing, I find it if I use my bust measurement for the top (duh, right?) and grade down a size through the waist and hips, I get a good fit. 

What did I like/dislike? 
I love the styling of the top.  It has the ruching but not too much.  I love the elastic treatment on the sleeves. 
Some reviewers mentioned the craziness of the neckline and how it was attached.  I tried it as the pattern was written and didn't like how wide the band was.  I removed the band, cut an inch off and reapplied.  I like it much better now. 


What changes did I make:
I added some top stitching around the neckline and down the front band. The seam would stand up, if that makes sense, and found that if I stitched it down it stayed put. 
I also stitched along the seam on the sleeve for about an inch so that the hem wouldn't pop out to the right side when I was wearing it. 
I made my usual 1/2" swayback adjustment.  Other than that, this is a great basic t-shirt pattern. 


Conclusion:
I will most likely put this together again.  I am really intrigued by B, but not sure if I will use the shoulder ruffles.  You can make this long sleeved version with or without the ruching, so it is a pretty versatile pattern. 

Thanks for reading!
Sue

Tuesday, December 25, 2012

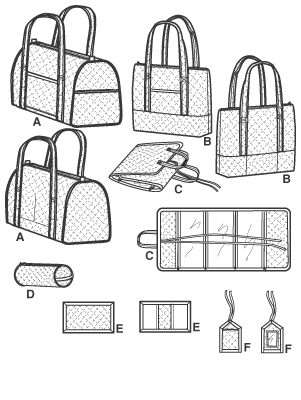
Simplicity 2600 Duffel Bags!

Simplicity Sewing Pattern 2600 Accessories, One Size
Simplicity 2600 Duffel Bags.  I made four of these bad boys for my two sons and two son-in-laws.  There is not really a description listed on the envelope so I am creating my own.  These are some decent sized bags.  The outside you quilt using fabrics of your choice.  You need some contrasting fabric for the inside of the bag and the underside of the handles.  Piping is also needed to attach the sides.  The finished bag measures about 13" X 20" X 11".  My son just packed his clothing for a three-day trip we are taking and he has a little room to spare. 

 Included in this pattern is a tote bag, jewelry caddy, make up case, passport cover and luggage I.D tag.  I had high hopes of also creating the jewelry caddy for my two daughters and soon to be daughter-in-law, but life just got in the way of sewing.  Maybe next year. 
The bag includes an inside pocket, outside pocket and outside side pocket.  For the first bag, I used an extremely heavy duty zipper and found it not as flexible as I'd like it to be so for the other three bags I purchased purse zippers all made of nylon, each with a double zipper thing-y. 
Also for the first bag, I made my own bias tape and took the time to quilt the handles.  After I completed this step of quilting handle fabric on the diagonal and then proceed to cut the six inch wide handle into three long strips of about two inches deep, I decided I was a fool and proceeded to not repeat that step again without rethinking the process.  On subsequent bags, I used denim as the layer in the handle, skipped the quilting by machine and am just as happy with the result.  I also purchased bias tape to edge the handles. 

I chose fabric I thought each guy would like and so far they all think these are pretty cool.  This is a great pattern, it only has 16 steps for the bag, although a few of the steps are time consuming--especially the quilting steps.  You can also opt to use bias tape on the bottom seam of the bag.  I did that on the first bag and then decided that on the remainder I was going to stitch the seam and then top stitch the seam edges down to reinforce them.  That seam was a little easier to handle without the bias trim. 

This is a great pattern.  A beginner could tackle this pattern with great results. 
One thing I had a little trouble with was the insertion of the side panel.  In order to get a great looking side, I decided to stay-stitch the entire edge and clip prior to stitching so it fit together and molded itself together.  I had less headaches and had to do less un-sewing afterwards.  I highly recommend this step for anyone tackling this bag. 

Sunday, December 2, 2012

Vogue 8689

This is such a cute Vogue Basic Design Pattern.  It is one of the custom fit patterns for A, B, C, and D cup sizes.  I love patterns like this!  Here is a picture. 
As you can see, there are a few design variations, which I love! 
Here are the line drawings, which I think help you to 'see' what the pattern is really like:

I choose to make view E but omitted the patch pockets.  My fabric was just too dressy for patch pockets.   See how pretty it is?  I love it! 

Here is a description from the back of the envelope: Misses' shirt: fitted shirts A, B, C, D, E have princess seams, collar and collar band, front band, front and back yokes, narrow hem, flat-felled seams and button closing.  A, B, side slit openings.  A, D: short sleeves with stitched hems.  B, three-quarter sleeves with button cuffs.  C, E: long sleeves with button cuffs.  D, E, patch pockets.  E, bias yokes, pockets, cuffs.  A, B, C, D cup sizes. 

Fabric choices are as listed on the envelope: sheer fabrics, batiste, lightweight linen, lightweight crepe and lightweight broadcloth.  I used 100% cotton from my favorite local quilt shop.  I wish you could clearly see the detail of the fabric, once I laid my eyes on it, I had to have it and knew it was just perfect for a crisp shirt! 

OK, so here is the low-down. 

The pattern is rated as Easy to sew.  I however don't think that a collared shirt with band is 'easy' to sew, so wouldn't want a beginner to pick up this pattern and be fooled by the easy rating.  Band collars are not difficult, but they do require a little practice to get the hang of.  The pattern is however very well drafted: everything fits together well.  I simply love the flat-felled seams.  If you didn't want to go through those extra steps, you could easily serge the seams and just top-stitch and you'd still get a cute effect. 


Directions were easy to follow and detailed.  Images were clear and easy to follow.  One thing that sort of bugged me was that the neck edge of the garment wasn't stay stitched prior to attaching the collar and band.  I did it anyway and found the collar and neckband went together beautifully. Sorry about the wrinkles in the picture. We had just gotten back from church and I should have pressed, but didn't . :)


One really nice thing is how this pattern has you put so many things together so that when you attach the collar and top stitch, all the hemming has been done previously so the total package is neat and tidy.   What I mean by this is that the lower hem is stitched before the front band is stitched on.  The inside looks just a lovely as the outside--see for yourself! 

All you need for notions are some interfacing, buttons and thread.  I used some additional notions that I had and make things easier for me!  For interfacing, I used Shirt-ese and just love it.  I used fabric glue to baste the buttons into place before sewing them on with my machine. 

Sizing is a little small--at least what I feel to be sort of a contradiction: the envelope shows a rather semi-fitted top while the description mentions it as fitted.  I found it to be too-fitted and ended up making a size larger than normal strictly because of how it fit in the chest.  I measured, and should have easily been a C cup but found it much too snug around the breasts.  Since the seams are all constructed using flat-felled seams, I had to cut a new side front and side back in the larger size.  My finished look is much more comfortable and looks much closer to the pattern image. 

What did I change?  Nothing substantial other than making a size bigger than normal.  The length is great.  The sizing is good, but keep in mind that it is a fitted top.  The flat-felled seams are cute and easy and give a great polished result on the inside of the top.  I think I have found a new go-to pattern for a simple blouse! 

I did make my usual 1/2 inch sway-back adjustment on just the center back pattern piece using a wedge at the center and tapering to nothing at the side seams. 

With all the lovely cotton fabrics, linens, and just vibrant colors, you can have so many of these tops. 

Have fun with this pattern! 

Sue