About Me

My photo
Sewing is therapy for me. I hoard fabric, patterns, notions, and spend more time shopping for fabric than I care to admit...

Tuesday, September 30, 2014

My Little Red Dress Challenge!


A little red dress?  Oh, I love pretty dresses.  They give you such a feeling when you slip them on, like a special occasion is about to happen.  One thing I love about dresses such as this is they can be dressed up or down, depending on the accessories.  Throw on a cardigan and flats, and you have a much more casual outfit than if you wear heels and blingy jewelry.


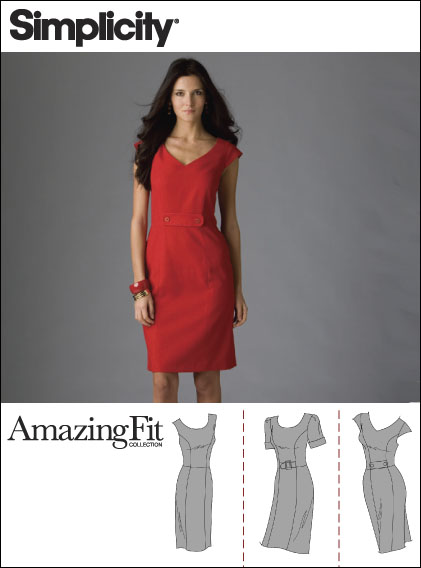
I had at least ten patterns pulled out before deciding on one.  Actually, the pattern I ended up completing wasn't exactly my first choice but I do love my finished dress!  My fitting assistant, aka DH, was out of town and I needed a second set of hands to help!  After consulting with DD1 and 2, Simplicity 2648 became my final project.  I've made this up before and it is an amazing fit pattern which I typically have very good luck with.


 So, for the fabric.  I used a Red Scuba Knit from Hancock's for this dress.  The color is what I feel is a true blue under-toned red.  The weight of the knit and the heft of it feel just lovely on my skin!
I made view C with the rounded neckline and view A's little belt detail.   Of course, I couldn't leave well enough alone, so I made a just-the-right-size embroidery with tone-on-tone thread on the front under the lowest part of the neckline.  And, there was just the right spot for a Swarovski crystal, so I added that as well!


Now, please don't scold me, I know that the amazing fit patterns have a one-inch seam allowance to allow for fitting as you sew, but this dress was HUGE!  I took in 1.5 inches along each side seam, a 1 inch swayback adjustment and the cap sleeves were taken in an extra 1/2 inch as well.  The waistline still looked and felt too wide, so I took in the princess seams along the front 1/2 inch on each side. The hem I let out by an inch and a half as I thought it would be shorter than I wanted.  You don't want to have to yank your dress down while sitting and the little extra length will eliminate that problem for me.  


What I do notice in my photos is that I need some new spanx! What I have just doesn't suck in as much so you have that sleek figure that eliminates undergarment lines!


I thought about eliminating the facings at the neckline and armholes but I really like the clean finish rather than what a binding would give this dress.  I may change my mind and switch the facings out for binding!

One thing that created an unintentional challenge was the pressing of a fabric that isn't supposed to be exposed to high heat.  Oh why did I fall in love with the color and feel of a fabric before thinking of pressing?

So, part of this challenge was to create a story about your dress.  Here's mine.  Every February, I have an extended break from work and my husband and I use that time to visit our oldest daughter and son-in-law whom are now living in Louisiana.  She lives about an hour from New Orleans, and while we are there, I'd love to double date and go to a lovely restaurant in the French Quarter!  It will be fun for us girls to wear special dresses and go out for dinner and hopefully some dancing!  And, in case you are wondering, I did test the dress for dance-ability and yep, it works!


So, what do you think of a little red dress?  Does it work like a little black dress?  I think my husband was hoping for something more revealing but this is what he got!


Thanks for reading!  Head over to the Fabric Mart Fabricista sewing challenge blog (here) for voting on Wednesday and Thursday and vote for your favorite which is hopefully me!

Sue :)

Sunday, September 28, 2014

The perfect (?) trouser pattern Butterick 5682

So here is another pattern do over that was a must for me.  I need more work pants.  Not to brag, but I've lost 20 pounds since January and a lot of what I wore before simply doesn't fit.  And, what is a seamstress to do but pull out fabric and make pants!


This pattern is a repeat as I said before.  I previously made a pair of jeans but this time I decided I needed trousers.

One thing I love about repeating a pattern is tweaking the fit.  This pattern was no exception.  I had made a pair of jeans using my beloved Vogue 8774.  I've made this so many times the tissue is getting rather tattered and torn.  Here is a photo of my latest pair--which I am very proud of!

Next time Vogue has a big sale, I may have to pick up another copy!  So, back to this pattern. Butterick 5682.  Five different views are shown: Slim ankle length, straight leg, book cut, flared leg, and trouser.  I choose view E or the trouser.  This is listed as Easy and it is just that!


So.  What makes the trouser different from the jeans is of course the pocket styling on the front and back and the absence of a yoke back.  I made my usual 1/2" swayback adjustment which was just enough along with lengthening the pants by about an inch.  I added a double welt pocket to the back simply because I don't like plain backsides with my flat booty.  Another alteration I made was to fold out 3/4" on the back upper leg, just below the crotch line to eliminate those pesky puddles I get with patterns.  Know what?  It worked!  I need to remember this simple and easy alteration from now on, especially on trousers!


I used a creamy colored RPL or rayon, poly, and lycra.  I believe I purchased it from Emma One Sock earlier this summer.  This was a wonderful fabric to work with but if you are making a more structured garment, you'll need some extra support in the form of interfacing to keep the fabric from 'growing' around the details.  Let me explain.  I tried sewing the slanted pockets but they stretched out of shape and looked wonky.  I remedied this by using stay tape on the seamline which BTW worked beautifully!  It kept everything in check and perfect if I say so myself!


To give these pants a more casual vibe, I edgestitched along every seam on the right side of the fabric.  I also topstitched the hem.

I'm pretty happy with my pants.  My wardrobe needed these pants and I see more in my future!

Thanks for reading!
Sue :)

Tuesday, September 23, 2014

Drafting from RTW


Here is the link to vote on the Fabric Mart site!  Hopefully, you'll vote for me!
Vote here!

So this week's challenge in the Fabric Mart Fabricistas contest is here: 


"Everyone has a favorite garment in their wardrobe. Even if you are a home sewer, nine chances out of ten this favorite garment is not made by you (but maybe it is!) Every time I sew, I try to make each garment my favorite thing to wear, but it just doesn't always work that way. So whether your favorite garment is handmade or not, I want you to dig in your closet for your favorite ready-to-wear garment. It can be a dress, pants, skirt, top, cardigan, anything! Use this garment as a pattern to create a duplicate garment out of a fabric(s) of your choice. You can make an alteration of the RTW item if it doesn't fit you in a particular place, but the objective is to create a duplicate, not an altered version of the original garment. You will be using this garment as a pattern!"

Holy crap!   I've only ever created one garment from a RTW piece and it wasn't for me, it was for a friend.  And, furthermore, I have been weeding out RTW from my closet and replacing it with my own creations, I mean why not?  That is why I sew, right?  To create a unique and custom made wardrobe that is not only fun to create (it is therapy after all!) but a pleasure to wear since I get to hand select the style, color, fit, and fabric.  I think I am inspiring myself!  So, with much nail biting and some trepidation, I set forth to make something that I'd actually want and like wearing. 

But....there are so few things to choose from!  A dress?  I probably have more of those than I need.  Pants?  I made a pair of those last week and I need a break from pants.  Top?  I've also got quite a few of those and .....  Jacket?  Maybe I am onto something here....keep digging in the closet and Viola!  A jean jacket I've worn the heck out of is lurking about and yep!  We've got a winner!  

I love the contrast fabric on the inside that peeks out.  


Now for fabric, details, and pattern.  I previously made Butterick 5616 but the styling is a little off--not bad, mind you.  

While the pattern is boxy, I can fix that with some alterations on the style.  Now for the details.  I love those little pockets on the chest of the original garment.  They don't add any bulk and the way the pocket bags are topstitched from the outside is pretty cool and a very clever design detail.  I've never seen anything like that in a pattern and I was certain I could figure it out.  Also, the pattern isn't long sleeved, but that is an easy-peasy fix.


I used a RPL or Rayon, Poly, Lycra blend for the main fabric.  The cute detail or contrast fabric which I used on the underside of the collar, cuff, lower band, and pockets is 100% cotton from JoAnn's.  

I had three different fabrics in my hand that coordinated with the light gray RPL and just to be safe, I purchased all three.  


I choose based on the buttons I selected and the print on the cotton.  One thing that always bugged my about the RTW jacket is that the coordinating plaid fabric is wool and mind you, not a soft wool, but a super scratchy, drive you up the tree scratch that you can't wait to take off at the end of the day.  Did that stop me from wearing it?  Nope.  I am a glutton for punishment.  


So, now for what I did with the pattern.  Since Butterick 5616 was my base, I pin fit the tissue to the original garment.  I had to work out how to make the front into three instead of two pieces which proved to be easy.  It also allowed me to make the jacket more fitted than the original as I scaled those pieces somewhat so they took the front in about 2.5 inches overall.  I also had to reconstruct the cuffs and lower band and cut those in half lengthwise and create a two-pieces or a band and facing, likewise with the cuffs.  I love the feel of the cotton on my skin, much nicer than the wool!  


Topstitching fulfills my need for preciseness--is that a word?  I love to see how exact I can make it.  Also, don't you think that is the hallmark of a well constructed garment?  I certainly do!  I copied most--about 95%--of the features that were topstitched on the original onto my garment.  

Oh yes, I almost forgot about that cute but pesky little pocket under the flaps.  So, here are some photos of what I did to recreate it.  I really thought it was fun to make the pocket bags out of the cotton, just like the original.  It did cause me a few head-scratching moments but I figured it out after employing my seam ripper too many times!  Has any one ever seen a pattern with pockets like these before?  If so, I'd love to purchase it just so I can read the directions!  


I am very pleased with my new jacket.  I'm not sure I am ready to ditch my beloved RTW dark jean jacket, but I may have to after I wear this one!  


Being allowed to participate in this even had stretched my creativity and my sewing skills!  Please vote for me if you like what I've done!

Sue :)      

Saturday, September 20, 2014

Last week's recap!

So, if you haven't figured it out yet, I am a contestant in the Fabric Mart Fabricista Challenge and I made it to the next round!  Yippee!  Here is a photo of the winner, Ann, from Sew Baby and the BEAUTIFUL dress she created.


This dress is so gorgeous!  Check the fit, perfect!  And the color!  I LOVE purple!  

So, for this week's challenge, we need to take a garment from our closet and recreate it.  This is tough for me as I have been weeding out my closet of RTW and replacing those items with my own creations.  People that know I sew a lot will say to me, I suppose you made that too?  YEP!  Isn't sewing your own clothes just the most fun and enjoyable thing ever?  

Ok, so I'd love to hear from you, what is the one garment in your closet you'd like to recreate--this has to be a purchased item!  I need ideas sewing friends!

Thanks!!!
Sue 

Tuesday, September 16, 2014

The Fitting Challenge!

So, this week's challenge from Fabric Mart was focusing on fitting and using a solid fabric since you can see how a garment actually fits rather than being hidden from florals or other distractions!  Oh fitting!  While sometimes I am perfectly happy with how I look, other times, like when I am fitting pants, I feel like I need to spend the next eight weeks at the gym working with a personal trainer!  It doesn't help that I am a 50+ woman!    So, here is my efforts at fitting pants....


Personally I like making pants.    And, while some people get annoyed reading reviews of the same pattern someone has created ad nauseum, I strongly believe that repeating patterns give you a chance to perfect the fit.  With that said, I created two pairs of pants for this challenge but ended up settling on jeans for my submission.  I LOVE Vogue 8774 and have created them at least four times and while I intensely worked on the fit (again) I still think I might be able to do some additional tweaking.  Know what I mean?


So back to my creation for this week....jeans!  The impetus for choosing pants was the dreadful pair I pulled from my closet last week to wear to work.  They were grey jeans with some bling on the back pockets.  I love the color but HATE the fit!  And, they are super high-waisted when compared to most jeans that sit on the hip bones rather than the true waist.  I felt like an 80's mom!  So, off those went to the charity pile and I set out making pants that fit me and my challenges.


So what fitting issues did I deal with?
1.  Flat derriere.
2.  Wide upper thighs aka saddle bags--which btw are hereditary--thanks mom!
3.  Crotch curve--yes, everyone's is unique and I had to resculpt it to fit me!
4.  Waistline--no matter how carefully I measure and plan, I have to alter the waistline after I create the pants.  Luckily these days I have to take it in rather than out but it is tedious to get it perfect.


So, how did I do all this?
1.  Flatness--I pulled out three sewing books from my library to figure out how to deal with this issue and was surprised that no one really addressed it!  What happens to me is that I get a little pooling of fabric under my buns that looks like a cowl-neck.  I did manage to find an article on line that suggested making an adjustment by taking a fold in the pattern tissue to eliminate the excess, sort of like when you make swayback adjustment.  Now, why didn't I think of that?  I had to work really hard not to over-fit in this area as I stated before my upper thighs are wider than I'd like so too much fitting accentuates my little pools of fat there.  So if you notice just a little extra fabric, that is a preference for me.
Because of the flatness, I had to rotate the back inseam to the front by 3/8" to get the inseams and outter seams to hang right.  I spent a great deal of time bonding with my seamripper for this challenge!


Another thing I did was to make a swayback adjustment.  I completed that by 14" in the yoke and another 1/4" at the waistband.  I like spreading the adjustment out as I think it looks better and feels better when you wear the pants!
2.  Wide upper thighs--pretty self explanatory, right?
3.  Crotch curve issues....ah, the crotch curve!  I get these annoying little lines at the front crotch that I pinched out and took about an inch seamline.  No more lines!
Back crotch curve was a different matter.  With that seamline I made a 'j' seam by taking in an additional 5/8" from the back seamline which you can see below.


Those were my main fitting issues.  Construction wise, I am very proud of how these jeans turned out!  They are very comfortable and I am very happy with the fit!  I like the addition of the white jeans thread I used to dress them up just a bit!


Length is a challenge for me with this pattern.  Being only 5'7", I didn't think I would need to lengthen them but I did by about 1.5".  Just beware of the length if you choose to whip up this pattern!

Friday, September 12, 2014

The Fashionista Challenge, Part 2!

Yes, that's right, I made it to round 2!  Oh my goodness, I am a bundle of excitement and nerves all mashed together!

This time, our challenge is to make a solid colored garment that focuses on fit.  With a solid, you see more of the fitting issues than you do with a print, especially a busy print.  I am super pumped for this round!

You can read more about the contest here: 2nd challenge!

Congrats to Beth from 110 Creations for being this week's winner!


You can totally see why she won.  Her top is beautiful!

Now, off to picking the perfect pattern and fabric!  Stay tuned for more fun!  Thanks also for your support and comments, I do appreciate them!
Sue :)

Victory Lola Dress!

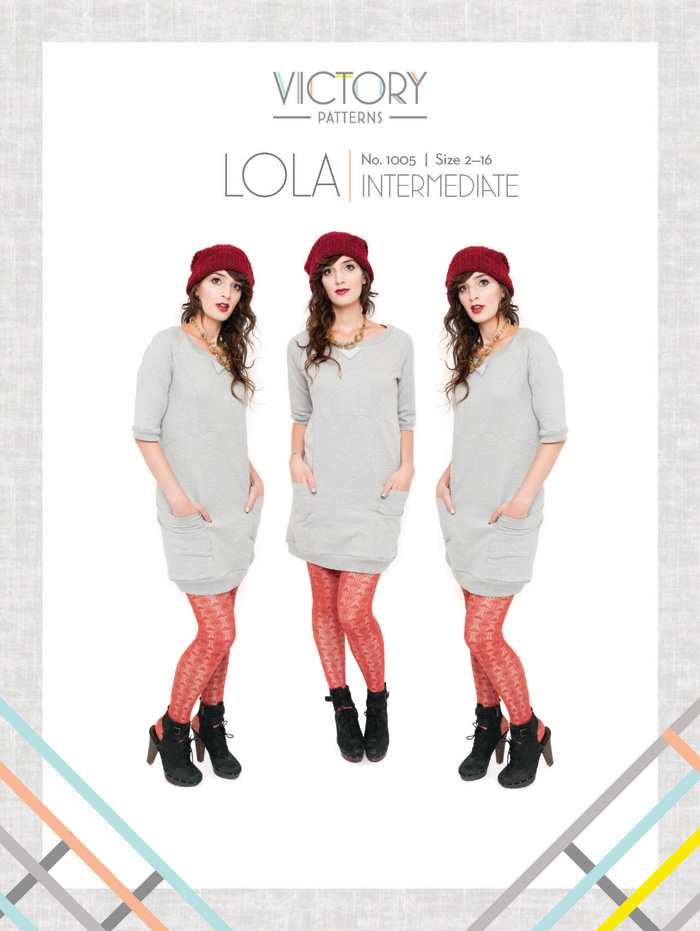
Victory Patterns Lola Dress 1005


This comfortable slip on dress features raglan sleeves, ribbed hem bands, front neckline “V” detail, and oversized wrap around pockets . The curved seams give a relaxed, feminine fit. This project is ideal for a serger and is easy to wear when you want to be cozy in style!

Ever want to feel like you are wearing pajamas all day but don't want to look frumpy or out of style?  Well, this pattern is for YOU!  


THis is a multisized pattern.  I made a medium based on my measurements but found it to run really big so I altered it quite a bit all over by taking it in at every seamline.  Right now, I feel like it fits comfortably roomy, not too large but not too tight.  


I just have to say that I was shivering as DH took pictures outside this evening.  We are having unseasonably cool weather and I should have waited until it was a tad warmer to take the photos.  Oh well!  


I used this ultra fabulous ponte from Emma One Sock.  It is super dark and I can't remember if I ordered dark expresso or black.  All I know is this is the nicest ponte I have ever used and hope they continue to carry this wonderful fabric!  It washed and dried well and sewed like a dream!  After an entire day of wearing isn't all stretched out either!


I just love these oversized pockets!  I didn't have quite enough yardage to make the pockets extend to the hemline nor did I have enough to make the ribbing bands at the neck, sleeve, or hemline.  So, I went to Hancock as JoAnn and I aren't speaking yet, and found this super dark and luscious black spandex knit used for active wear.  The ribbing wasn't anywhere close to the right color but this worked!  

All seams are topstitched and with the pockets I merely turned the bottom edge up and edgestitched and topstitched to hem.  

I really like how the front waistline is higher than the back which dips down a bit and is tough to see with the black fabric.  It gives it some interest and details.  

The instructions are super easy to follow and if you've made a t-shirt or a sweatshirt you won't have any difficulties despite the pattern being rated as intermediate.  I did leave off the little neckline emblem just because of my dressier fabric choice.  Had I used sweatshirt fabric, I sure as heck would have added it as it is cute! 

If I hadn't made this too big, the entire thing from start to finsih  would take only a few hours.  Now that I've made it once, I anticipate it going together even faster!  

What a great dress!  I will make this again and will work on extending the sleeve length, especially if our unseasonably cool fall is any indication of what winter will be like!  

Thanks for reading!  
Sue  

Tuesday, September 9, 2014

My Scout Woven Tee

Ok, so my first challenge with the Fabric Mart Sewing challenge week 1 which you can read about here.  So at first glance, easy peasy, right?  Well, not for miss over-analyzer Sue.  Yep, that would be me!  And that is how I sew....will this work?  Is this just the right fabric for this pattern?  Is this the right interfacing?  Will it fit right?

Sometimes I drive myself so crazy I actually forget to sit and sew but instead contemplate what I am going to do with each pattern and fabric.  Sometimes I actually have gotten to the point of having everything pinned and am ready to make my first cut and then change my mind!  Good thing I am a female!  Truly though, I am working hard to just cut it out and sew something!  So here is my journey with the Scout Woven Tee.

So for the pattern:
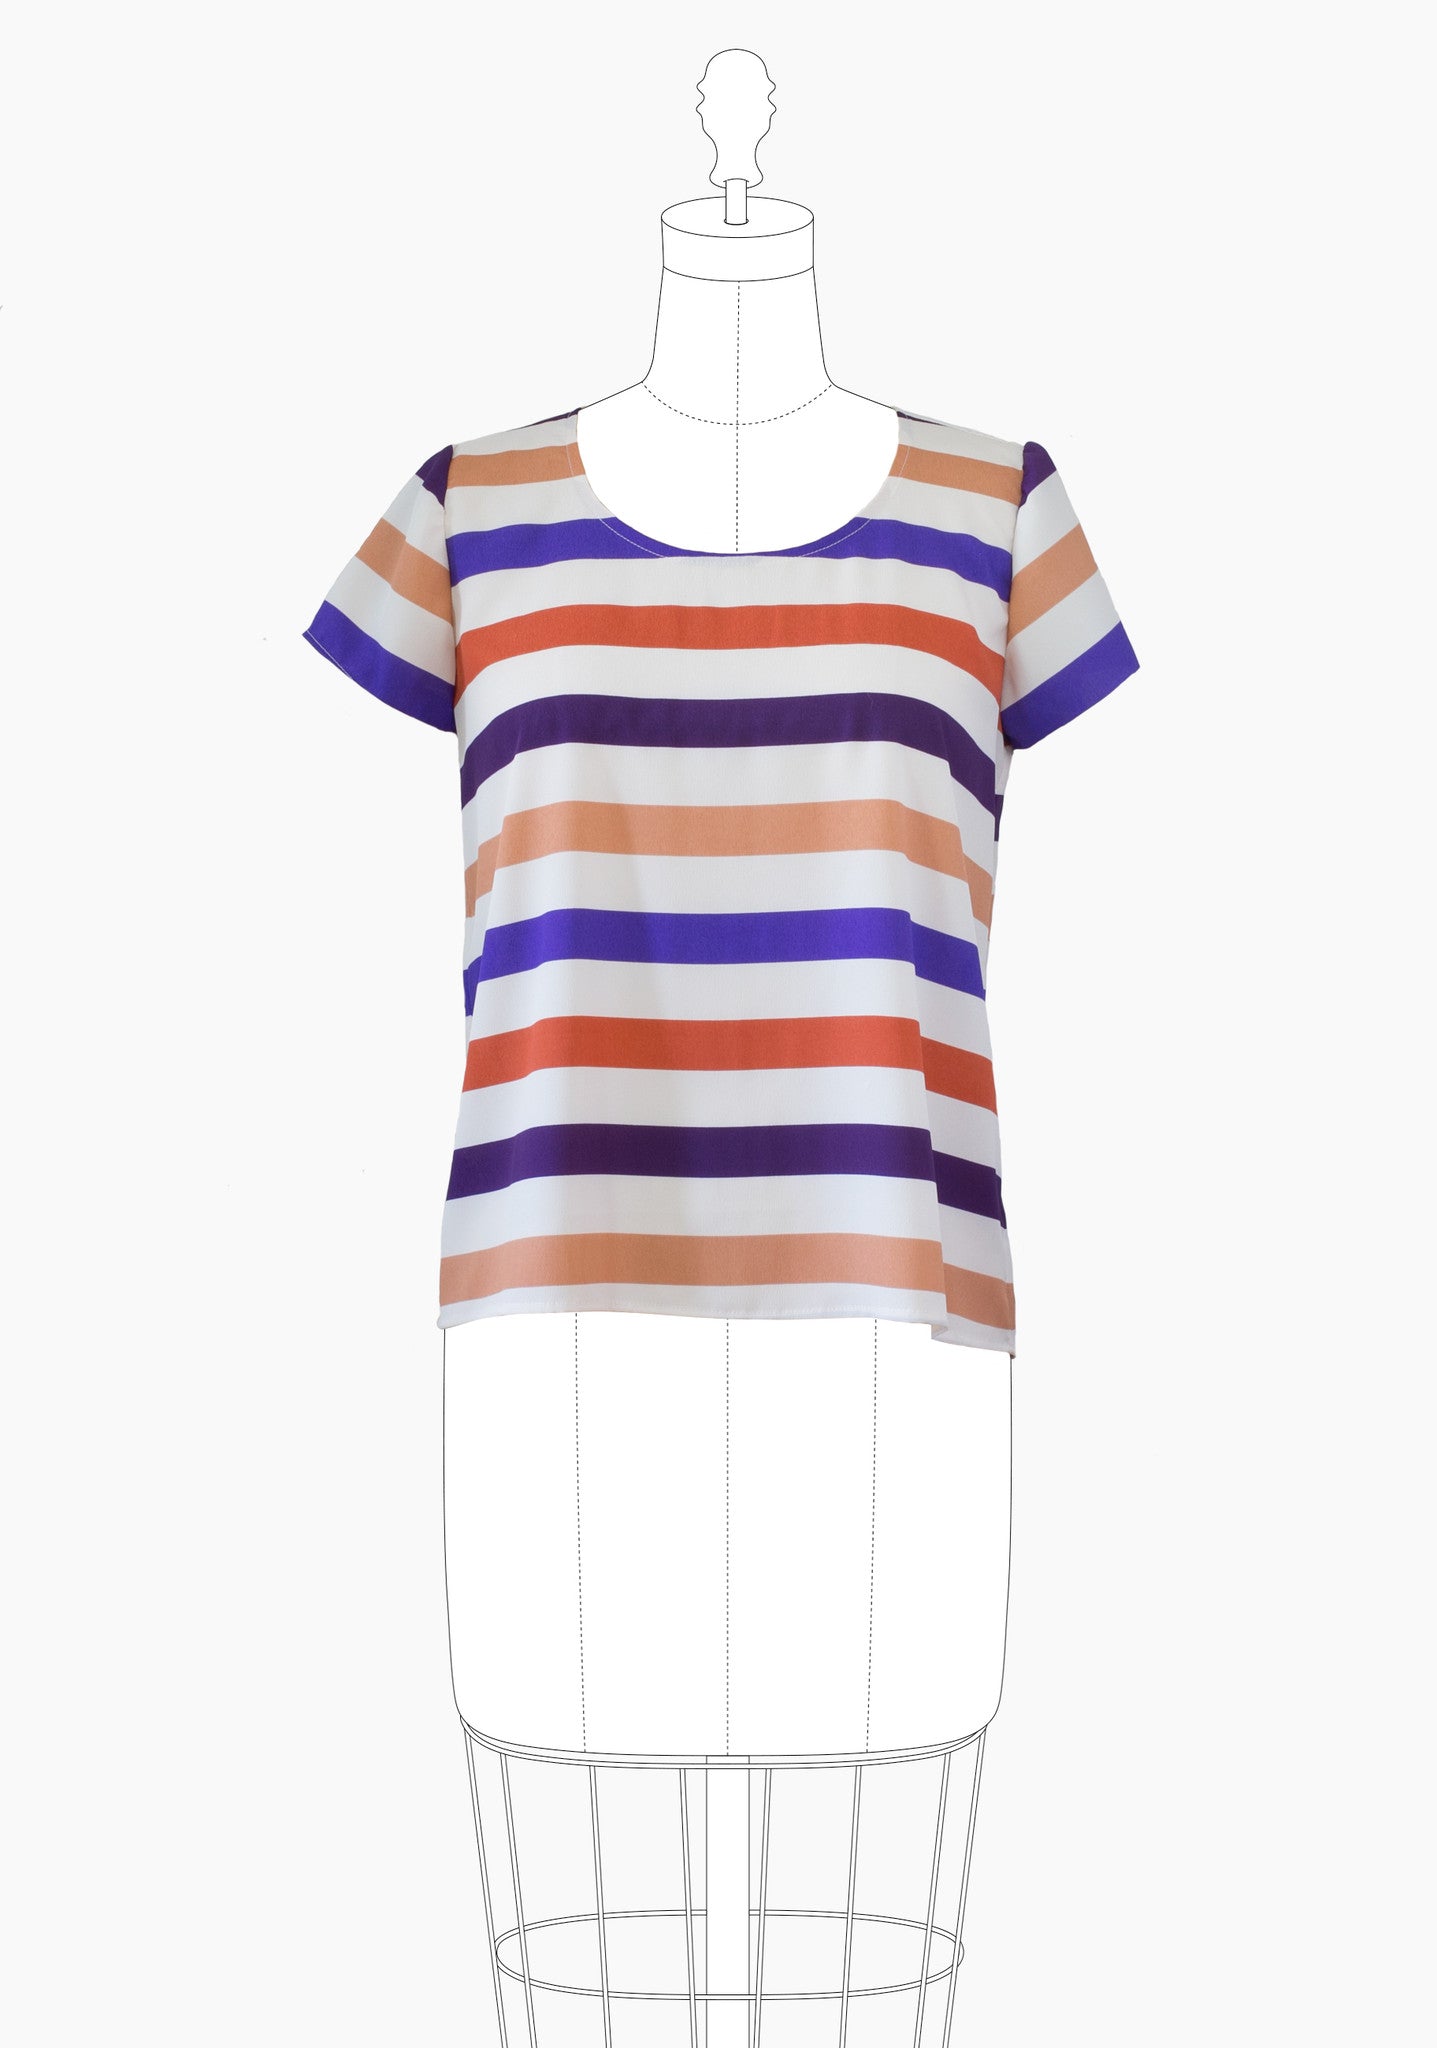
 Scout Tee

Should be no problem, right?  Well, if you read the directions to the contest, you need to make it your own by embellishing and altering the pattern.  Anyone can make a pattern as written, but when you take time to fit it right and to have fun and be creative, it is a process!  Albeit a fun and challenging one at that!

So here is my journey with my very own Scout!

First, the fit....oh the fit!  According to my measurements, I should have made a 14, well, I did that once and although the fit was fine, I wasn't thrilled with it.  You can see that top below.


See what I mean?  It is fine, but definitely not worthy of entering into a contest!  So, I made two muslins, why two?  Well, becuse I wasn't happy with the first alterations and wanted to make sure I loved it, so two I made.

Here is the first, which to me looks frumpy and lumpy.  This is a size based solely on my measurements.  Major modifications are needed!  Agreed?


Look at those drag lines at the bust!  I just think that looser-fitting tops look so cute on a different body type than mine.   I feel frumpy in them!


Ok, so major adjustments needed for swayback, addition of bust darts, smaller hips and waist to start. Wow, so I started pinning this how I wanted it to look and couldn't get the bust to stop pulling at various places so I thought maybe I needed to use my high bust measurement and then adjust for a full-bust.

Sounds reasonable, right?  So my second muslin was a size 10, which is two sizes smaller than what I started with!  I added a bust dart and my swayback adjustment was reduced twice to a total of about 1.5 inches--to  me, that is a startling amount!  Although whatever, it worked!  I struggled with over-fitting the top as I really wanted it more tailored rather than swimming-in looking!  So, enough was enough and here is my second muslin--lesson learned, make more muslins  Why am I such a stinker about this?  I so rarely do it and what a tremendous difference it made in this top!


Here were my other ideas for this top:
1.  Button up back, because I am a sucker for any top that has a button back!
2.  Three-quarter sleeves, because well, fall and winter are approaching rapidly and I'd like to wear this once or twice before putting it away until spring.
3.  Bias-bands on the neckline and hems because I love the look
4.  Color blocking!  I love lots of color!
5.  Silk fabric, so it would be floaty....more on that later.

The process:
Oh the process!  So after making my muslins and transferring the markings to the pattern pieces, I set about to find fabrics.  My first thought was to use silks in three colors.  Let me tell you a bit about the fabric choices where I live, we have a JoAnn's and a Hancock.  There are three quilt shops and a Hobby Lobby.  Do you think I was able to find silk?  Don't spend too much time contemplating, the answer is no!  Hancock's selection was closest with 70% silk but in beige.  Argh.  Next decision was to try and hand dye some fabric to the colors I had envisioned.  But my dye from Dharma Trading Company recommends natural fibers.  What was available to me?  Synthetics.  I don't give up too easily and decided to try and dye 100% poly.  What happened?  Well, it is pretty!  I used twice the amount of dye so I could end up with a deep fuchsia red, but got a baby pink....Grrr!  BTW, the dyed fabric is on the far right.


Next thought was to drive to a local thrift shop and try and find some gently used silk clothing I could dye and use.  Smart, right?  Maybe in theory, but in practicality I found only one top made of silk. My Argh's and Grrr's quickly progressed to unrepeatable four-letter words!  While I was looking for the silks I did find some fabrics I really liked and decided to deconstruct and use in my top.   And, I found two colorways and decided to make not one but two tops so I would have a choice of entries.   I like choices, how about you?


Why don't I rescue more unwanted clothing more often?  I made sure I purchased high-quality fabrics and trims and it gave me another layer of the challenge that I took on!  I really loved the colors in the blues and greens and started with those.

Something I hadn't considered with taking apart previously made garments (most of which were brand-spanking new!) was that the seams and such made it impossible to have big pieces that I could straight cut the pattern pieces.  Creative piecing was in order along with dealing with things such as button bands--check out one of my sleeves!

So with the major portions of the top front and back ready to cut, I had to make a commitment on fabric choices and my only option happened to be the dark blue with the white emblems on it.  Is it bandanna like?  Is it just a random print?  Not sure, but since it was a never-worn dress with a background color I liked, I went for it!  Creative piecing was in order and worked well for my overall design.


Speaking of design, it sort of evolved as I went along.  I found that as I added embellishments, I thought of more things I could do and tried them out.  I mean, how many people use all those decorative stitches on their machines?  I try, but with over 100, I have only scratched the surface and tend to go back to the ones I like the best, and are also the simplest.  Trying to branch out can be difficult, but with the main greenish-yellow band on the front (is this chartreuse?) I knew it needed some sort of dark blue stitching on it.  I like the effect.  Super easy, but very creative, amirite?  


I also found this baby and normal sized rickrack in my stash and in the perfect colors!  It had to be used, it is a match made in heaven!  I also used it down the center back seam which was originally going to be a button back, but I thought that might border on too much, and added just the right amount of touch I wanted and felt was needed.

Other parts of the construction process included bias bands on the neckline that flipped to the right side which I show in process here:


Also, I had to use this button band down the sleeve, you would too if you had the chance, right? 
Baby rickrack highlights the seam as well.  


So enough about all this process nonsense, let's see more of the final result!


So, now I am wondering what your thoughts are?  Have you done anything like this before?  What did you think?

Thanks for reading!
Sue