About Me

My photo
Sewing is therapy for me. I hoard fabric, patterns, notions, and spend more time shopping for fabric than I care to admit...

Sunday, November 29, 2015

And...I liked it so much I made another!

So....if you saw my sewing room, you'd wonder how I get anything done or know where anything is lately...it's not good, but it isn't beyond repair yet!  Since things are a little untidy, I still had out the StyleArc Mara pattern and decided to give it another go.  I mean, I love this pattern, so why not?

The classic shirt dress featuring a fly front, pleat pockets and two piece sleeve
As others who've made up this pattern have noted, this pattern doesn't include the tabs and rolled sleeves, although it would be easy to add those elements either by drafting the tab yourself or using another pattern as a template.  Never mind this goofy look on my face below, I think I was about to tell DH to make sure to hold the camera steady or some other really useful information like that.


This fabric--isn't it gorgeous?  It is a designer cotton brocade from Ralph Lauren I purchased from FabricMart.   The colors, texture, and weight of it is just wonderful!  I thoroughly enjoyed working with it and think it made they perfect weight for a winter time dress.


The first time I made the dress, I used a much lighter weight cotton which worked beautifully.  This time with the heavier cotton, I added about 1/2" to the center back seam from about an inch below the neckline to the waist.  The dress isn't uncomfortable at all or pull or anything like that but I thought it might be a tad snug and slightly restricting movement if I didn't make a slight alteration.  It worked great!


The only other design alterations I made were to leave off the flaps on the patch pockets and also to add the side seam pockets.  I typically don't sew in side seam pockets simply because I don't like adding any girth to my hips.  ;)


I cut this dress out on the cross grain to take advantage of the beautiful border print and can you blame me?  It would have been a shame to not use that as a design element.


I really love this pattern, can you tell?  I'll put it away for now, maybe!


Thanks for reading!
Sue

Tuesday, November 24, 2015

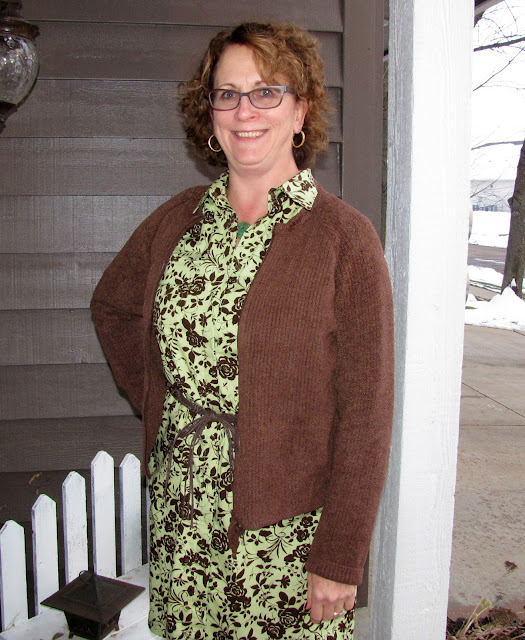
Bright floral shirt dress just in time for winter

I love shirt dresses.  They are comfortable.  You can make them super casual or dressy depending on your fabric choice and accessories.  I've had this fabric from quite a while.  I love the play of the brown floral print on the green.  Green is one of my favorite colors to wear. It also works well with this super comfy sweater I've had forever but still love!

The classic shirt dress featuring a fly front, pleat pockets and two piece sleeve

I have a few patterns that I really like for tunics but this time I wanted to use a pattern that was longer and had something other than a super boxy shape like the Archer or princess seams like one of my favorite McCall's patterns.  In waltzes the Mara by StyleArc.  I think all of you know how much I love using StyleArc's patterns.


I sort of feel like the pattern line drawing and the description don't match.  I think the pattern looks loose-fitting however the description is of a close-fitting garment.  Not that I minded, but what you see is not what you get.  This dress has a fly front or concealed button front which was fun to construct although the directions are confusing for this.


The pattern has fold lines marked with the numerals one through three and to construct the button fly, you make a series of folds that create this cool fly feature. My advice is to mark the lines carefully, practice folding but for goodness sake! Don't over think the process but look at the drawings for what it needs to look like when you are done.


Also, there aren't any directions on what to do with the raw edge of the fly.  There ended up being about 1/4" that I folded under the fly and when the stitching is completed to secure the layers it works perfectly.


Another issue with the directions is that they weren't very well proof read.  In fact, it seems like they were pretty haphazardly put together.  There are lots of references to follow tutorials on the StyleArc site which I didn't do.  I've made many shirts with stand collars so I know what the process is and can put one together pretty quickly.


Drafting for this one wasn't up to Stylearc's usual standards.  I found the sleeves difficult to set it. Typically StyleArc's sleeves are BEAUTIFULLY drafted and seem to fall into place quite easily. These were a struggle!  I used about 100 pins to ease the sleeve heads in and that worked but dang....not what I was expecting or hoping for!


All in all, I do like this dress.  I will make some additional modifications next time i use this pattern.  I made my usual 1/2" swayback adjustment and I need a lot more next time.  I plan on wearing a belt with this so I think it won't be as noticeable.  I feel like I've complained about this pattern quite a bit but I do like it!


Likes:
Fit--not too boxy
Sleeve length is perfect and have nice shaping with an upper and lower sleeve
The button fly front is a nice touch
The button cuffs go together well and look nice
The collar and collar stand went together easily and eased into the neckline really well
I like the patch pockets with the flap and the box pleat
I like how this fits through the shoulders


Dislikes:
Sleeve head isn't drafted as nicely as some other StyleArc patterns I have used previously
Fit doesn't match the drawings on the pattern
There are a LOT of buttons on this dress!  Three for each cuff and I think 9 marching down the front. I used brown plastic snaps so the process was much faster than sewing on all those buttons and making all the button holes.


What do you think of this dress?  Is the pattern a keeper?

Thanks for reading!
Sue :)

Monday, November 16, 2015

The Pearl top from StyleArc

The Pearl Knit top was a freebie in October and I had to order anyway so....

Draped side knit top with long or short sleeves
Isn't this just comfortable cute?  It looks like a sweatshirt you can't wait to pop on at the end of the day or hang out in for the weekend.  I found it to be a tad dressier than it is pictured above...we will see what you think!

Here is how it is described on StyleArc's site: The gorgeous draped side panel cleverly creates an interesting pocket detail.  The asymmetrical hemline adds a stylish effect to this on trend top.  Mix it up by using different textures or colours.


  I used a lovely knit I purchased from a local quilt shop which decided to sell off all their fabric and focus on software, machines, notions.  Anyway, I bought the entire dang bolt of this Michael Miller that has a bit of lycra in it.  


Can you see the construction process I messed up on?
That's right, the pocket should be on the other side.  You cut each piece individually and I had the fabric wrong-side up and therefore everything was reversed.  


I found this top to be much more asymmetrical  than shown in the line drawing.  I also found it longer than expected.  I am 5'7".  StyleArc patterns are usually the perfect length for me, both in sleeves and in the torso and this was no exception.  I love it when that happens!


As you can see, there really aren't many seams to this tunic.  There really aren't that many steps to this top either.  And for StyleArc, the directions are adequate even for them!  If you have some knowledge of putting together knits and have put together basic tees or a sweatshirt, you'll be able to figure this out.


Don't stress over the dropped pocket.  Just read the steps and make sure you have carefully clipped your notches, match up the corresponding letters and you'll be fine.   To reinforce that bit of stress on that part of the top, I reinforced it with a small piece of silk organza sewn to the seamline prior to attaching the dropped pocket piece.  I just felt better about putting this together if I reinforced the area. Maybe I am an over-anxious seamstress?


I made a straight up size 12 and the fit is spot on.  No FBA was needed for me.


I taped the shoulder seams with stay tape and it worked beautifully.  A few things I really appreciate about StyleArc is the drafting of the shoulders and necklines.  The neckband went in perfectly....just perfectly!  It lays nice on your neckline...can you tell I love the drafting of this?

Another winner from StyleArc!

Thanks for reading!
Sue

Thursday, November 12, 2015

Another McCall's winner 7254

I love the shape of this jacket: check it out!


It looks cozy and I love that it isn't boxy but somewhat fitted.  This can be sleeveless, without the collar, color-blocked, or a shorter length.


I made view C, which is a bit shorter than the view shown above.  I wanted to make the longer length but I didn't have enough fabric.  I barely had enough to make this view and found out when I was almost finished that I didn't cut two back peplums.  I made it work, but dang!

This pattern is described as: Misses' cardigans: unlined cardigans are close-fitting.  A, and armholes, B, D: Narrow hem.  D: Purchased toggle closing.  B, C, D, E: Self-lined front (extends into collar variation) and back peplum.  A, C, E: Stitched hem on sleeves. 


I used a beautiful jacquard double knit I purchased from Fabric Mart.  I really loved working with it.  It has a fantastic weight and I used a very light-weight interfacing I purchased from Fashion Sewing Supply.  I thought about not using it, but decided to anyway and am glad I did.


How I fixed that little mishap with only one peplum was to hem it with my coverstitch and then attach it to the lush collar.  I then attached the facing side of the collar and at the sides where the peplum joins in, I turned in the side seams and topstitched those to the collar piece.  It worked great!  I was a bit concerned that the peplum area wouldn't lay nicely but it does, don't you think?


I love cozy cardigans like this.  They are perfect for layering.  Camis are perfect for fall/early winter and during the deep cold, a long sleeved tee makes it even warmer.


I made very few alterations to this pattern: mu usual 1/2" swayback adjustment
I lowered the bust apex by about an inch and made an FBA.
Easy, peasy!

I used my coverstitch for the hems on the sleeve and peplum.


This is a great pattern!  I'd love to make another one in a sleeveless version.


Thanks for reading!
Sue

Sunday, November 8, 2015

Wonderful wool made more special with Cashmere!

The StyleArc Livia I made earlier this fall has been playing on my mind...I simply wasn't ready to file the pattern away.

Classic jacket with pocket treatment
I've had a beautiful wool/cashmere in my stash for a year.


I'd purchased it while at a conference in Billings, Montana.  It was on sale but it was still pricey but so soft, and I am a sucker for a muted plaid.


It was my destiny and I knew once the perfect pattern came along, I'd be ready and it would be hopefully fabulous!  What do you think of the result?


Obviously it has changed a bit from the pattern, but that is what makes sewing so much fun!  Here are my alterations/modifications:


1.  Half-inch swayback adjustment
2.  Half-inch sloping shoulder adjustment
3.  I added just one pocket and the band is a contrast, off-white wool/cashmere purchased at the same time as the plaid and I decided to attach it so I could fringe the edge
4.  Added nine shell buttons to the front
5.  Hong-Kong finish on the inside made even better with the addition of a decorative stitch


6.  Cut out each pattern piece after matching the plaid at the seamlines--I hope this makes sense!  In other words, I took a great deal of time to cut this baby out!


I thought about lining the jacket but with my age-bracket these days, additional layers of fabric are too much for me.  :)  Those of you in the 50-plus crowd know exactly what I mean!


I really love this jacket...can you tell?  I've worn it twice now and received many compliments!  I love it when that happens!  Look how windy it was today when we were taking pictures!


Thanks for reading!'
Sue

Thursday, November 5, 2015

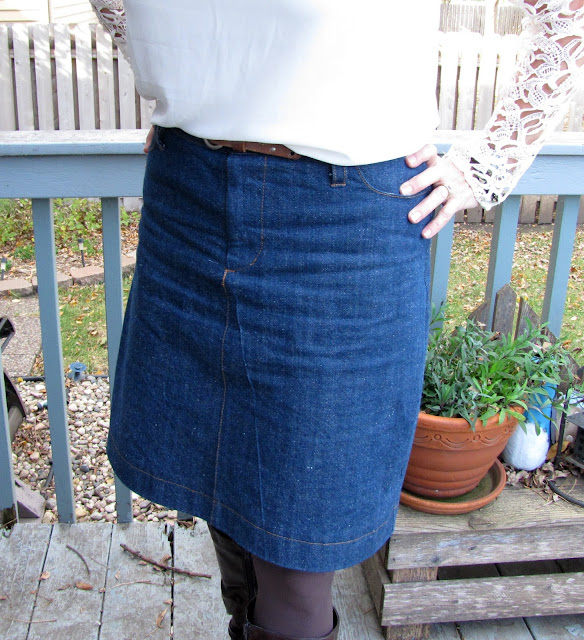
StyleArc Sally Jean Skirt--winner winner, chicken dinner!


Do you ever come across a pattern that you must try, purchase it, and then don't use it?  Welp, that was me.  Why?  Not sure....still kicking myself for waiting so long.

Great knee length jean/denim skirt


This pattern is rated as challenging by StyleArc and is a basic jean skirt with classic styling.  


If you've put together a jean skirt or a pair of jeans/pants with a real fly front, you'll find the directions really good.  


If you've never done that type of a garment before, then use some directions that have extended visual and written directions.


Just to give you an idea of how many flys I've done....it's more than 10, which isn't a huge amount, but I do feel confident putting them in.  


Sorry for the wrinkles...I wore it to work today.  Super comfortable.  Just the right amount of ease to be comfortable and not loose or sloppy looking.  


I made this as is....no alterations at all, however looking at the photos I think I will make my usual swayback adjustment of a 1/2".  


Just for a reference, I am 5'7" and the skirt is a great length.  I put in an inch and a half hem and it hits me a few inches above the knees.  


The rendition show the finished skirt a bit longer, but I like this length on me.  


I used a denim I purchased on Amazon and it is called Cone Denim.  I found it as a kit on the sewing blog, Closet Case Files.  I wanted to try the denim without a big commitment and this piece from Amazon was the perfect size and weight for this skirt.

The topstitching thread came from Wawak and is 'Levi gold'.  It worked beautifully.

I love my new skirt and can see this becoming a TNT.

Thanks for reading!
Sue