About Me

My photo
Sewing is therapy for me. I hoard fabric, patterns, notions, and spend more time shopping for fabric than I care to admit...

Tuesday, May 24, 2016

More StyleArc love....

Why do I wait so long to post my makes?  I've had this tabard and pants made for probably two weeks but just haven't had time to post about it.  Better late than never, right?
This designer tabard is a great versatile piece that can be worn over a pant, as well as the Cleo dress

So first up is the Tania Tabard.  What is a Tabard you ask?  Well, I had no idea so I turned to Wikipedia for an answer and here was mine:
tabard is a short coat common for men during the Middle Ages. Generally used while outdoors, the coat was either sleeveless or had short sleeves or shoulder pieces. In its more developed form it was open at the sides; and it could be worn with or without a belt. Though most were ordinary garments, often workclothes, tabards might be emblazoned on the front and back with a coat of arms (livery), and in this form they survive now as the distinctive garment of officers of arms.

                                    
And a more modern interpretation, also from Wikipedia: In modern British usage, the term has been revived for what is known in American English as a cobbler apron: a lightweight open-sided upper overgarment, of similar design to its medieval and heraldic counterpart, worn in particular by workers in the catering, cleaning and healthcare industries as protective clothing, or outdoors by those requiring high-visibility clothing.
Ok.....Now the easy part of the review: the Beth Stretch Woven Pant: 
Pull on woven stretch pant with wide waistband and the perfect leg shape
From the StyleArc site: this is an updated version of the Barb Stretch pant with slimming design lines.  This is my second make from this pattern.  My first was a stretch bengaline I purchased from StyleArc.  This time I made them in a heavy ponte.

Here is my completed outfit.  I left off the front twisted overlay.  While I left it off, it truly was one of the things that drew me to the pattern in the first place.  Why did I leave it off?  I did because it didn't work for this fabric.  This linen blend was far too stiff  to lay properly and drape as it should.


Under the overlay there is a tuck but I decided I didn't need that either.  Ignore my partially closed eyes.  DH caught me mid-blink.  


I like how this tabard fits: not tight, but not loose either and those side-slits are awesome.  Can we talk about side bra coverage?  Nothing shows at all.  Yippee!  


I also like how the shoulders, back, waist, and hips fit on this.  It is slightly different from the line drawings, mine isn't cut in so far at the shoulders but I like how this looks.  


And, here's the pants.  Sorry to start you with a booty-shot.  I love the wide waistband.


 Even with my borderline flat rear, these aren't very baggy on the back upper thighs.


And I do like the design lines on this pant.  They do give it some style and talk about comfort!  These are amazing!  


I purposely made this ankle length so they would be sandal appropriate.  I made zero alterations to the pants.  That is just how awesome this pattern is.

I love my new outfit and can't wait to wear it.

I appreciate you reading my posts and love to hear your comments!
Sue

Sunday, May 22, 2016

Another dress for summer..McCall's 7351

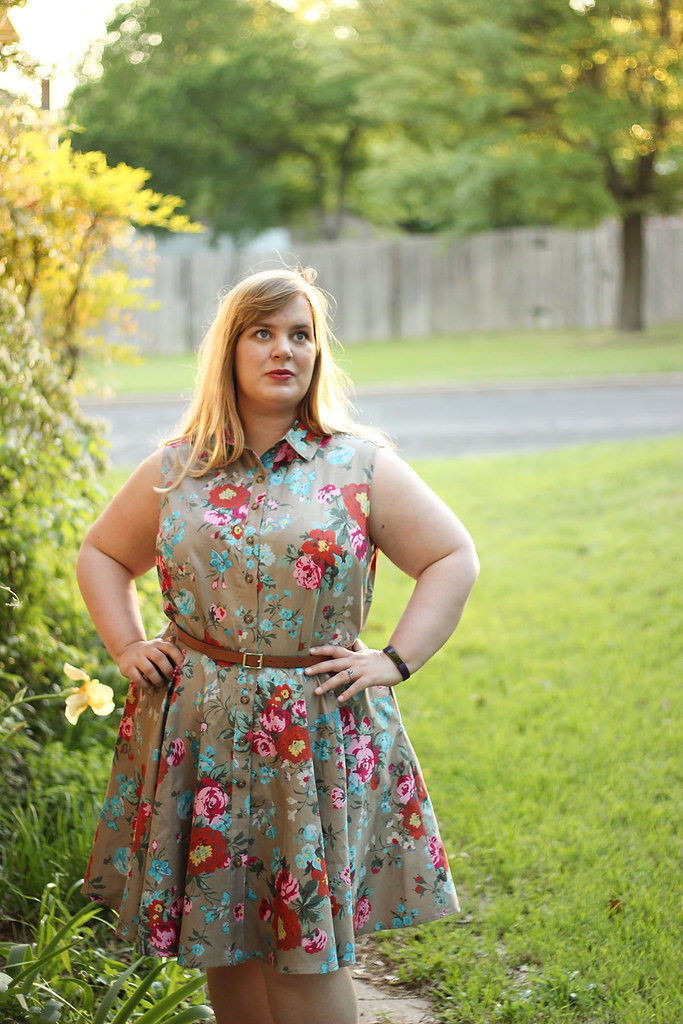
When you find beautiful fabric are you like me and rush to snap it up?  That's exactly what I did when I saw a fellow sewer make a lovely shirt dress with this same fabric I used. And, here is her dress:


She had a clickable link to Mood fabric and I snatched it up right away!  I wish I could remember her user name and I would share he blog post, but I am not that organized to have saved it but I will tell you that if you click here you can see and order some of this pretty fabric as well!

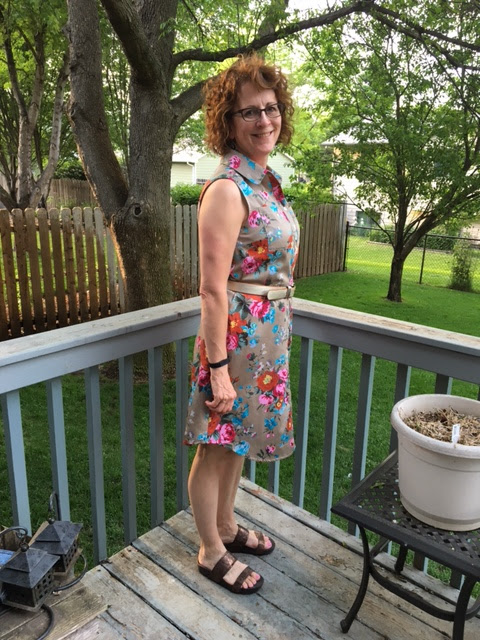
So back to the task at hand...let's look at McCall's 7351, which BTW is the same pattern I used!


I made view A sans lower pockets.   I just didn't think those pockets added to the overall look.  Do you?


I just love how summery and colorful this fabric is!  It is lightweight and very breathable.  I love the lower-in-the-front/back and higher-on-the-sides look.  It is a bit different but not too dramatic.  


I made a size 14, my usual size in McCall's.  This pattern has custom fitting for cup sizes from A/B to D.  I made the cup sizing in a C along with sloping shoulder adjustment.  Those are the only alterations I made.  Typically, I also make a swayback adjustment but when there is a waistline seam, it seems like I don't need that alteration.  


I really love how there is little gaping at the armscye so the bra is covered.  


The back is really great as well.  I love the detail of the back pleat and yoke.  The yoke is lined with the main fabric so that the inside looks nicer and tidier than it would if that wasn't lined.  


I've made enough garments like this that I didn't read the directions word-for-word but I will say that the order of construction was well thought out and logical.  All the pattern pieces fit together well and the pattern seems well drafted.


This dress is made for a belt and I had this Fossil belt in my wardrobe that gets used frequently.  Did I mention that I really like the collar, collar stand, and front bands?


For some unknown reason, I had a whale of a time stitching on the collar band.  This has nothing to do with the pattern or the drafting but only me and my lack of sleep from the previous night.  I finally just cut both pieces out new and started fresh.  It made all the difference.  

Thanks for reading!  My only minor complaint about this pattern is that while it looks shapely on the envelope, I don't think it does anything for me but to make me look more rectangular than I am.  Am I imagining things?  I still love the dress and will wear the heck out of it!

Sue :)

Monday, May 16, 2016

Another summer dress--McCall's 7350

I fell in love with this pattern the first time I laid eyes on it.  Can you blame me?  I love the neckline and the cross-over, high-low hemline.     


I made a mash-up of the length of view A with the bodice of view C/D.  


This was fun to put together.  I used this super-soft yet able-to-hold-its-shape ditzy floral knit from Fabric Mart.  I had no idea what I was going to make when I purchased it but I let it stew for a bit and came up with this fun dress.  


Typically I make a several alterations to patterns but this is sewn as is based on the shaping of the bodice.  For bodice C/D it is a loose-fitting.  Normally, I make an FBA, sway-back adjustment, sloping shoulder adjustment.  For this, I made just the sloping shoulders.  


Yes, there is that much ease in the bodice!  I didn't think the cross-over in the front skirt was as pronounced as the pattern tissue indicates.  Just watch for that! I do think that there is plenty of coverage as I tested it out when I walked around the house and yard.   


My deviations from the pattern were so minimal!  I didn't add the elastic casing at the waistline as I didn't think I needed it after I tried the dress on.  I haven't worn this all day yet, so if I change my mind on the elastic, I will update this post!  What I think is key is to pick a knit that has excellent/good recovery after stretched.  


The midriff lining piece is a very nice touch and gives the top stability at the waistline.  My only minor complaint with this pattern is the amount of armscye droop.  I must wear a cami with this one! The v-neck is also pretty low cut and the cami will help with any possible wardrobe malfunctions.  


 I really like my new dress!  Both DD1 and DD2 said this was frumpy.  I don't see frumpy at all.  I see a casual, summer work appropriate dress.  What say you?  Were DD 1 and 2 right?  

Thanks for reading!
Sue :)  


Saturday, May 14, 2016

A little summer dress in chambray

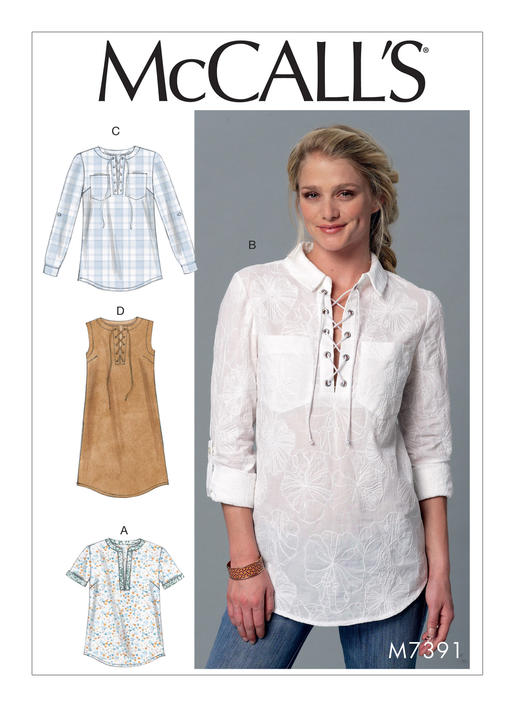
I love Chambray, it is super comfortable, sews together so well and looks great in so many ways!  I decided to make my May contribution to Fabric Mart based on a cute little McCall's pattern, 7391 in a dress.


I LOVE this fabric.  It is soft, holds its shape, presses beautifully, and the color!!!  My oh my, this is my ideal shade of Chambray blue.


I like adding little bits of hardware at times and since this pattern had grommets, I had to try it out. McCall's patterns are the ones I sew the most often and I know what steps I need to take to make the garment fit me.

McCall's Misses' Laced or Split-Neck Tops and Dress 7391

When you prepare your pattern tissue according to your fit, it makes construction very easy.  I made an FBA, swayback adjustment, sloping shoulder adjustment and that's it.  Although when you make a sloping shoulder adjustment you also must decrease the height of the sleeve cap and lower the armscye so the sleeve isn't too tight at the shoulder.


This pattern is stated as loose-fitting but don't believe it.  That would mean it has between five 1/2 and eight inches of ease from the bust down.  This dress has no where near that, but I could tell by looking at the photograph of the model on the pattern envelope.    I purposely made mine garment a bit snugger than that, more lie a semi-fitted dress.  And, I laced my differently than the pattern envelope suggests, just because I can.  :)


My serger was being serviced when I made this little dress and I wanted a very nice finish on the insider as well as the outside so I decided to make flat-felled seams throughout.  If you've never made flat-felled seams, don't fear!  They are easy and quite fun and give you such a RTW finish on your garment inside.


To make a flat-felled seam, sew your seams allowances with the typical 5/8".  Press the seam open flat.  Decide which direction you want your topstitching to show on the garment right side and cut the appropriate seam to a scant 1/4".  I like to use applique scissors for this step.


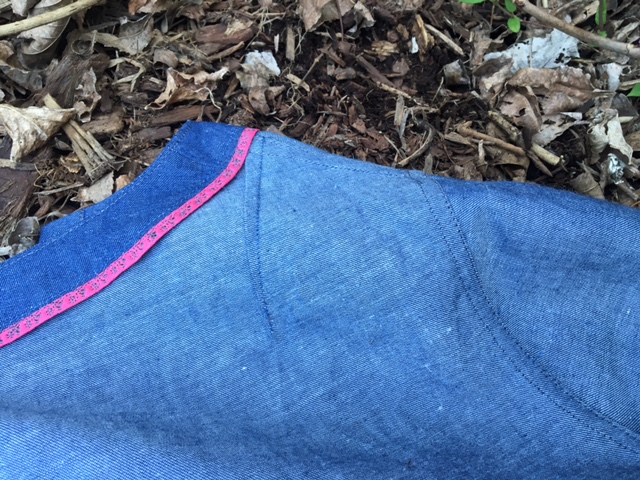
Next, press the untrimmed seam allowance under by 1/4" towards the seam you just trimmed.  Lastly, stitch close to the fold line.  If you've sewn accurately, pressed and trimmed accurately, you will have a seam that is very precise and looks very good on the garment right side.  When I stitch down the felled part of the seam, I use my edge stitching foot, move my needle over three notches, and increase the tension on my machine.  I love the results I get.  Below you can see the flat-felled stitching from the inside of the garment.


It is also fun to add an element of surprise to a garment whether it is inside or out.  Since my serger was out of commission, I added this bright pink bias tape to the lower part of the facing and used a decorative stitch to attach it.  I really like the pop of color when it is hanging up.  


This was a great, beautiful, and fun fabric to sew with.  Choose a pattern you love, get a great fit, accessorize, or keep it simple and sew yourself a great dress with some chambray!

Thanks for reading!
Sue

Friday, May 6, 2016

Loving StyleArc!

I know, I know....I have a thing for StyleArc that I just can't help but instead of apologizing, I am going to show you my makes!  I haven't been blogging much simply because I've been busy.  This time of year is always nuts at work and my second grandson was born four weeks ago so life has been a little crazy!  But, I love it!  Would you just look at this picture?  Grandson number one, who is 2.5, is holding and kissing his little brother, 2 days old.  I just love this photo!


I know you aren't here to tell me how beautiful my grandchildren are, so let's get back to sewing.  :)

Here is an outfit made from 2 StyleArc patterns.  The first is the Kim Swing Top.  Here is what it looks like:

Jersey swing top with an asymmetrical hemline and short sleeve

This is a newer pattern from StyleArc.  It is described as a Great everyday jersey top with style.  Featuring an asymmetrical hemline, round neck and short sleeve, a staple piece for your wardrobe.  
Directions for this top are very straight forward and there is only four pieces to the pattern.  If you've made a tee-shirt, you can tackle this top.  I do feel like StyleArc is attempting to upgrade their directions.  There is even a helpful diagram included with this pattern.  '


Next is the Barb Stretch Pant.  I've made this pattern twice now, once in stretch Bengaline, that I ordered from StyleArc, and the second time in a beefy ponte that worked great!  I had read somewhere that StyleArc patterns were known for their fit and drafting on their pants patterns and I thought, "What?"  I have only tried one pant pattern from them and I really liked it for some reason the lights didn't blink at me nor did any bells go off to say, "Try more of the pants patterns!"  Sometimes I am really dense!

Pull on woven stretch pant with wide waistband and the perfect leg shape

Both garments were fun and quick to put together.  For the pants, I made ZERO alterations to the pattern.  I love how these fit and I love the stretch bengaline I ordered from SA.  The Kim top was made from fabric from my stash and I love the movement of the wavy lines.  DH also gave his stamp of approval.


My only deviation from both patterns was to use my regular sewing machine on the top's hemline.  I put my coverstitch in time-out for the next couple of days so I used a single needle stretch stitch and honestly, it works just great!

Any alterations I made to the patterns were confined to the top.  BTW, I love how it falls from the shoulders.  I love the folds it naturally makes; it feels graceful and fun when wearing.


Typically, I make a swayback adjustment, a sloping shoulder adjustment and also an FBA.  I did that with this pattern as well and am pleased with the results.

I love my outfit.  It is comfortable to wear, washes beautifully and is so darn comfortable!


Sorry for the close-up of my side, but I wanted to show you the design lines on the pants!  
Thanks for reading!
Sue