About Me

My photo
Sewing is therapy for me. I hoard fabric, patterns, notions, and spend more time shopping for fabric than I care to admit...

Tuesday, July 22, 2014

Lekala Top! Blouson 4284 X 2!

This is my first Lekala pattern and it won't be my last.  I had a lot of fun making this top that I am super happy with and really like!

So here is a little bit about the company.  It is based out of Russia and what is super cool is you pick your pattern, send them your measurements and you get a customized pattern as a PDF.  How awesome is that? I paid and extra 50 cents for the addition of seam allowances and feel like that was well worth the extra charge.  I told DH what I had done and he made a comment about overseas merchants and credit cards and since I used my paypal account, he was immediately relieved.

There are four pattern pieces to this top.  Isn't the line drawing cute?  I love tops with details in the back, it is unexpected and just makes sewing it up super fun!


If you don't speak Russian, it is okay.  The patterns and directions can be translated.  Although with that being said, as I read through the instructions I had some difficulty deciphering them.  Maybe the translation is a little off?  Not sure, but with such a simple top, it is pretty intuitive in how to put it together.  If you are a beginner, if you can find a similar top's instructions, I am sure you could use those and it will work out just fine.


So for my tops, I changed things up a bit.  The first one I made is the lightweight print that I pulled from my stash.  The directions simply have you 'serge, turn inside and topstitch the neckline'.  I only did that in one place and that was the main body of the back that has only a slight bit you can see when you are wearing the top.  I knew my fabric was thin and I didn't want a turned and stitched neckline or back yoke where the cute bow detail is so I did this:
1.  Cut two from and back yoke pieces
2.  With right sides together, stitch the neckline or in my case serge the edges.
3.  From the right side, press the seam
4.  Understitch the necklines, both front and back
5.  On the underside of the back yoke, stitch the seam with right sides together
6.  Repeat step 3 and 4
7.  Stitch the completed back yoke to the back top piece
Now you have beautiful finished edges on both the front and back necklines!  And, it didn't take hardly any extra time and it used up some of my scraps I had from cutting out the main fabric.  Bonus!  I am trying to not save scraps anymore.


I used my coverstitch on the hemlines.

At first I wasn't too excited about the darts as I really don't like darts in t-shirt fabric.  But in this case, they seem to work.  I also think I could make a swayback adjustment.


All in all, this went together fast, is easy and I really like it.  My only complaint is regarding my fabric choice.  Both are very light weight and see through so I am wearing a cami underneath.  I should have chosen better!

For top 2, both fabrics are from my stash.  The main fabric is more of a ponte and the lace is a knit as well. DH likes the printed top better but I like them both.

I do highly recommend this top.  It's a little different and if you don't mind taping together a PDF, you'll be ready to sew in a short time after receiving the pattern.  From start to finish, it took me about 2 hours to complete this top (this includes assembling the PDF!)

Although 2 is enough, I think I will make an additional top or two for fall/winter months.  It will be easy to lengthen the sleeves and as long as I remember to use a more substantial knit, it will be plenty warm as well!

Thanks for reading!
Sue

Monday, July 21, 2014

Vogue 1204 pants

Yep, another pair of pants but this time with a different pattern.  After reading another reviewer's comments on Vogue 1204, I had to try it and to make my decision easier, this pattern was on sale!  Yahoo!

The pattern envelope describes these pants as fitted below waistline pants has front side slant pockets, back patch pockets, fly zipper closing, back yoke, waistband, carriers, and topstitched trim.
 

This is a designer pattern from Issey Miyake.  The fabric this designer choose is super funky and I had passed by this pattern numerous times based on the fabric selection but after having so much luck with my other pants seen here I decided to give this one a try as well.


This pattern is rated as advanced and for the jeans, it is a tad more involved than Vogue 8774 .... however with that being said the designer details are sort of fun and I like many of them.

This is actually my muslin.  This fabric had a great weight, but it has some 'lines' through it which I believe to be just part of using denim.  Hopefully after a few washings the lines will blend it more.


Ok, so let's talk about the construction process.  There are 57 steps to these pants and a total of 13 pattern pieces.  Four alone are for the front pockets!  I didn't mind, but not sure all the fuss was totally worth it.  Each pocket (facing and lining) is cut from something other than the main fabric yet has a piece of the main fabric so you don't know that the pockets are constructed with something else.  The result is a very nice and non-bulky pocket that is also nice and deep.   


The directions also have you make a binding for the fly and fly facing which I did using the pocket fabric.  I like how it looks and makes the inside look neat and tidy.  I would highly recommend using a very lightweight fabric for this that won't add bulk.

The fly went together really well and I think that the directions for those steps were well written and easy to follow.  One thing about the fly facing, sometimes the facing is too short and doesn't cover the bottom of the zipper, well this one does!  See that little fraying along the seam?  When I took these apart to reconstruct them, (more on that later) I ended up serging that seam so the fraying is gone.  That is one thing that bugs me about pattern directions.  That seam is never finished and yet I still forget to do that at times!  I was hoping that the stitching would secure the loose threads but they didn't.  Even though no one but me will see it, I am much happier with those little details. 
 

So, I made some alterations to my original garment.  I tried these on several times as I was constructing but sometimes you can't see the full effect until it's all put together.  (Sigh!)  I just wish I hadn't done all the topstitching but I did and then had to remove it all.  Luckily we had a long car trip and it gave me a lot of time to take it out.  So, my alterations were to take in the yoke seam by 3/8", take in the back and front crotch seam by 3/8", and lower the back waistline by 3/8".  The result is so much better, but still not perfect.  I might try pattern again or revert back to my TNT.

Before altering...pretty much unwearable--at least with a tucked in shirt!

After altering...

Before altering! 
After altering.  I think I could have taken a little more of a swayback adjustment...


The directions also have you use flat-felled seams and I did those prior to having to take the suckers apart but I didn't like how the denim laid so I ended up just serging and topstitching.


These are a little longer than I intended as I lengthened them by an inch and now they are too long.  I'll probably have to re do the hem in the future.

All in all, these pants are fine.  I like the designer details.  If you typically make a sway-back adjustment, you will for sure want to do that alteration again and perhaps a little deeper than normal.

I do recommend this pattern if you want to experiment with some designer-inspired details.

Thanks for reading!!!
Sue 

Monday, July 14, 2014

McCall's 6700 Maxi!


I finally made this pattern from my long neglected stash and love it!

I now see why everyone loves their maxi dresses!  It feels like I am wearing an ultra comfy pair of pajamas!  I was sort of afraid that I had missed the boat on the maxi dress adventure, but went into a nearby department store and they had at least 30 different maxi dresses to choose from!  I just hate being late for the show!

  
This dress is described on the package envelope as a pullover dress that has fitted mock wrap bodice, shoulder ties, elasticized shoulders and raised waist, fitted, narrow hem, thread carriers and self belt.  Well, McCalls, I have a few issues with your description.  First of all, I made this dress according to my measurements and it wasn't just too big but sloppily huge!  As you can see from the amount of fabric I am holding out to my side, I need to do some serious reducing here to make this work.


I thought about just dropping this on the floor and leaving it for a while, but I really love this fabric.  It's pretty and perfect for this dress.  So, I picked it apart and started again.


Much better!


As you can tell, I made some changes to this pattern.  I didn't want the back bodice in a v as I wanted some additional coverage so it is more work appropriate.  I can't just put layers on as I work with kids, I get HOT!!! and I hate sweating profusely and having them ask me why my face is wet.  So, I reworked the back piece and made it so it is one-piece and has a lot more coverage.  As you also notice, the neckline is super low, I mean you can see the model's bra on the cover photo.  I can't have my bra showing so I cut 2 inch bias bands, folded them lengthwise, pressed lightly and sewed to the neckline from front around the back and to the other front edge.  I did very slightly stretch this so it laid a little snugger on my body.  I did go ahead and gather the shoulder edges and gather those to the back shoulder seams.  I added the bands to the armholes stretching slightly so they hugged the bodice to my body--no gapping seen!  Yay!


Those were my modifications.  One alteration I made was to shorten the skirt by 2.5 inches.  I was so surprised being 5'7" and all, in fact I thought it may be a tad short and I would have to make my dress knee-length.  I used my cover stitch machine for the hemline.  I need to find some good tutorials on how to use the cover stitch as I feel very incompetent when using it.


I didn't even bother with the belt.  I don't like self-fabric belts made from knits so I just decided to use a regular belt.

I like my dress, it is super comfortable, when together fast and this dress is easy.  A beginner that has worked with knits would be able to have some success with this dress.  Just beware of how low cut the dress is (Obviously I am wearing a cami) and how over-sized this pattern is.   I am wearing a sweater with this because I found it in my closet and it matches perfectly and it's damn cold outside for July.  The high temp for the day is 68 degrees.  Crazy!


Thanks for reading!  I so enjoy your comments!
Sue

Monday, July 7, 2014

Named Clothing Kanerva Button Back Shirt 2


Ok, so me being on the repeat roll that I am, I simply had to make this blouse again from Named Clothing.


 I love my first version, seen below.


It's different, cute, comfortable, and I love any blouse with buttons up the back.  I think it takes me back to my adolescent/young adult years?  Whatever the reason, this pattern lured me back in and I am glad I listened to that call to repeat this fun blouse.


This pattern company originates in Finland.  I purchased this as a PDF and what I really liked is that it is environmentally friendly and only a few pages printed at a time.  The pieces overlap on the sheet, much like a Burda Style magazine but with my less 'clutter'.  I traced off each piece on the pattern tracing cloth and now have a permanent pattern for this blouse.  Another tactic that I simply love is that you have the option to print off the range of sizes you want for this download, not all of them which makes tracing a huge bonus in my book.


After choosing the pattern tiles you wan to print and trace off, next is fabric.  I had purchased this beautiful fabric from Emma One Sock specifically for this top.  It is so beautiful, colorful, and just fabulous to work with that I wish I would have ordered about 10 yards of it.  I have some left over, not much mind you, but I do intend to use every tiny scrap for something, anything in future projects.  I mean, can you blame me?  Look how vivid the colors are!  Look how plentiful the color is!  It is a cotton that is a wonderful weight, pressed beautifully, sewed amazingly....can you tell I love it?  DH said my finished top was wonderfully hippish and cool.  I think that means he likes it!

Enough on the fabric, if you don't stop me, I will go on for quite a while about the fabric so let's move onto the pattern.  The pattern pieces all matched up and seemed to be well drafted.  All notches and marks lined up.  The directions are very detailed, especially if you are a beginner and haven't sewn before.  Everything from the grainline and pattern notches are explained--a bonus if you haven't much experience.  I found this pattern super easy and a beginner would have a certain measure of success with this top given a little time surrounding closures.  I used snap closures and my KAM snap pliers and loved the entire process.  The only modification I made to the pattern was a 1/2" swayback adjustment which is usual for me.  I also added another concealed snap just below the waistline pleat to help with overexposing my backside when I raise my arms over my head.


One thing you do have to note about the pattern directions is that there are 1cm seam allowances or 3/8".  If you don't read the directions, or at least skim them, this could totally alter the fit and you could end up completely dissatisfied.  One of the beauties of this top is that there is enough ease you can slip this on and off over your head without using the button closures at all.  Love this!


Since this is my second time through, I really don't have anything else to add other than I do highly recommend this pattern.  I am working hard to support more indy patterns and this is a company I will look to more often.


Thanks for reading!
Sue

Friday, July 4, 2014

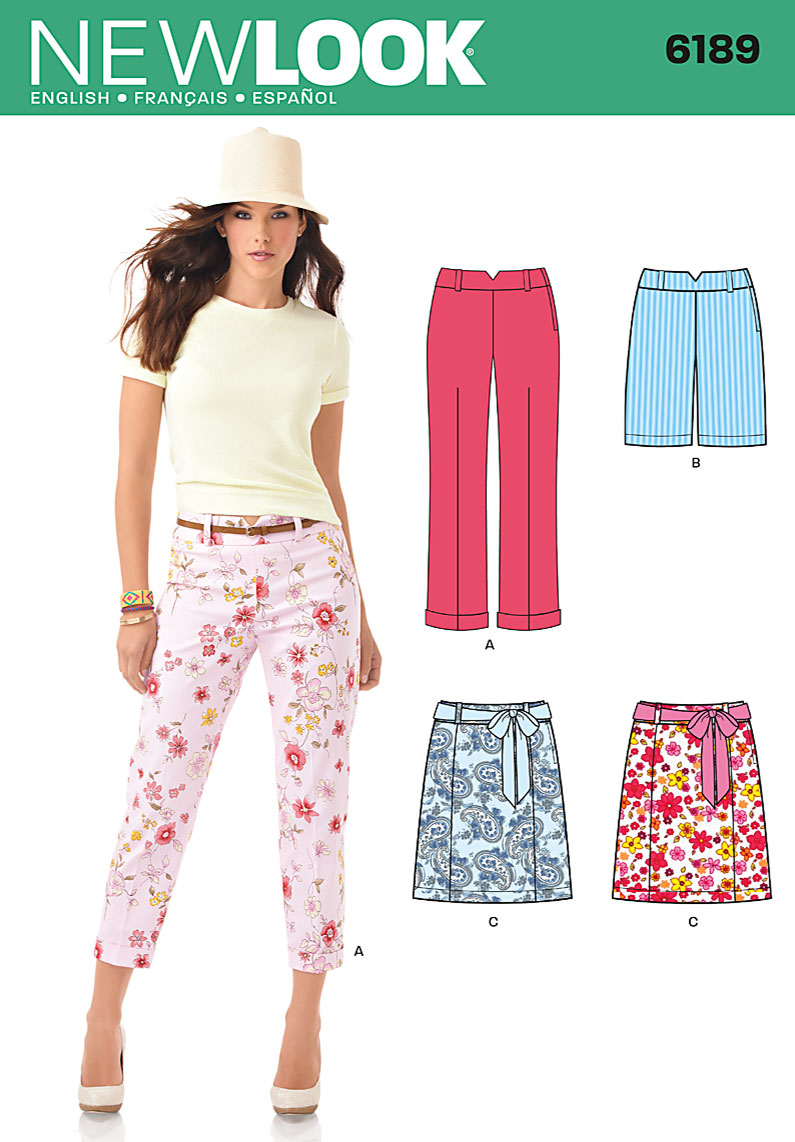
Round 2 New Look pants


Hi again, it's me on my pants kick once again.  I just can't seem to help myself, but I am enjoying the fun choices I have in my closet now for pants.  First I want to talk about the fabric for this.


I once again let myself fall for cheap-o fabric simply because I loved the color!  What a disappointment it was to work with.  I purchased it at Joann.  Luckily it was 1/2 price so I didn't pay an arm and a leg for it but I do have to say that numerous times I almost took it outside and sacrificed it to the fabric gods of cheap (but pretty colored) performers.  Ugh.  I am just about to put a ban on Joann's until I read from other sewers their quality has improved.  The cost of cheap is just too high--I'll explain my frustration in a bit.


Now, back to the pattern.  Don't let the envelope fool you.  Straight from the envelope these pants aren't even close to resembling the straight leg, slightly tight look the super thin model is wearing.


I started with a 16 based on my measurements and took off a total of 2 inches from the waist, hips, and legs--from the top to the bottom!  Luckily there are so few seams that this is super easy to do.


I did know they would be huge based on my first review but as I cut out my pretty pink denim, I realized it would require some special handling in that it seemed to not respond as well as they denim I used from Hancock.


I sewed in this sequence which makes sense to me!

Staystitch the waistlines front and back
Sew the inner leg seams together
Sew the creases in the pants front
Sew the crotch seam
Sew the outer leg seam
Sew the waistband side seam and attach to pants
Put in the zipper
Hem
Cuff!


This is very similar to the pattern directions.  What I changed this time design wise was to omit the v-shaped cut out on the front and leave off the belt loops.  I also cut the waistband width in half because I didn't want them as high waisted as the others.


Fit wise, I mentioned earlier how much I took these in and also I lowered the front waistband by 1/2 inch and raised the back waistband 1/2 inch.


What gave me so many fits was putting in the lapped zipper on this fabric.  I ended up finally getting it in acceptably and then ripped out the seam from the end of the zipper to the hemline and resewed that.  I tried the pants on and just about cried, I hated them so much!  But, I thought let's give these a chance and wash and dry them and hope the fabric will go back to the original shape and luckily it did!  Yahoo!  My pants are saved!  I am interested to see how they will perform after wearing an entire day.  I am a little worried they will give me the baggiest butt in the world!  I will have to wear them around the house all day before venturing out.


So I do like my finished pants.  I do hope the fabric behaves better than it did as I was stitching them up.  I do recommend the pattern if you are willing to put up with adjusting the fit.

Thanks for reading!!!
Sue