About Me

My photo
Sewing is therapy for me. I hoard fabric, patterns, notions, and spend more time shopping for fabric than I care to admit...
Showing posts with label Sewaholic. Show all posts

Monday, August 1, 2016

Made by a Fabricista: Redesigning the Renfrew

I was so excited to participate in the Fabric Mart post on the summer of Tees.  I knew it would be a stretch for me as pattern hacking is something I don't do a lot of, but when I do, I am just (usually) stoked when I see the overall results.  I searched Pinterest for an idea that I could use with one of my favorite tee patterns: Sewaholic's Renfrew.  

In case you aren't familiar with the Renfrew, here is a picture of the pattern envelope.  Just think of the possibilities with this pattern!  I've made this pattern numerous times and have tweaked the fit quite a bit with an FBA, sloping shoulder adjustment, and swayback adjustment.


When I was looking at all the pins I have on Pinterest, here is the look I was hoping to recreate: 

But I wanted only to recreate the back color-blocking portion and of course use my beloved Renfrew, which doesn't have raglan sleeves.  

Here is what I did for re-drafting the back pattern piece.  


I use plain tissue paper when I copy off my pattern pieces.  It is easy to see through to copy and lightweight and I can refold it back into the pattern package easily.  
 And yes, I do lightly iron the tissue before I lay it out on the fabric to cut it out.  


Here is a closer-up of the drawing along with the reminder to add the 5/8" seam allowances, just like the rest of the pattern calls for.  


Here is what the back pieces looked like after I cut out my fabrics.  I really love the contrast of the blue perforated scuba knit and the ITY floral print.  The perforated scuba knit is from Gorgeous Fabrics and the ITY knit is from Fabric.com.  I really like the blue and white combination. 


That inverted 'V' I had made so pronounced on the pattern tissue and in the cut fabric is my less so when sewn together--this is more of the look I was going for!  Notice the topstitching along the seamlines of the neck band and the intersection of the two fabrics?  I did that to conceal the seam edges.  The neckband's seam was pressed upward into the neckband and then topstitched.  The seam long the back was pressed downward and topstitched into the lower portion of the bodice back.  


I really loved the sleeves that were in the contrasting fabric, just like the inspiration photo.


I just love using a pattern to 'hack' that you've used before, fits well, and is simple to sew.


You get a hint of some fun when you see the front but with this top, the party is mainly in the back!


I love the look of this from all angles!  


Sewing with two very different fabrics wasn't difficult at all.  Just use the right needles, notions, and take your time to think through the steps.  As I said previously, I folded the seams of the neckband to upward and topstitched to the neckband.  That way you don't see that seam on the finished garment back.  On the sleeves seams where both fabrics were the scuba knit, there were some 'holes' due to the perforations.  Since at times I would be sewing 'on air' I decided to reinforce that seam with stay tape.  It worked like a charm. I also topstitched the seam on the scuba knit only along the backside of the sleeves to not only reinforce the seams but to also help them lie flat.


I am very pleased with how my 'hack' turned out, or should I say redesign?

Do you have an redesigns of the Renfrew?  I'd love to see your version!

Thanks for reading!
Sue

Wednesday, July 1, 2015

June Wrap up!

Where has summer gone?  I know it is only technically almost 1/2 over, but still!  I had so many grand plans and my house painting is sucking so much of my time, but that's another story!


I was productive this month!  Yay!  I have a few things I'd like to make but at this point, I've decided it is best to make the two remaining summer dresses I m-u-s-t create and perhaps another pair of cropped leggings or two and then I need to seriously think about late summer/early fall things.  Do you know how hard it was to type that???

Here's what I made:

2 of these tops cuz from McCall's 7093 and why not?


This tunic from my all time favorite McCall's 7122 pattern!!!


And of course, leggings from the same pattern cuz it's just that awesome!


You know, those legs aren't bad for a 52 year old!!!

This top from Sewaholic Alma is my least favorite make of the month, although that COLOR!!!


Then I did this from Thread Theory Design for all these dapper dudes:


And this little number from Kwik Sew, which BTW is my favorite of the month!


I still have a dress from McCall's 7092 that I've made but haven't posted yet, so watch for that soon! And the drop dead gorgeous fabric I used!!!  Squeel!


Oh yes, I almost forgot....how am I doing on those goals I set in January?
Here they are: 
1.  Continue to work on bra making--haven't done anything with this....
2.  Continue to work on pants and fitting--this I have been working on but need to continue.  If only my weight would stay the exact same and I would continue to work out as much as I need to keep everything as is!
3.  Perfect the FBA--I must say that I have really been working on this and even took a Craftsy Class on adjusting the bust.  What a help!!!
4.  Try more specialty fabrics--which yes, I have been working on this but need to continue.  Neoprene is not nearly as scary as I thought it would be and actually sews up really well!
5.  Finish quilts...still working on these....this one may continue until 16.  :)  

I hope your sewing is going well and you are having some fun creating unique and fun garments for yourself and those you love!  

Sue 

Friday, June 5, 2015

Sewaholic pattern Alma Blouse


I've had this pattern for a while, as this is one that I thought I must have a while back, purchased it, and promptly filed it in my stash.  Argh. Why don't I have a better system? I'll come up with one, I hope!

This is a very simple, semi-fitted pull over blouse with neckline and sleeve variations.  There are a lot of variations with this top, so if you love sewing with woven fabrics, this is for you!


Sewaholic patterns are made for pear-shaped women.  That translates into a smaller bust but wider hips.  Well, I am typically an hourglass or borderline rectangle which means that I have to make some modifications to the fit.  :)


I started with a size 14 but made an FBA as well as taking this in at the waistline and hips. Both of these alterations didn't surprise me in the least so I was well-prepared to make quite a few adjustments to the top prior to taking photos for this blog and more importantly, wearing in public!


I made the body of view C, with modified sleeves of B which I shortened by about 4 inches sans the belt.  I tweaked the fit quite a bit which I'll detail.  Can you see my invisible zip?  I am very proud of how well I put it in!  SCORE!!!  Hint, it's on the side I have facing the camera on the above photo!


My high bust measurement is about 36.5 inches.  In the past, I'd use my full bust to make a garment and would swim in it!  It is MUCH easier to make an FBA and I highly recommend it!  I typically use two resources for this: The first is a Craftsy class I took with Kathleen Cheetam (hope I spelled that right!) called Adjusting the bust and the second it a book called Fitting for Real People.  Both are equally helpful when it comes to making an FBA and both have similar methods.  One thing that I figured out is that I only need the adjustment in the bust not lengthened to the waist as a lot of classes and books recommend.  So, my FBA stops at the waistline.


I have been working to rid my sewing of facings, that is if I can without compromising on style or function so with this blouse, I used Lynda Maynard's book on Sewing with Couture Techniques to make banded neckline.  The technique has you measure the length you need, add four inches, and press the fabric to allow for shrinkage.  You also figure out the width of the band by adding the seam allowances, multiplying by two and adding an inch.  Don't gasp when you think of how wide this is, see how small mine ended up?  This is a great ratio!  Just make sure you staystitch the neckline before applying the band so nothing stretches out of shape.  I ended up making a double row of topstitching at the neckline to keep the seamline stay put, plus I like how it looks on the outside of the finished top.


Typically I lower the bust apex by an inch on the big four patterns and did this on this top but I was so wrong in assuming that I needed it!  I had to resew the darts to a higher apex placement, which is very unusual for me!


With the sleeve length, I like the length of the elbow, but wanted one shorter as it was so stinking humid today that I needed some breathing room--if you know what I mean!  I do think I will make a straight-up view B soon as I love the collar and sleeve length.


I used this super pretty linen-blend fabric from Hancocks.  It washed beautifully, pressed well and was on sale, so this was a very economical top to sew.  I had leftover fabric from the 1.5 yards I purchased so this is a top that you could splurge on some very nice fabric if you felt like it!

The invisible zipper was the most challenging part of the top and I spent the most time working on perfecting it.  I purposely used an ivory color just to show you that if applied correctly, you don't have to have a perfect color-match.  I used the newest issue of Threads Magazine for tips on how to insert this without ripples or having it show.  The only thing I will invest in is some nail polish the same color as the top so I can paint the zipper pull so it doesn't stand out so much!  Can you see it below?  If you insert an invisible zip correctly, you shouldn't be able to!


All in all, I like this top.  I most likely will sew again, especially since I spent so much time fitting it and fiddling with the details.  I am very pleased with the color as it beautifully coordinates with this lovely scarf my son and daughter-in-law gifted to me!

Thanks so much for reading!!!
Sue


Monday, January 26, 2015

Jungle January continues!


So imagine this: your TNT skirt pattern in a jungle print?  I think I hear winds blowing and purring contentedly!  Meow!  I love this pattern and I love my python print...what else to say?  Wow!


So, if you've never sewn Sewaholic patterns before, what the heck are you waiting for?  They are just simply awesome!  They go together easily, are super cute, well drafted, stylish, and look great on a variety of people!  Any questions?


I used this print from Hancock that sewed up great and it has a bit of a stretch for extra comfort.  I made this pretty much straight from the package directions except for the lapped, rather than invisible, zipper.  Why?  I didn't have an appropriate invisible zipper so I improvised.
I made view A, which is the same one I made before.  I love the ability to wear a belt with this skirt so I do!
This was an incredible bargain--my fabric was 75% off and cost me less than $4 a yard!  All in, this skirt was less than $10 (fabric and zipper).


This skirt only takes about 2 yards so it is economical as well as stylish and an instant gratification project.  The pockets are really ingenious and are created with one piece of fabric that includes the pocket facing and back--all in one!


I made a 12 and it fits perfect in the waist but may need tweaked in the hips just a bit, as in I may take it in a tad...not quite sure as I like it just like this!


Make this if you want a quick project that you'll love wearing!


Back off ladies, the handsome young man photo bombing this is taken...he's my son and newly engaged!


Your welcome!
Sue

Sunday, December 21, 2014

My first, but not last, Renfrew!


How many times have I felt like I am horribly late for the party?  Sewing party that is!  How long as the Renfrew by Sewaholic been uber popular?  Well, I finally broke down and purchased it and I can see what all the hype is about!  


It is a very versatile pattern with the sleeve and neckline variations.  Right?  I can see this as a TNT or tried and true pattern that you go for again and again.  


So what made me break down and purchase the pattern was a craftsy special.  Have you ever seen these where they offer kits of a pattern and fabric?  It was a bargain in my book and the f-a-b-r-i-c!  It was super lovely and sewed like a dream!  I searched and searched their site and just can't find a link to purchase any additional fabric.  It really is exceptional!  

So, I only received enough to make view A, which is just fine!  In order to determine my sizing, I made a muslin using the collar from C and the long sleeves of A.  I seriously needed an FBA which you can see below. 


Luckly for DD2, it fit perfect!  Yay!  I may have to get more fabric to make another in this same version with the yellow and that adorable cowl!  

So back to my final version.  I made a FBA using this method: http://www.sewalongs.com/myrtle/myrtle-full-bust-adjustment 


It worked well, at least I thought it did!  Maybe I need a slightly larger adjustment?  What do you think?  

I'm not sure what else I can add to this awesome pattern that hasn't been said by other but to purchase it!  It is versatile, well thought out and is darn cute!  

Thanks for reading!
Sue 
Monday, November 10, 2014

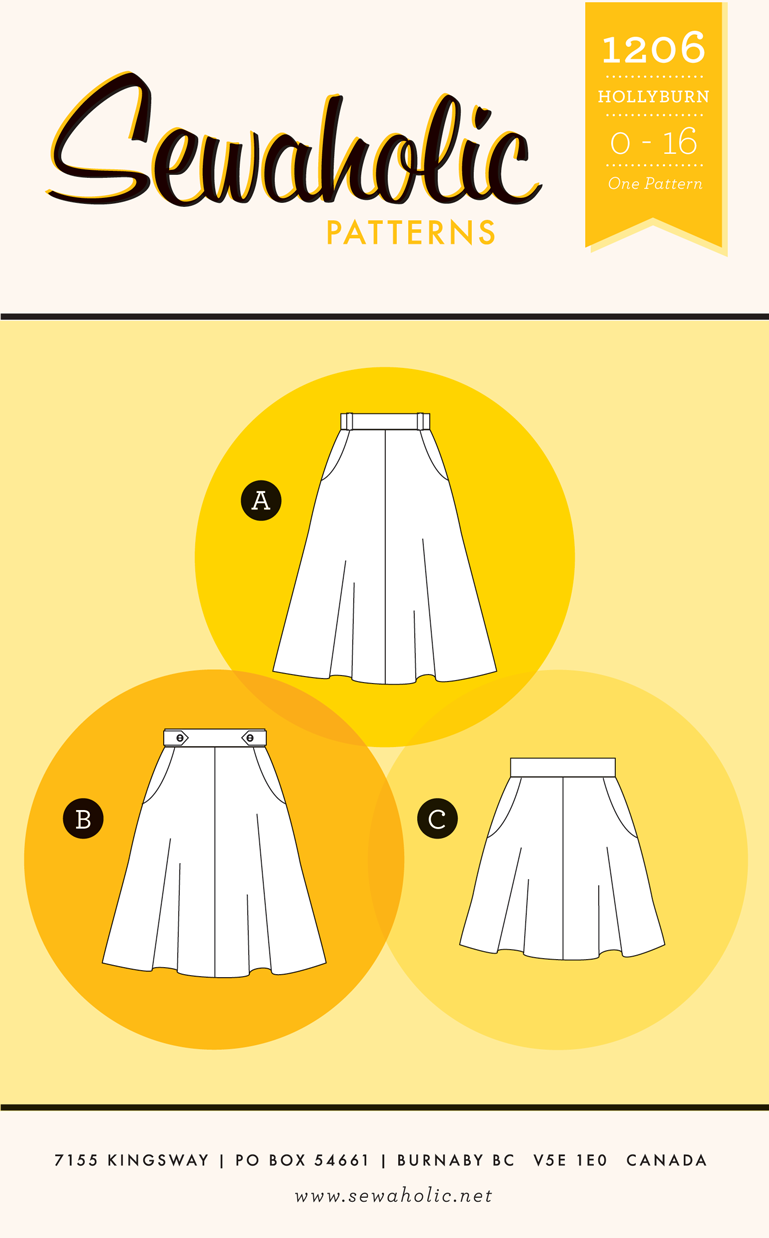
Sewaholic Hollyburn Skirt!

From the Sewaholic site: 
Especially for beginners, this is the perfect flared skirt! A wardrobe essential, the Hollyburn Skirt has just the right amount of flare. It sits right at the waist for maximum figure flattery, and features super practical pockets!
Based on the popular Lonsdale Dress pattern, this skirt pattern includes three different lengths with three different amounts of flare. The shorter the skirt, the more flared the silhouette!
Additional details add emphasis to the waistline, with optional button tabs to feature pretty buttons, or belt loops to show off your favourite belts.
Pattern includes extra-thorough sewing instructions and detailed sewing diagrams. Perfect for your first garment project!
Easy to wear, simple to sew!
Sizing is proportioned for a pear-shaped figure: smaller waist, larger hips.


I am loving Sewaholic patterns and this is one I obtained from my Fabric Mart gift card that I won during the Fabricista Challenge.  Is this adorable or what?  I've had this fabric I purchased from JoAnn's for quite a while and I couldn't decide what to do with it.  So, I unfolded it and realized it HAD A FLIPPING LIGHTER LINE RIGHT DOWN THE MIDDLE OF THE FABRIC!  Can I get an ARGH?  I was seriously irritated as I really didn't feel very well and probably shouldn't have been sewing but sometimes you need to sew to feel better (at least that is what I told myself).  So, I cut, sewed and worked hard to cover up the lines down the fabric.  Next time, if I do buy from that p-l-a-c-e again, I am going to lay out the fabric and examine the fold line before I purchase.    I just really liked the print.  It has so many of my favorite colors in it.  

I wanted to match up the pattern down the center front and back of the skirt so that required me to cut the fabric off-grain, with the grainline at about a 30° angle.  It lays fine and all, and damn, I matched that up fabric pattern great, didn't I?  Just for fun and which you unfortunately can't see very well, I topstitched the front seam line about 3/8" from the edge.  I also decided to make a narrow hem of about 1/4" that I turned twice and stitched.  I used Steam-a-seam for this little project and wow do I love that stuff!  So easy to use and such awesome results!  

Since I am not pear-shaped, I cut a 10 in the hips and a 12 in the waist.  That is smaller than what I typically cut in the big four patterns which is a 14.  I really like the fit.  I made view B's length with the belt loops of A.  And who doesn't love pockets that aren't side-seam so they don't add bulk to the hips?  

The fabric has a bit of a stretch so it should be comfortable to wear and wow do I love my red tights with this!  I just wish I had some knee high red boots!  

This pattern is well designed and any beginner could pick up the directions and if you sew carefully could get a great result!  
Thanks for reading!
Sue :)  Have you had any disappointing fabric purchases lately?

Friday, October 31, 2014

October recap and plans!


October was a wild ride sewing wise, can I say that?  Can anyone relate?  I feel so very blessed to be part of the Fabric Mart Fabricista challenge in which I finished 3rd!  I am still feeling great about that challenge.

So here is my October recap:

I made my first ever Marfy pattern.  I do like this pattern but I must admit that weighing the cost of the pattern versus the result is a toss up for me.  While I am glad I completed this item on my bucket-list, I think my money might be spent better elsewhere.  Not entirely sure how I feel about this pattern.  I mean I like it, but am I madly in love?  Hmm......


How freakin awesome is my obnoxious yellow trench coat?  This I LOVE!  The Sewaholic Robson Trench pattern is VERY well drafted, the directions are excellent and the finished result is something I am very proud to wear!  I modified the pattern since it is designed for pear-shaped women by cutting the waist and hips two sizes smaller than the bust.  I so want to make this coat again in a wool with a more substantial lining.  I may even try to figure out how to make a detachable lining piece.


Next I made a second version of McCall's 6531 which is my new favorite pattern of all time.  Why?  The DETAILS of course!  How freaking RTW is this jacket?  And, I love this army green version as much as my first.


McCall's 6996 was an instant gratification project that I used this unbelievably beautiful knit from Marcy Tilton. Isn't it gorgeous? I love everything about the pattern.  It has an adorable peplum in the back.  The length is perfect for me and the drafting is great as well!  LOVE this and will make many more as I love layering pieces for work and home.


Next up is my rendition of Simplicity 1316.  I had originally thought about making this top for the Fabric Mart challenge as an art piece but am glad I made the bright yellow trench coat pictured above instead.  This top fit sort of weird when I made my first muslin and the contrast stitching I was thinking about would have been a pain in the you-know-what.  So, I made this simpler version instead and do love it a lot.  I highly recommend a muslin to test the fit and I like the longer sleeves I made by lengthening the sleeves.  With winter rapidly approaching, this pattern will have to go in the wait to spring pile.  The metal studs were easy to apply with an iron but be aware and wait a bit before touching them as they are hot.  Why didn't I realize that before I burnt off the top three layers of my fingertips?


As I look at this picture, I am reminded of how badly I am in need of a hair cut!  And also, this is my first Ottobre pattern and it won't be my last.  Isn't it unique and awesome?  It runs large and I took this in tremendously but wow do I love it and plan on more!


My last garment of the month is this awesome and colorful cardigan from Mouse House creations.  This pattern was part of the perfect pattern parcel which you can sign up for!  This was the sixth parcel up for sale which benefits education and allows you to try Indy patterns.  Gosh I love this!  The fabric was from Fabric Mart and while it is bright, I simply love everything about it!
What a great layering piece.


Plans?  I do have plans for the rest of 2014.  I really need a medium weight jacket/coat that is warm and I can move easily in.  When I am on the playground, I must have a warm coat.  Some of my current coats aren't cutting it.

I love layering pieces as some classrooms I visit are way to warm and others I am freezing in!  Other than some of the cardigans I used recently, I am hoping some of you can suggest some great patterns.  I need some ideas!

Thanks for reading!
Sue :)