About Me

My photo
Sewing is therapy for me. I hoard fabric, patterns, notions, and spend more time shopping for fabric than I care to admit...

Monday, August 31, 2015

StyleArc Lani Woven Tunic

I hope you aren't tired of my review of tunics!  I am so hooked on them!  This one isn't a knit but made from a woven, a linen to be exact, and this is the type of pattern I have been looking for.

From the StyleArc site, here is how the tunic is described: This is a fabulous piece, the design lines make it interesting and the asymmetrical hem line really makes this pattern unique. The tunic length is great over pants as well as a long line skirt.
Gorgeous tunic with asymmetrical design lines and ¾ sleeves

What drew me to this pattern is not only that it is for a woven tunic but look at those design lines! Genius!  I just love them!

I used a linen from Hancock's that was labeled as dry clean only--hogwash was my first reaction and I washed it in HOT water and dried it on HOT--not once, but twice.  It didn't compromise the fabric at all but made all the different colors in the weave stand out.  Glad I did this!  I also included the pocket!


This linen wrinkles just looking at it!  I hope after several washes and dries, it will soften up a bit.  


This is listed as a challenging sew or for experienced sewers.  While I had a few head-scratching moments, it was mostly due to how the directions were written--without the diagram, I would have scratched my head at least a few times!


My first 'huh' had to do with the way the instructions are written in regards to the mitered corner on the front hems.  I had to read it more than once as at first it sounds to me like you are supposed two sew the two mitered corners together...nope.  You sew each one separately.


I am very glad that the pattern pieces have points A, B, C marked so you can easily match up the appropriate notches so this puzzle comes together as it should.  While it does take a few minutes to cut out, I didn't find this challenging at all but if you don't have much sewing experience, this would be difficult.

I think the neckline, shoulders, sleeves, and armscyes are shaped just beautifully and I didn't have to ease the sleeve head at all--it went together so well and so easily I double checked it twice to make sure there wasn't a big tuck somewhere I wasn't aware of!


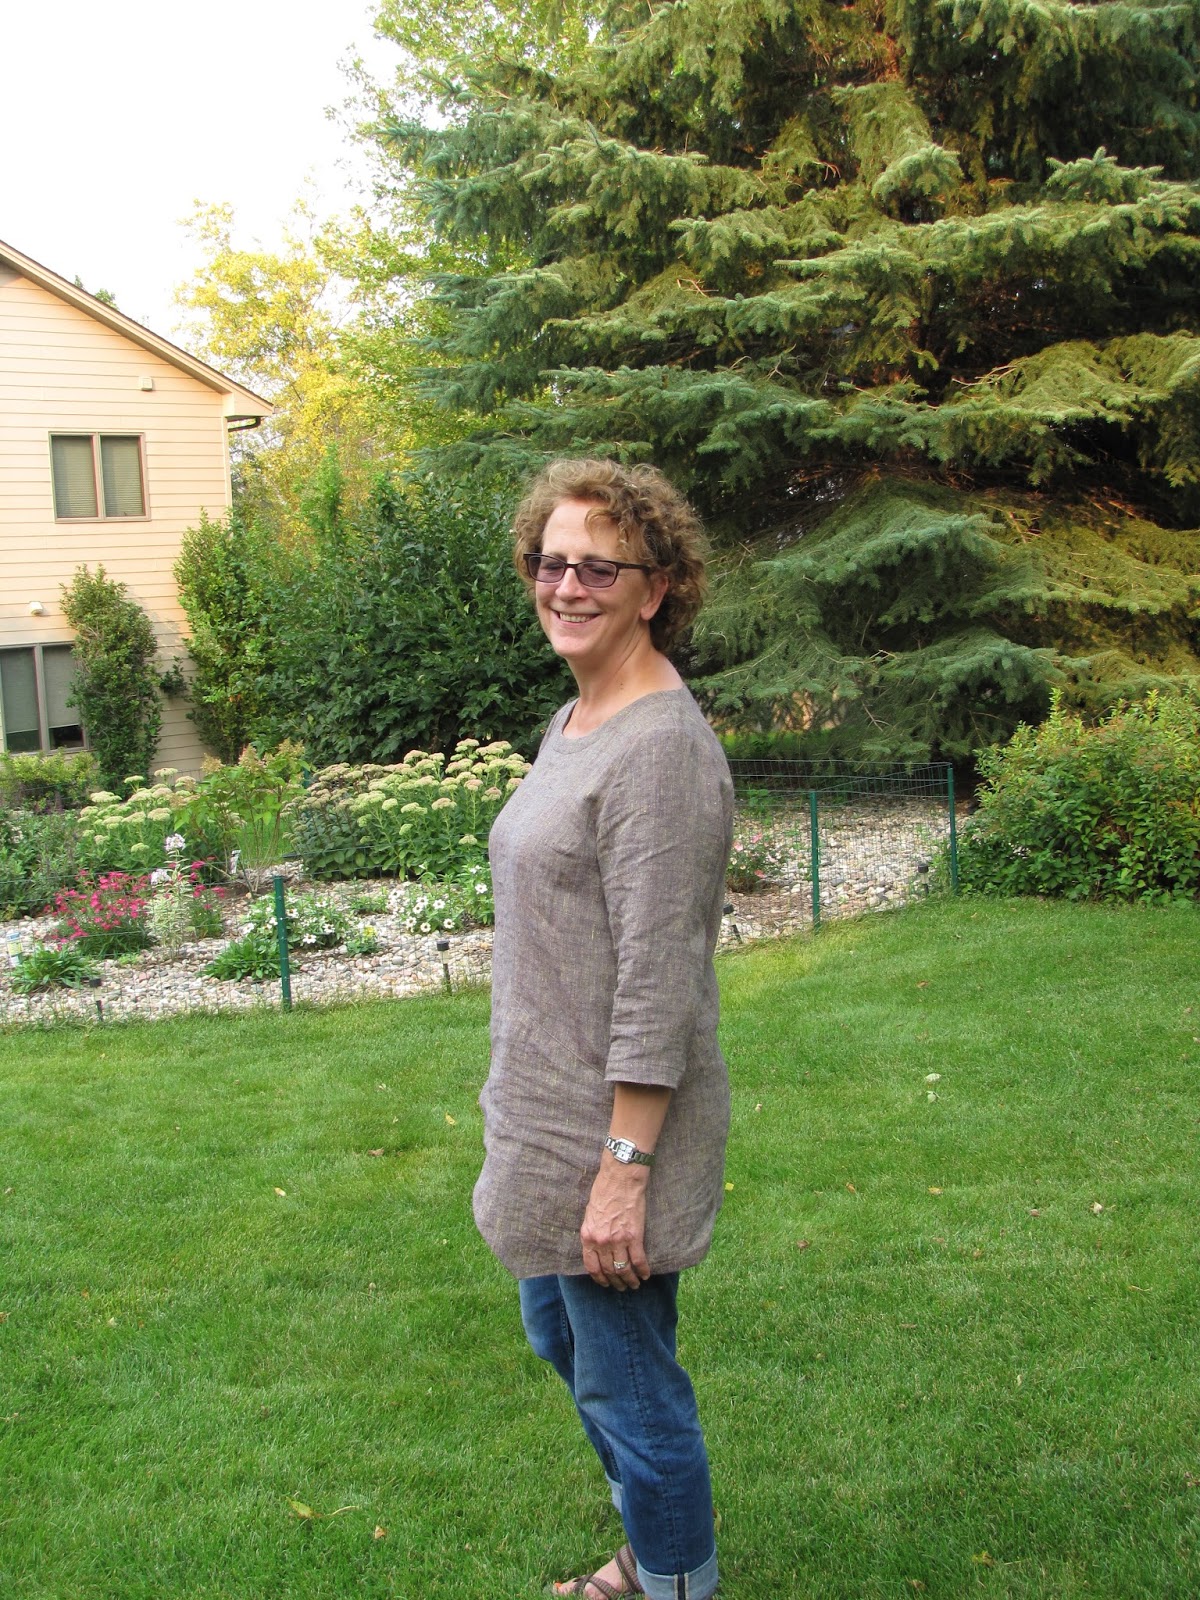
My only modifications were to taper in the side seams about an inch from the bust to an inch above the hemline and I liked the little bit of a flare there.

I really like this tunic and I love it with my jeans!  It was fun to make and it took about as long to cut out as it did to sew.  I'd like to make this a few more times, perhaps sleeveless or with a long sleeve.  I think it would work well with a stiffer ponte and perhaps may work for color blocking!

Thanks for reading!
Sue

Thursday, August 27, 2015

Simon is 2--my favorite little man! McCalls 6828


Do you have a little one in your life?  I am so lucky that I do!  His name is Simon and he just turned 2 this week!  He is my first grandchild and what fun being a grandma is!  I stumbled across this pattern and the grandma in me screamed, buy it!  So, I did!


This pattern has a choice of three creatures which can be left to your interpretation.  I think they look like a cat, raccoon, and some sort of bear.  Whatever you want to call them, they are just darn cute!

I made view B, which I call a raccoon.


Wow. for you young moms out there, I have forgotten how difficult it is to get a 2 year old to stand still for 5 seconds!  Sorry for the blurry photos but this little man doesn't want to stop moving!  


Is he cute or what?  
Can you believe I made this based on his measurements?  I would say it runs a little large!  


I'm okay with large because I think/know it will fit next year as well!


He really didn't know what to make of the buttons and do you see the blue foot, leg, and hand?  Uncle Andrew thought it was a good idea to let him use a marker, unsupervised...he doesn't have any kids of his own yet!  


It's almost like he is modeling on a runway with this pose!  


And this one!


Off and running!


Sewing is pretty straightforward.  I made some changes based on my little fella.  He is one hot little kid, so I omitted the lining which would have made two layers of fleece.  He would have just melted in it!

I made this out of gray and off-white fleece.  I think they were from Fabric Mart and Hancock's?  The blue and black cotton were scraps from my stash.  Buttons were from JoAnn's.

Based on his measurements, I made a size three.  It appears there is plenty of ease, so if it's a little big, that will give him some growing room.

The instructions were good and with this very basic pattern, no head scratching moments at all!

I really love to applique and use to do it all the time when my own four kiddos were small and now that Simon is around, I have rediscovered my love for it!

Isn't that tail too much fun?  I only appliqued one side of it and I can't wait to see what he thinks of it!  He hasn't discovered it yet, so I think it will be fun when he does!


For the hood and sleeves, both called for the lining and since I omitted it, I choose to attach bands to finish off the seams.

I also made a huge boo-boo and sewed the face on incorrectly to the hood--how on earth did I manage that?  So I ended up cutting off the stitched applique from the ruined hood and stitching it to a newly cut and correct hod by securing it at the outside edges with a narrow zig-zag.

Grandma-ing is so much fun and if you have a little person in your life, I hope you'll make some fun little garments for him/her!


Thanks for reading!
Sue

StyleArc Marni Ponte Jacket

Peplum style knit jacket with princess line and shawl collar

You all know how much I love sewing jackets and how I have this huge crush on StyleArc patterns, right?  Well, I was looking through my ridiculously large stash and found this gray techno knit/ponte and I knew the Marni Jacket would be perfect for it.


That little peplum is just too cute and the pleat that forms the peplum, is genius!

I made a size 12 in StyleArc with almost no modifications--that is probably why I love using their patterns so much!


Here is a description from the StyleArc site:
Great easy versatile jacket featuring a soft peplum with tucks falling from the princess line. The ¾ sleeve has a slit cuff that can be worn up or down. Wear it with or without a waisted belt – or dress it up with an interesting stud closure.

If you've sewn with StyleArc before, you know the directions are minimal, but I found a critical step missing.  Tsk-tsk!  Not a huge deal as it is intuitive, but let's proof read people!


No where does it tell you to sew the side seams before attaching the sleeves and the sleeves are not sewn in flat.  

Another gripe/personal opinion I have with StyleArc and some of the big 4 is the way in which you attach collars that require a pivoting seam.  In the good ol' days, you'd be instructed to stay stitch the pivot points, clip, and then stitch.  Now I see that instructions have you skip the staystitching and clipping before hand and have you stitch to the pivot point, leave your needle down, get your scissors jockeyed in there under the presser foot, clip, and continue sewing.  Maybe this isn't difficult for anyone but me, but I can't get my scissors in there very well and I just end up with a messy looking pivot point.  I like creating this point the old fashioned way.  


I left off the stud closure and made just a couple of modifications because of the softness of my fabric.  I used a decorative stitch on the front princess lines and the peplum to dress it up a bit and I ended up topstitching my collar and cuffs just to give the fabric more of a tailored look.    


Isn't hindsight always 20-20? I should have used a ponte with more stiffness.  This one is a tad soft, but I still love it and will wear it gobs!  

I love my new jacket!

Sue 

Tuesday, August 25, 2015

Another Tunic--Ollie from StyleArc

I can't get enough tunics so I hope all of you never tire of reading about them!  So comfortable, causal, and fun!  Plus, some feel like you are wearing pajamas and I am all about looking professional while feeling like I am lounging in bed or in front of the television.


Here is the StyleArc Ollie tunic.  Quick & simple over tunic

Such a simple pattern and I wouldn't have necessarily ordered it but on the StyleArc site there was a sale on the tunic and fabric combo so I couldn't help myself.  I am such a sewing pushover!


There is nothing surprising nor difficult about this make.  There are nine steps, the first of which is to cut out your pattern.  Step nine is a final press!


 Egad!  The cami is showing here!  Need to tighten up that armhole area!


When I make StyleArc patterns, I typically use a 12 with zero alterations.  I did however make an FBA as I didn't want drag lines ruining the look of my bright coral fabric.  And, I made my usual 1/2" swayback adjustment.


Just a note however when you look at the line drawings...do you see the illusion of waistline shaping?  Well, get over it, there is none!  This is a rather boxy top and I made it as is so you can see the lack of shape.  I will be taking it in at the waistline at least 2 inches and perhaps up to 6.  I will have to see when I get it on my body and pinned in place.


The drafting is impeccable, as usual for StyleArc, no?  I simply love how the neckline is drafted and
then the notches in the pattern help you get the perfect stretch so it lies nice and flat on your chest.  And another note, this neckline is drafted higher than the 'model' drawings lead you to believe.  I may end up taking the neckband off and lowering it but first I will have to take in the waistline and I think the way to alter garments is one step at a time!

Just to give this some pizzazz, I added a decorative stitch on the neckband seam.  This accomplished two things: 1.  Helped the seam stay put and not roll to the outside and 2.  added just a touch of something different.  However I do think I slightly stretched out the back portion of the neckband so should I try this again, I will use some stabilizer there so that doesn't happen again.

I used my beloved cover stitch on the hemline and now I have a very bright, boxy Ollie Tunic!

Thanks for reading and I will try and remember to update this after I take it in!

Sue :)

Monday, August 24, 2015

Jalie, you make me swoon!

I've decided that I need to be much more consistent working out and there is nothing more motivating than making your own unique, colorful, and well-fitting workout wear!  Can I get an AMEN here people???

I was so inspired by Dawn and Two on, Two off and her recent makes that I immediately ordered the patterns and got to work!  She gushed over the Jalie top and pants and now I know why!!!  Both patterns are super cute, functional in the design, shape, and cute (oops, I already said that!) so if you've never sewn workout wear, what are YOU waiting for???

First up, the CORA tights.  Have you ever seen such cute tights?  EVER???
 

I mean that you don't have to pay at least $75 for?  These take minimal yardage--in fact both pairs were created with left overs from previous makes!  The gray is Nike Dry fit that was in very limited supply at Hancock's, and the pink from Fabric Mart.  The white and black I had in my stash and isn't that yellow/black camo combination just too much?  It was also left over from a previous project. SCORE!


Yeah, my face is red, I had to test these before I reviewed them!  I just finished a four mile run and may I say, these preformed beautifully!

I had a lot of fun trying to figure out where to place the colors based on my yardage available.  :)


Let's talk construction shall we?  I used my serger and with super stretchy knits I do believe it is a must.  Jalie however does walk you through how to successfully sew these bad boys with a regular machine.  I think I am just to spoiled having my Bernina serger to even try a garment without it.


Jalie's instructions for this are really dynamite.  Every step have a visual and a succinct text to match. I did something super, well let's just say downright dumb, silly and sewed the gusset on at the inseam instead of the crotch and couldn't for the life of me figure out why there was a weird bump and how I would attach the leg bands.  So much for having a glass of wine while sewing!!!  After taking it apart and realizing I was not thinking at all, I rolled on the floor laughing at what a ding-dong I am!  So, taking apart and reattaching the gusset where it needed to be took about 10 seconds flat--not kidding!


What I think is such a nice surprise is the little pocket on the caboose side of the pants were little running essentials hide out.

I also love how the elastic is attached--it is completely hidden in the waistband!  After sewing both layers, you attach the elastic to the seam, stretching it to fit and it is all hidden nice and cozy like.

Now for the top--isn't it just dang cute?  I love the styling, the fit is superb and it has a darn cute little back pocket at well!  


When I was tested the top today I didn't have anything rubbing, scratching, binding, biting, or really even move out of place.  My phone rested in the top's back pocket and it didn't jiggle at all--which I must say I was a little concerned it would.  


Here's a peek inside the top so you can see how it is constructed.  I think this is pure genius!
 I love both sets of my running clothes and now I look forward to wearing them!

Thanks for reading!  I can't wait to make the full length tights!

Sue


Tuesday, August 18, 2015

Yet Another Vogue 8950 Tunic...Can't help myself!


I simply HAD to make another tunic, but this time from Vogue 8950.  I truly think this is one of my favorite color blocked tunic patterns.  This doesn't even have to be color blocked and it is still a fav tunic!  I just simply love it that much!  Here's an image from Vogue Patterns site: 


V8950, Misses' Tunic


Agreed?  It's darling!  The fit is fab, the color blocking opportunities are perfect and I love the fit...oh wait, I already said that!  This time I made a short sleeved version and tried to incorporate a detail I've seen in RTW and that is the zippered pocket.


I love the ponte I used for the lower half.  I purchased it from Fabric Mart and it was delightful to work with.  For the upper portion, or that with all the color, I used a knit I purchased from Treadle Yard Goods in St Paul, MN.  Wow do I love that fabric store!  I just wish it was closer than 4 hours away!

Obviously I used the contrast on the front and back upper yokes and the sleeves along with the neckband.  The lower half is all the ponte.  The orange zip is from my stash.  See how much I love orange?  I painted my front door that color!


This is an instant gratification project and wow do I need those once in a while!  I had just completed a time-consuming garment and needed something easy, cute and fast and this worked perfectly!  Since I've made it before, I knew I would need an FBA but with the ponte, I chose to use a cheater's FBA and add 3/8" additional width to the side seam on the front only.  If I had added that amount to the back also, it would have hung weirdly at the underarm seam and that doesn't look good on anyone!


When I added the zippered welt pocket, I followed the directions for creating a welt opening in a knit by interfacing the area, sewing around the opening, carefully cutting the fabric, and then installed the zipper.  Since I didn't want a functional pocket bag or a pocket bag showing through the front of the garment, I merely backed the welt with a rectangular piece of off-white ponte that was the same fabric as the lower half of the garment.


I added a neckband to the neckline, because I like that finish better than folding over and hemming, although if the colorful contrast had been of a heavier weight, I would have tried using my coverstitch at the neckline, but the fabric was rather lightweight and I simply didn't want to use interfacing to help stabilize it so I wouldn't get tunneling.

Here are peeks at my previous versions:


I so LOVE this tunic!  It's such a great pattern and I can see many more versions before retiring it for a while.  I do so thank you for reading and how many patterns do you have that you can't put away for good or a while?

Sue :)


Saturday, August 15, 2015

Storage ideas anyone?

I wish I could claim some of the ingenious ideas for my sewing room storage techniques I use as some of just pure out-side-of-the-box-thinking which to me is nothing more than genius!

Here are a few ideas to share that I've read on other blogs or stumbled across....

Pattern storage solutions:
What do you use?  I've tried a four-drawer file cabinet which worked but since it wasn't in my actual sewing space didn't' work quite as well for me as my cardboard comic book storage boxes that are in constant view--yes I am a visual learner.  Can you believe that manufacturer's build boxes for comic books?  I had no idea until another reviewer (sorry, I don't remember who you are or I would give you FULL CREDIT for your genius idea!) posted this on her blog for a storage solution for an abundance of sewing patterns.  I just need to take a few minutes to make cute labels for the boxes!


Next up sewing machine needles: I have to admit to two phobias, one is not related to sewing at all and one is!  I must change the dish cloth I use to wash dishes/clean the counters and tables every time I need to regardless of the last time I used it.  Yes, I know crazy in some people's mind but I hate musty-smelling cloths or the idea of bacteria growing in a dish cloth that will wipe my counters or tables.  How do I deal with this phobia?  I have a LOT of dish cloths and that works for me!
Phobia number two is a fresh needle in my machine for every project.  Now maybe some of you don't think this is necessary but I've had more than one sewing machine technician tell me the best way to prolong the life of your machine is to use a quality sewing needle and to change it regularly.  My tradition is to change it with every new project and along with that task, I also clean the bobbin run and oil the machine.  Too much?  Well, it makes me feel better when I hear my Bernina purr after a cleaning and new needle I think that yes, I too like to be well fed and pampered, enough said no?


If you've read my blog, you know I mainly sew garments but occasionally create a quilt.  To keep my special sewing projects separate, I put my quilting projects in separate containers away from my garments.


For my upcoming garments, that is the ones that I have finally cut out and am committed to, those are stored in individual containers.  I finally decided that I spend too much time at my cutting table deciding which pattern to use for a fabric and 99% of the time I go back to my original instinct.  Just to save time and keep myself moving forward in an effort to reduce my every growing stash, I cut out and prepare the pattern pieces and fabric, put in a container with a lid along with the pattern instructions and those garments are one of the next ones in line I reach for when contemplating what to  sew next.  No over thinking necessary!


I would love to hear how you organize your sewing space!  Do share!
Sue