About Me

My photo
Sewing is therapy for me. I hoard fabric, patterns, notions, and spend more time shopping for fabric than I care to admit...

Sunday, February 15, 2015

Donna Karan Vogue 1440


I literally gasped when I saw how lovely this pattern from Vogue's spring collection was!  Look at the lines, look at the details, look at the fabric!  I had to have it and as soon as it went on sale at BVM, I struck!  So in case you are wondering about it, here are the deets: Unlined jacket has fringe, shoulder pads, draped front extending into back collar, wrong side shows, seam detail, no side or shoulder seams, two-piece sleeves, mock band on upper sleeve and continuous bias for piping and finished seams.  Wow, right?  The jacket is listed as semi-fitted and I think it fits that way as a finished garment.  This is listed as Average and it isn't for the faint of heart!  It is a LOT of work, but I enjoyed every minute of putting it together!

V1440, Misses' Jacket, Top and Pants


This calls for lightweight tweed or cotton blends, and the contrast in Crepe de Chine, or Charmeuse. I used a wool blend and a purchased cotton piping, which may explain why my jacket doesn't drape quite as nice as the model's.
Line Art

Believe it or not, I made a muslin and am so glad I did!  There really isn't any way to fit this unless you make a muslin based on the way the seams are created.  A also decided not to make my own bias tape simply cause I hated the idea of trying to get slipper fabric behave for all those seams!  I may be a patient sewer, but I am not that patient!


 I also wanted a high contrast with the navy and white fabric I found on sale at Hancock's for a mere $4 a yard!  It had been $24/yard!  I had no idea since it was in the area where the $24 buck a yard stuff was but there was a sign that had 40% off.  I am not math mathematician but even without a calculator, I know that this does not work out to 40% off!  What a happy surprise!


Right away, you start encasing seams with the bias binding but make sure you wait for the directions to tell you to do so!  Otherwise your intersecting seams will be a disaster and not nice and neatly finished.  The back, just by itself, has eight pieces!  All of them have piping along with the bias binding.  Definitely a labor of love, or pure unadulterated insanity!    I will admit, I didn't bind all the seams as you can see in my photo above.


Once you get to the point where you attach the collar, you might think you are in the clear for putting this together, meaning that perhaps the process will speed up a bit, but nope!  Fringing the edges took me more than an hour, but it was really the icing on the cake, if you catch my drift.


The instructions are very good and I found the illustrations easy to follow and they made sense to me!  Normally, I make an FBA, but I didn't think it was necessary for this.  I did make my usual 1/2" swayback adjustment and that's it!  I did find the sleeves a little long and yes, I know they fold under a LOT for the hem but still!  If you are running short on fabric, you could easily cut off a good three or four inches and still have enough for a decent hem.


One of the main features of this jacket is the trim and to make sure it is up to Donna's standards, make sure the trim on the garment right side and wrong side line up perfectly or it will look silly. This is a multi-step process so here it is in a nutshell:
1.  Attach the contrast binding to the fringe pieces
2.  With wrong sides together (fringe and garment) using the placement lines on the garment, attach the binding edge to this line and stitch
3.  Using the stitching line you just completed, line up the edge of the grosgrain ribbon and stitch down both sides to secure it
Ta-Da!  Then fringe to your hearts content!

I do think I need to tweak the back for some additional fitting issues, but all in all, I'm happy!


I love this, it is different, feels very RTW but my family isn't impressed.  They found it rather frumpy, but whatever...I'll still wear it with pride!


Thanks for reading!
Sue

Sunday, February 8, 2015

Sunday Stash Buster Style Arc Tamara Top!

So today, I am still under the weather with this nagging cough and cold that I've had for at least three weeks.  Argh and grrr...but that's neither here or there so on with the review.  

I've had this fabric for months and just couldn't decide what to do with it although I do like it a lot. And then I found out that Style Arc patterns are on Etsy so what's a girl to do but check them out and I came across this little number.  

Interesting spliced knit top
And, here is a description from Style Arc's site: 
T” Top with interesting design lines allowing you to create your own look - colour block or use a lace or a sheer fabric to dress it up.  A great basic “T” a must have wardrobe builder.


I have quite a few knit tops, but none with this detailing and I just had to have it, even though it is a pdf and in theory pdf's are great, but then the work begins of taping, cutting, cutting, and taping...need I say more?  


This was easy to put together and even though the instructions are sparse, they were easy to follow.  I did deviate from the directions however and the results were just fine.  


I made a straight size 12 and look at that, no pulling at the bust!  What is up with that!  There are no darts nor shaping in that area, so I suspected this wearable muslin would be given to DD1 or 2, whichever wanted it.  Wow, was I wrong! 


I mentioned that I deviated from the directions and here's what I did, nothing major mind you, just some tweaks.  


The directions call for putting interfacing at the insets and front neckline to stabilize it.  I decided my ivory colored interfacing would show through so I decided to use staytape and know what?  It worked!  My other deviation was to add bands to the sleeves and lower hem simply because I didn't want to mess with my coverstitch on lace, I just couldn't fathom how that would end well for me. 


I thought for about 15 seconds about sewing the sleeves in flat but that just didn't work since they are two piece sleeves, see the bottom?  That's why I have my hand behind my head, so you can see the detailing, not my arm pits!


It is very important the inset and upper sleeve seam match or this top won't look right.  I am sometimes very lazy (like today) and don't always mark all my notches but luckily this was a detail I figured out...the directions tell you to line up the notches which would guarantee they'd match but like I said, I was lazy...


My only other alteration was to make my usual 1/2" swayback adjustment.  

I really love this top and it is a nice alternative from a regular tee!  

Thanks for reading!
Sue   

Friday, February 6, 2015

My missing Mojo...and a fleece jacket!

So, I haven't been around much...life and apathy are interfering with my sewing and I feel like my mojo has gone for a trip but is ready to come home, know what I mean?

I've wanted to make a fleece jacket for quite a while and had two patterns, both equally cute, to choose from.
zip-front hoodie and jacket
 K3813, Jacket & Vest

See what I mean?  I really like both of them so it was hard to finally decide on one and the winner was....Kwik Sew 3813!  I had to make it with the pockets on the front and the ability to color block!


 So here is a description from the back of the envelope: Slightly fitted jacket and vest have collar, front zipper with zipper shield, left breast welt pocket with zipper, front and back princess seams with lower front pockets in seams, back yoke, and casing with elastic at bottom edge.  Upper front, yoke, and collar have contrast fabric overlay...etc.


I made a medium and love the fit!  It is exactly what I wanted, for a fleece jacket, slightly fitted.  The fleece I used for this was from my stash and I am 99% certain I purchased it from Fabric Mart.  I had the zippers and lining in my stash so it was super easy to put together and even better to wear as it cost me less than $10!


With Kwik Sew instructions, they are usually very good and this time was no exception.  The directions are even in color!  Yahoo!  This was very helpful when stitching the welt pocket and even though I have made many welt pockets, I like having the pink stitching lines show up as a guide on the directions.


My only deviations from the pattern as written were to make my usual 1/2" swayback adjustment and use a silky print for the inside pocket lining at the left breast, right upper front and back yoke.  It made it less bulky to sew and gives a little unexpected surprise when you see it peeking out at the neckline area.  I had the zipper I used on the upper welt pocket and thought it would make a cute little design detail, so I left it exposed.


I love the idea of being able to put my cell phone there when I am out running so there's no need to worry about it bouncing out!  I also decided to eliminate the zipper shield but will try a version with it as I think it is a great idea!


The only thing to be aware of is that the seam allowances are only 1/4".  I always read patterns for SA if they are not obvious so I don't drastically alter the fit.


This is so comfortable!  I just love the yellow and blue one pictured above that I have to make it! Also, that is my Alma mater's colors--so it is a must do!


Casings for this are awesome--the sleeve and lower hem are strips that are sewn on, the elastic is inserted into an opening and then stitched shut.


I had zero difficulties with anything on this pattern!  I hope to make the cute little vest as well!


Thanks so much for reading!
Sue

Sunday, February 1, 2015

January wrap up! February plans?

Where on earth did the month of January go?  I always love it when winter is one step closer to being history but holy cow, this month flew!  I always sort of laughed when I heard people that were empty nesters (like me) said that time flew quicker and quicker and wondered what they talked about! Now, I know!

Here is my January recap and plans for February
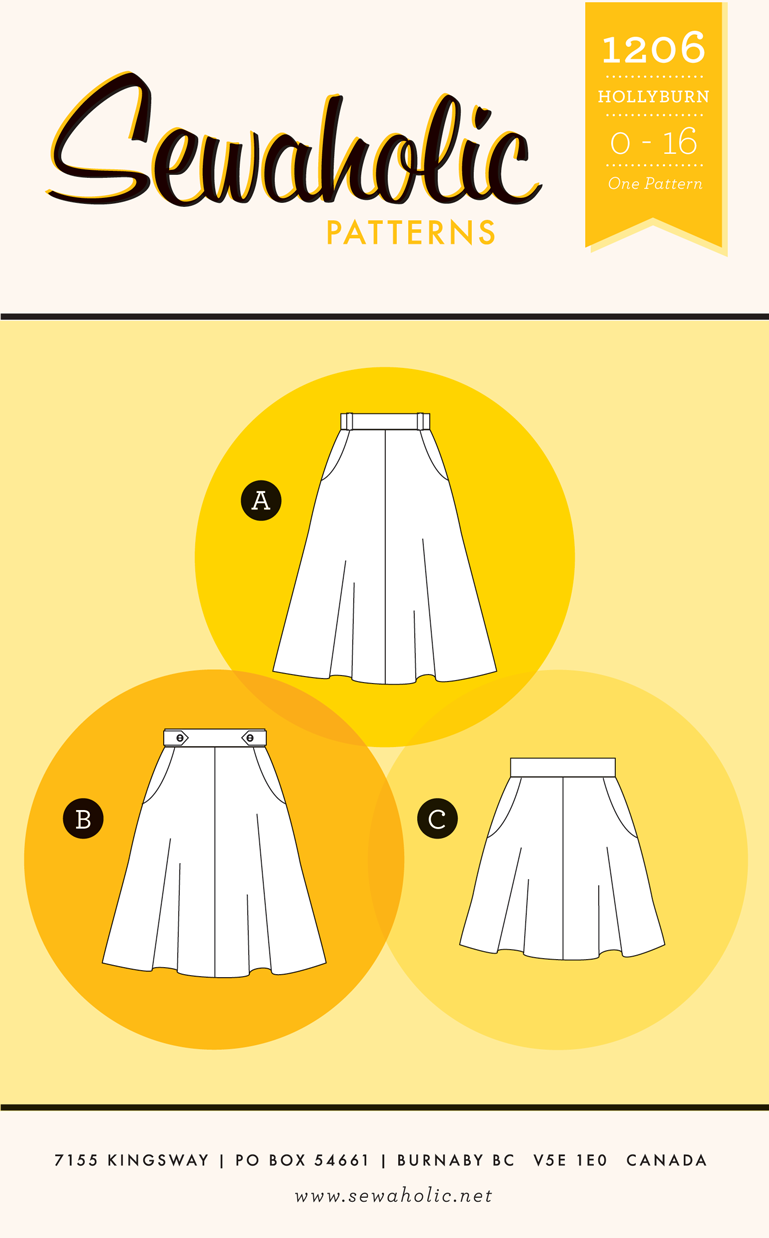
I made a second Hollyburn skirt and may make a third in February!  I so love the pockets, the shape and the ease of sewing this cute skirt!
I revisited a few old fav patterns including McCall's 6747 or a Henley top/dress.  Wow, do I love this pattern!  It's so easy to put together and so stylish but classic at the same time!  Know what I mean? What drew me to pick up this pattern again was the fabric I choose which was a graphic knit, while it is not bright, floral, or trendy, to me graphic knits in grey with black ink are super cool (to me at least) and classic!   If you've never made a placket before, this is a great pattern to try it out on. Seriously, it is!  The instructions are very good for it and make it super easy!

Other McCall's makes in January included 7018 or a button up knit top with roll up sleeves with button tabs.  Another super classic top with timeless styling.
McCall's 7024 was my first make of the month with a fun, pleated collar, princess seams and pockets, and an elasticized back waist.  Gosh, i love this jacket and what a versatile pattern!  I hope to make this out of a denim or lightweight wool.

I made 6750 into a tunic length and wow, what a great top with excellent instructions!  It was easy to put together and with the instructions, wow, you have no margins of error in fit--that is if you follow the directions for fitting as they are pretty darn awesome!

An OOP Vogue, 8831 was a make I created while sick--under no circumstances is it ever wise to sew while sick...take it from me! I miscalculated the yardage needed, and ended up piecing together to create a center front and back. Luckily, I had taken a course from Katherine Tilton on silk screening and had all the necessary supplies to save my top!  Whoa!

I had another idny pattern from Merchant and Mills or the Dress Shirt pattern which was fun to put together and sew.  I so love the details i finishing off the insides or the back and front neckbands.
Wow, what a great finish!

Last but not least was another Lola dress from victory patterns.  This is such a great pattern!  I do recommend making a muslin as I took this in quite a bit as they really need to fit in the bodice and everywhere else!

So, February plans include starting the Burda challenge of sewing one Burda a month.  This month, i will be behind but plan to catch up with sewing my catch up pattern in February or March.  

I also hope to start sewing more items for spring.  It's only about three months away for those of us that live in the northern plains, so why not?  :)

Also, I do plan on reevaluating what is already in my closet and deciding if I should donate or toss it.
I hope you had a productive month of sewing and can't wait to see what you've created!
Thanks for reading!
Sue

Monday, January 26, 2015

Jungle January continues!


So imagine this: your TNT skirt pattern in a jungle print?  I think I hear winds blowing and purring contentedly!  Meow!  I love this pattern and I love my python print...what else to say?  Wow!


So, if you've never sewn Sewaholic patterns before, what the heck are you waiting for?  They are just simply awesome!  They go together easily, are super cute, well drafted, stylish, and look great on a variety of people!  Any questions?


I used this print from Hancock that sewed up great and it has a bit of a stretch for extra comfort.  I made this pretty much straight from the package directions except for the lapped, rather than invisible, zipper.  Why?  I didn't have an appropriate invisible zipper so I improvised.
I made view A, which is the same one I made before.  I love the ability to wear a belt with this skirt so I do!
This was an incredible bargain--my fabric was 75% off and cost me less than $4 a yard!  All in, this skirt was less than $10 (fabric and zipper).


This skirt only takes about 2 yards so it is economical as well as stylish and an instant gratification project.  The pockets are really ingenious and are created with one piece of fabric that includes the pocket facing and back--all in one!


I made a 12 and it fits perfect in the waist but may need tweaked in the hips just a bit, as in I may take it in a tad...not quite sure as I like it just like this!


Make this if you want a quick project that you'll love wearing!


Back off ladies, the handsome young man photo bombing this is taken...he's my son and newly engaged!


Your welcome!
Sue

Sunday, January 25, 2015

A save from wadderville!

Vogue Patterns Misses' Top And Tunic 8831

Yep, you've guessed it, I've made this before!  It's such a great pattern and I am sad to say it is OOP! 


Here is a description: 
Close-fitting, pullover top and tunic have double-layered, draped collar, side front/side back seams and stitched hems. C: narrow hem, back longer than front (wrong side shows). A, B, C, D: cup sizes.

For once, now hold onto your chair, I didn't make a tunic but a top, why?  I didn't have enough fabric, but more on that later.  

I purchased this lovely soy-hemp fabric from Fancy Tiger Crafts in Denver.  Wow, do I ever love this fabric!  I had no plan when I purchased it but with the lovely color and the quality of the fabric, I swooned!  I wanted to make a stash-buster and found this pattern in my stash and thought--why not?  I love this pattern.  I made a great tunic from it with elbow length sleeves in a jungle print that I can't wait to pull out this spring/summer.  


So, how did I save this from wadderville and what the heck happened?  Note to self, don't cut out and try to sew when you don't feel well, it doesn't.  Work.  At.  All.  Argh.  But I do feel like I saved it from doom and have a top I will enjoy wearing.  

Problems: 
1.  I wasn't paying attention when I cut this out.  The neck takes a lot of fabric and I didn't plan accordingly when I was cutting out so I ended up with--of course--is my center front and center back having to be p-i-e-c-e-d or wadded.  Oh did I just about cry!   At that point I had nothing to loose and decided to piece it as attractively as I could and sew it up.  


A view of the front piecing.  I intentionally made it off-center and the bottom piece 1/4" from the bottom
The back--see the piecing?  Intentionally off center and hopefully it looks like a design element.  

At first, in my fever ridden state, I thought it looked fine.  However, after a night of sort of restful sleep, I went and looked again and thought, crap.  Wad that baby up!  I fingered the fabric and basking in its deliciousness, decided I had to try and save it so I did.  


I have some fun screens from Marcy Tilton and some fun paint I purchased from Dharma paint co and decided to give it a go.  


I practiced some screens on scraps with different colors of paint, let dry, cut them out, and played with the placement on the top front and back.  I highly recommend this step if you ever decide to paint your garments as fabric paint, especially high-quality paint, shouldn't come out and guess what?  It doesn't ever leave the fabric if you make a mistake.  


After playing, I went for it and I have to say that I am very pleased with my design and how it helps silence the piecing I made on the front and back.  I have a top I can wear and enjoy now!  


One thing to remember--when fitting a top and wearing for photos, make sure you have the same bra on for both.  It is amazing to me how different my girls look in different bras!  I need to throw the one I used for these photos out, immediately!  


This is a super easy pattern that has cup sizing.  I made a 14 with a C cup.  I didn't deviate from the instructions at all and love how everything turned out.  


If you don't have this pattern, try and get a copy, it's great!  


Thanks for reading!  I do love this top!
Sue 

Saturday, January 17, 2015

New Year, New Resolutions, New Workout Wear!

So every year I vow to get in shape and stay in shape and typically I do really well with this promise to myself up until about October and then it seems like busyness, apathy, and life just gets in the way and I backslide into old habits...including not working out!

While it's not quite that bad, it does sometimes feel the way this looks!

So to start 2015 out right I decided the best and most appropriate thing to do is make some workout out clothes I will look forward to wearing and why not?  They go together quickly and with this AMAZING fabric I choose from Fabric Mart to complete the job, I'll make more!  This is a poly lycra blend and I wish you were able to touch it, it is SO soft!  I wish I could wear something like this to work as I think I'd smile all day long!  I'd certainly look and feel comfortable.


Softshell jacket pattern cover


For the jacket I used Jalie 2679, or the women's sport jacket.  I can't even tell you how long I've had this pattern and just never took the time to create it and wow--what was I waiting for?  The details are awesome, the directions good although a little sparse, and the drafting is perfect.  I LOVE this pattern and I am so pleased with my final result!  It was fun playing with the layout of the pattern pieces to determine where I would use the contrasting white.  I could have easily made this all in pink and been equally happy but I wanted some sort of contrast.   I love the zippered pockets--aren't they awesome?  You can fit quite a bit in them such as your cell phone, Kleenex, and even a pair of mittens--that is if you like to run outside like I do!  My only alterations were to make my usual 1/2" swayback adjustment.  I do feel the sleeves are long, but when you are running outside in cool weather, I prefer them to be too long so I can pull my hands into them if necessary.

The fabric behaved beautifully and it pressed well and stretched when it needed to.   Lovely stuff, really lovely!  And, who doesn't want pretty work out clothes?  I love pink and if that motivates me to work out, then so be it!


At first I was a little worried I would stick out like a sore thumb but when I was at Target recently, I noticed that they have workout clothing in pretty colors and something other than black!  Hip, hip, hooray!


For the pants, I used a Kwik Sew pattern that again, has been in my stash for quite a while.  Kwik Sew 3988 has two versions of Yoga/workout pants with a long version with a waist inset, perfect for color blocking, or a shorter version that's knee length that you can make color blocked at the waist seam and outer legs at the knees. 

K3988, Misses' Pants

Both views have a gusset at the crotch area--which makes you able to move in multiple ways--even ways you didn't know your body was capable of doing!


Everything went together well and I did struggle with which size to make.  These pants are supposed to be very close fitting (tight) and for an over 50 year old woman, I certainly didn't want them overly tight as no one wants to see that rear view, even if you are working out!  So, long story short, I cut a large, knowing they be a little loose but with only 1/4" seam allowances, I knew it would be easier to take them in as there is not much room for error if they were too small!


I can't even tell you how much I took these in!  I would say I ended up, size wise, between a small and medium rather than anywhere near a large!  And, I took them in everywhere except the length which I lengthened by about 1.5 inches and found that to be just about perfect for me.


I LOVE this fabric.  It is so soft and I am very happy with the patterns I choose to make this outfit.  I wish it would have been nice enough outside to pose out there for the photos, but the wind chill was about -30 degrees with an air temp of minus zero.  No thanks!  Not going out there if I can help it!


Thanks for reading and I so appreciate your comments.  If Fabric Mart has any of this fabric left, don't hesitate to purchase is for any knit garment.  It is lovely stuff!

Sue