About Me

My photo
Sewing is therapy for me. I hoard fabric, patterns, notions, and spend more time shopping for fabric than I care to admit...

Tuesday, December 25, 2012

Simplicity 2600 Duffel Bags!

Simplicity Sewing Pattern 2600 Accessories, One Size
Simplicity 2600 Duffel Bags.  I made four of these bad boys for my two sons and two son-in-laws.  There is not really a description listed on the envelope so I am creating my own.  These are some decent sized bags.  The outside you quilt using fabrics of your choice.  You need some contrasting fabric for the inside of the bag and the underside of the handles.  Piping is also needed to attach the sides.  The finished bag measures about 13" X 20" X 11".  My son just packed his clothing for a three-day trip we are taking and he has a little room to spare. 

 Included in this pattern is a tote bag, jewelry caddy, make up case, passport cover and luggage I.D tag.  I had high hopes of also creating the jewelry caddy for my two daughters and soon to be daughter-in-law, but life just got in the way of sewing.  Maybe next year. 
The bag includes an inside pocket, outside pocket and outside side pocket.  For the first bag, I used an extremely heavy duty zipper and found it not as flexible as I'd like it to be so for the other three bags I purchased purse zippers all made of nylon, each with a double zipper thing-y. 
Also for the first bag, I made my own bias tape and took the time to quilt the handles.  After I completed this step of quilting handle fabric on the diagonal and then proceed to cut the six inch wide handle into three long strips of about two inches deep, I decided I was a fool and proceeded to not repeat that step again without rethinking the process.  On subsequent bags, I used denim as the layer in the handle, skipped the quilting by machine and am just as happy with the result.  I also purchased bias tape to edge the handles. 

I chose fabric I thought each guy would like and so far they all think these are pretty cool.  This is a great pattern, it only has 16 steps for the bag, although a few of the steps are time consuming--especially the quilting steps.  You can also opt to use bias tape on the bottom seam of the bag.  I did that on the first bag and then decided that on the remainder I was going to stitch the seam and then top stitch the seam edges down to reinforce them.  That seam was a little easier to handle without the bias trim. 

This is a great pattern.  A beginner could tackle this pattern with great results. 
One thing I had a little trouble with was the insertion of the side panel.  In order to get a great looking side, I decided to stay-stitch the entire edge and clip prior to stitching so it fit together and molded itself together.  I had less headaches and had to do less un-sewing afterwards.  I highly recommend this step for anyone tackling this bag. 

Sunday, December 2, 2012

Vogue 8689

This is such a cute Vogue Basic Design Pattern.  It is one of the custom fit patterns for A, B, C, and D cup sizes.  I love patterns like this!  Here is a picture. 
As you can see, there are a few design variations, which I love! 
Here are the line drawings, which I think help you to 'see' what the pattern is really like:

I choose to make view E but omitted the patch pockets.  My fabric was just too dressy for patch pockets.   See how pretty it is?  I love it! 

Here is a description from the back of the envelope: Misses' shirt: fitted shirts A, B, C, D, E have princess seams, collar and collar band, front band, front and back yokes, narrow hem, flat-felled seams and button closing.  A, B, side slit openings.  A, D: short sleeves with stitched hems.  B, three-quarter sleeves with button cuffs.  C, E: long sleeves with button cuffs.  D, E, patch pockets.  E, bias yokes, pockets, cuffs.  A, B, C, D cup sizes. 

Fabric choices are as listed on the envelope: sheer fabrics, batiste, lightweight linen, lightweight crepe and lightweight broadcloth.  I used 100% cotton from my favorite local quilt shop.  I wish you could clearly see the detail of the fabric, once I laid my eyes on it, I had to have it and knew it was just perfect for a crisp shirt! 

OK, so here is the low-down. 

The pattern is rated as Easy to sew.  I however don't think that a collared shirt with band is 'easy' to sew, so wouldn't want a beginner to pick up this pattern and be fooled by the easy rating.  Band collars are not difficult, but they do require a little practice to get the hang of.  The pattern is however very well drafted: everything fits together well.  I simply love the flat-felled seams.  If you didn't want to go through those extra steps, you could easily serge the seams and just top-stitch and you'd still get a cute effect. 


Directions were easy to follow and detailed.  Images were clear and easy to follow.  One thing that sort of bugged me was that the neck edge of the garment wasn't stay stitched prior to attaching the collar and band.  I did it anyway and found the collar and neckband went together beautifully. Sorry about the wrinkles in the picture. We had just gotten back from church and I should have pressed, but didn't . :)


One really nice thing is how this pattern has you put so many things together so that when you attach the collar and top stitch, all the hemming has been done previously so the total package is neat and tidy.   What I mean by this is that the lower hem is stitched before the front band is stitched on.  The inside looks just a lovely as the outside--see for yourself! 

All you need for notions are some interfacing, buttons and thread.  I used some additional notions that I had and make things easier for me!  For interfacing, I used Shirt-ese and just love it.  I used fabric glue to baste the buttons into place before sewing them on with my machine. 

Sizing is a little small--at least what I feel to be sort of a contradiction: the envelope shows a rather semi-fitted top while the description mentions it as fitted.  I found it to be too-fitted and ended up making a size larger than normal strictly because of how it fit in the chest.  I measured, and should have easily been a C cup but found it much too snug around the breasts.  Since the seams are all constructed using flat-felled seams, I had to cut a new side front and side back in the larger size.  My finished look is much more comfortable and looks much closer to the pattern image. 

What did I change?  Nothing substantial other than making a size bigger than normal.  The length is great.  The sizing is good, but keep in mind that it is a fitted top.  The flat-felled seams are cute and easy and give a great polished result on the inside of the top.  I think I have found a new go-to pattern for a simple blouse! 

I did make my usual 1/2 inch sway-back adjustment on just the center back pattern piece using a wedge at the center and tapering to nothing at the side seams. 

With all the lovely cotton fabrics, linens, and just vibrant colors, you can have so many of these tops. 

Have fun with this pattern! 

Sue

Saturday, November 10, 2012

Vogue 1210 Sandra Betzina

Vogue 1210 Sandra Betzina dress is a new favorite of mine if you want something a little different.
 

Here is a description from the back of the envelope: Loose-fitting, pullover dresses A, B, below mid-calf at center front, have slightly cut-in armholes, self fabric or contrast 'V' neckband, sleeve inset and times, angled hemline. 

The only notion you need is stay tape. 

The line drawing shows the details more clearly.
Line Art

This pattern is rated easy, and I agree!  A beginner could put this together with good results. 
There are only 16 steps to this pattern.  When I first opened the package, I couldn't figure out where the direction page was mostly because it was just one page (front and back) and that is it!  Typically with Vogue you get many pages with many steps! 

So my fabric choice was once again from the red tag clearance bin at Joanns.  I pre-washed and threw this colorful sweater knit in the dryer prior to cutting.  It washed beautifully and this dress cost less than $15!  For the inset, I had the denim looking knit in my stash.  I have no idea why I originally purchased it, but I do like it a lot. 

I made view A with the contrast on the V neck and the sleeve inset.  After reading several reviews on sewing pattern reviews, I decided against the tie.  It wraps under the girls around to the back.  I don't see any reason to emphasize mine as they are plenty big enough anyway so I just left the time off and plan on wearing a belt.  You can see in the model's photo that with the ties wrapping around to the back, it provides quite a bit of shaping to the back. 


I am rather tall (5'7") and I did lengthen the sleeves about 1 inch.  I am glad I did as I feel they are just the right length. 

I did use the stay tape as instructed.  I followed the instructions to a T for inserting the V-neckband and had to unsew twice.  I am still not completely satisfied with it, but it looks fine.  If you look in one of the photos, it is very slightly gaping.  It was really gaping the first two times I inserted the neckband and it is so much better, but I truly strive for perfection and didn't feel I made it to that sacred point. 

I plan on wearing this to work and feel the neckline is a tad low, it seems to stay put when you move in the dress but for extra insurance, I plan on wearing a cami underneath. 

One thing in the pattern directions that sort of bugs me is in step 7 where Sandra states that if the V on the front is not perfect, don't worry about it since it can be covered by the tie.  So I just have to wonder, did she have trouble as well? 

I cut a size D and think it fits pretty darn well.  I wouldn't want it any looser nor any snugger. 
The only pattern modifications I made was to top stitch along the sleeve insert on both sides.  I also added a decorative stitch to the hemline on the sleeves and lower hem. 

As usual, I made a 1/2 inch sway-back adjustment using a wedge at the waistline and tapering to nothing at the side seams. 

Will I make this again?  Maybe.  It is pretty distinct but wouldn't it be cute with short sleeves in a summery print for warm weather? 

Conclusion: make sure your fabric has some drape.  It won't look or lay right if it is stiff at all.  Test the neckline to see if you are okay with the depth.  I knew it would be low, but knew I had just the right color cami to wear underneath.  Sandra's patterns do run a little large, especially in the waist and hip area, so check your measurements against her sizing options.

Have fun with this dress! 
Sue 

Wednesday, November 7, 2012

Vogue 8795


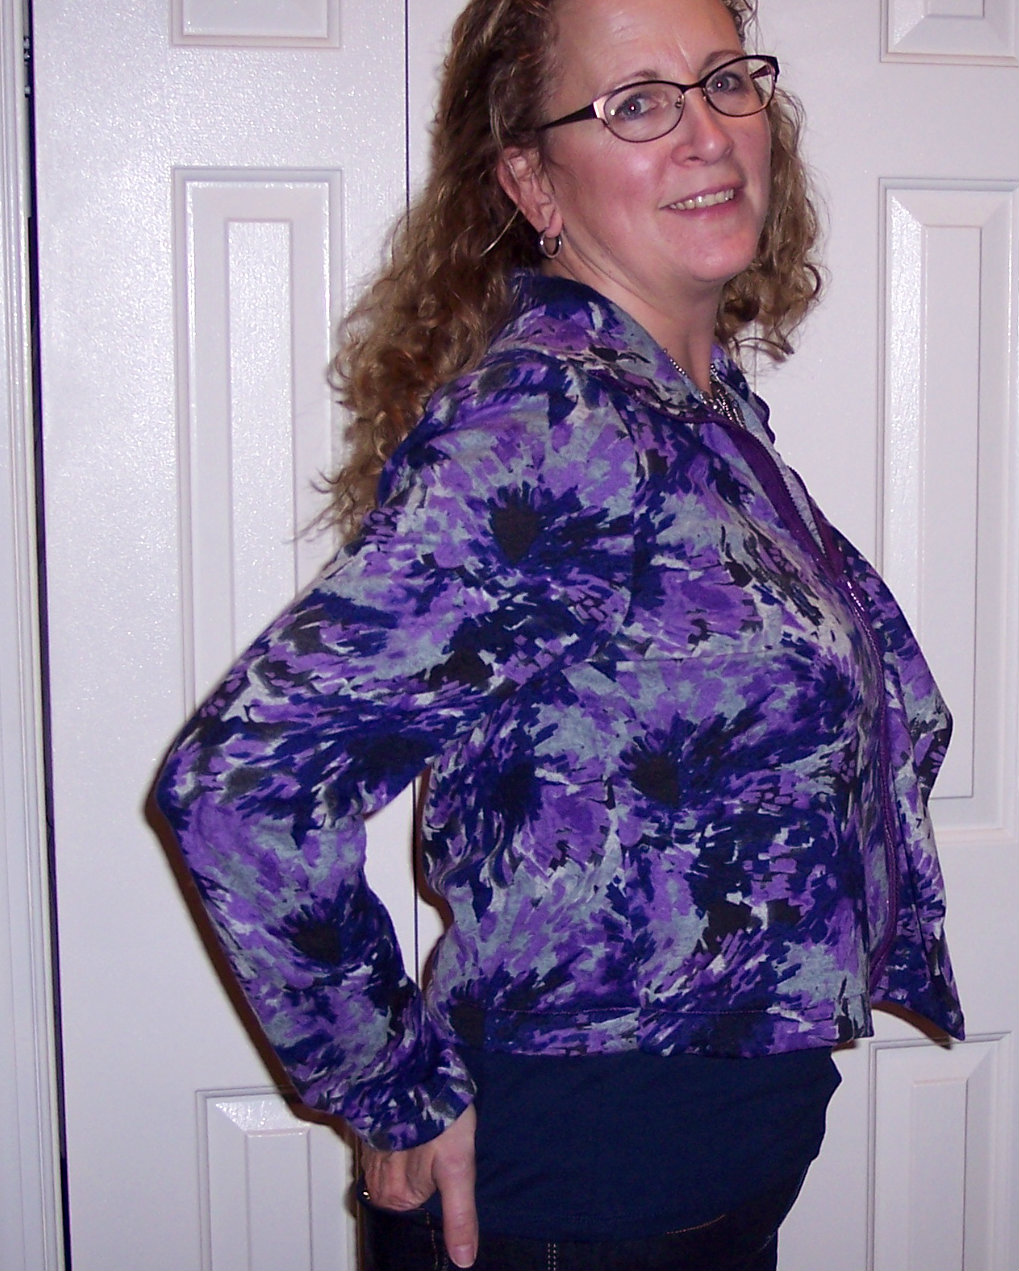
Here is my latest creation, a cute little Marcy Tilton jacket. 

The pattern envelope describes the jacket like this: Semi-fitted, unlined jackets, A, B, C have collar, left front extending into drape and stitched hems.  A: purchased decorative hook and eye tape for closing.  A, C, Right front and right collar edges may be cut on the selvage, wrong side of fabric shows on the drape.  B, C: Purchased decorative zipper. 
This pattern is listed as easy and for moderate stretch knits only.  Sweater knits is listed as a recommended fabric and that is the main reason I choose this pattern. 

I found this lightweight sweater knit in the red tag clearance bin at Joanns.  I am really into knits and purple lately, so I had to have it.  This is my wearable muslin.  I had the purple separating zipper in my stash and was happy it was the right color of purple!  I shrunk the sweater knit by washing it and drying it prior to cutting out.  Now that I have done that, this finished garment will receive a cold water wash and air drying. 


Alterations I made to the garment was only my usual 1/2 inch swayback adjustment.  The directions call for 1 inch wide interfacing the length of the shoulder seam to stabilize.  I prefer using 1/4 to 3/8 inch clear elastic sewn into the shoulder seam.  Ready to wear is usually finished off with elastic and I think it is easier than ironing in interfacing.


I cut a 14 and knew it would be boxy.  I am thinking it is just a little too boxy since it stands away from my waist area.  See what I mean:  
I am sure it doesn't help the way I have my arms back and my hands in my pockets! 

Instructions are well-written and easy to follow.  Depending on your fabric, do take the extra few minutes to hand baste the zipper.  I had not previously sewn on a sweater knit and this proved very helpful to get it to lie smoothly.  The first two times I tried to sew the zipper in, I didn't baste and it took me longer than necessary to get a good final finish. 

A modification I made was to hand baste purple seam binding on the left inside of the jacket, just opposite of where the zipper is sewn in.  March has you construct a facing, however I just didn't like how it lied with the knit I used.  I trimmed that facing close to the seaming for the zipper and then simply inserted the bias tape.  I do like the extra punch of purple it gives. 

I also used narrow strips of fusible interfacing that I ironed to the hems prior to stitching.  That little extra step helped the hemming to be completed easily and quickly. 


I will most likely make this again.  The exposed zipper is a fun touch.  I think it would work in a lightweight stretch woven in a fun color.  If I can find hook and eye tape, I would like to try that as well! 

Have fun with this one!
Sue

Sunday, October 14, 2012

Vogue 8497 Marcy Tilton Top


So, I can't seem to stay away from the Tilton girls, so here is my latest creation from Marcy.  I am beginning to believe that yes, I was meant to be a Tilton and so I am hoping either Katherine or Marcy will adopt me!

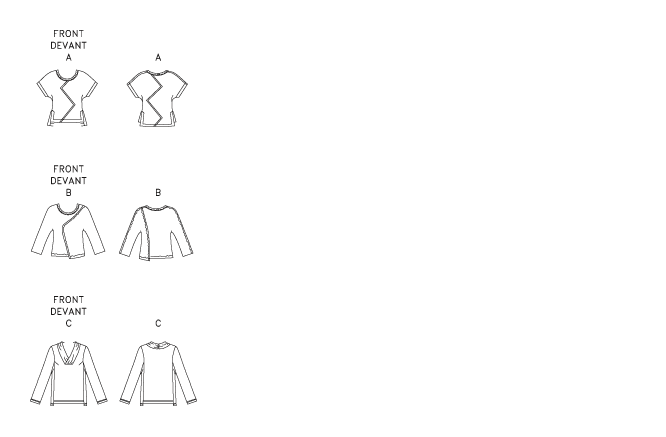
I choose to create 8497 view B.  I just love the lines of the top.  I am in need of some autumn and winter tops and this one fit the bill. 

Here is a line drawing of each view.
My original plan was to use view A, but as I started to lay out the pattern, I felt B was better for my fabric choice.

This is a multi-sized pattern: AA ranges 6 to 12 and EE ranges from 14 to 20

Here is a description from the back of the pattern envelope: Loose-fitting pullover tops have neckline, hem, sleeve, and hemline variations.  A, B, decorative stitching C, side panels (no side seams).
 
So my original fabric I purchased from none other than Marcy Tilton.  I have been eyeing this fabric for a while and finally broke down and purchased some of it.  How fun is a geometric print?  I love it.  The colors are awesome for fall and winter, so I snapped some of it up.  As I began laying this out, I quickly discovered that an entire top of this print would take away from the design details, so I rushed to our newly expanded and improved Joanns.  They had the perfect poly/cotton/spandex blend in basic black to set off the print.  I also decided I needed a transition from the print to stark black so I found a pumpkin-ish colored knit from my stash  that I purchased from Treadle Yard Goods in Minneapolis.  DH thinks the top is 'really different' but in a good sort of way. 
 
Pattern instructions and design is just great.  Directions are super easy to follow.  Drafting is accurate and the fit is just what you'd expect in a garment such as this.  I love that there are  no darts on this top.  Sometimes I get tired of darts in a t-shirt. 
 
I made some minor modifications to the design based on the fabric choices I made.  I added the pumpkin colored ruffle on the curved edges, both front and back.  I added this ruffle just because I felt I needed another color on the top.  I decided to use my ruffler attachment for this job and it was super easy.  I cut 1 1/2 inch strips of the fabric 44 inches wide and ruffled the entire length.  After ruffling, I basted it to the curved edge and then attached the contrast fabric.  I didn't like how my fabric laid on the curve with the raw edges showing, so I removed the contrast or the geometric print and laid it with right side together.  I serged the edges together and turn the geometric print back.  After that step, I followed the pattern directions and top stitched.   I know it is okay to leave raw edges exposed in knits, but I am still getting over my fear of doing this.  It is easier for me if the fabric is heavier as I seem to have more faith in it.  So consequently I couldn't leave the neck edge raw, so I folded it over and stitched.  As a result, the neckline is very narrow, only about 1/4 inch instead of about 1 inch. 
 
Other than those very minor design changes, the made two other alterations.  The first was to take in the side seams about 1/2 inch on each side.  My fabric was pretty stretchy so fit your top before you automatically take any fabric off the sides.      
 
I also lengthened the sleeves so they were long.  I like wearing long sleeves in the winter and to have the option for pushing my sleeves up as it is ually too warm for me.   
 
All in all, this is a great pattern.  I think there are so many variations that you can use this pattern at least 10 times before tiring of it.  To prove my point, I already cut out View C., which is radically different from A or B.  I am excited to see how it turns out. 
 
Try this pattern.  I believe you will have great results! 
Sue
  

Friday, October 12, 2012

Silhouette Patterns, Angie's Top

s  This is my first Silhouette pattern and for it I choose Angie's Top.  I just love the casual styling of this top.  I had read some reviews for Silhouette patterns and found that seamstresses like the simplicity of the pattern instructions. 
I have to say I agree! 

Silhouette patterns have B, C, and D cup sizing.  For this top, cup sizing isn't really necessary.  I found that to be true--sort of, read on. 

I used a fun and sparkly fabric I purchased from either Hancock or Joann.  I have so much in my stash sometimes I don't remember where I purchased what.  :)  My fabric was rather lightweight and the directions do not call for interfacing, so I used silk organza as interfacing just to give the collar section, cuffs, and ties some body.  The buttons I used were antique from a local shop that has some pretty vintage yardage as well.  That fabric will be used at another time, for another review.   


What is unique about these patterns is that you use finished garment measurements to figure out what size you'd like to make.  I started with a three and took the top in on the front sections about 1/2 inch for my final fitting.  I just found the top too loose.  My measurements, based on a favorite blouse with similar sizing would have been about a three. 

These patterns have you break up the sewing into two sessions, although with a blouse as easy and simple to put together as this, you could get it done in one. 

  I like the simple styling of this top.  It is current, simple to sew, and fun.  I really like the white as it shows off the lines in the design. 

This top is rather low cut, so beware.  I will have to wear a cami underneath if I wear it out in public, which I intend to do. 

Simple, fast, stylish, what more could you want?
Thanks for reading!
Sue

Vogue 8620 Marcy Tilton Jacket


Here is the description form the back of the pattern envelope: Semi-fitted jackets, A, B, have pockets, underarm gussets and front zipper closure.  B: silk-screened embellishments.  Package instructions include silk-screening. http://www.bing.com/images/search?q=Vogue+8620&view=detail&id=21182C825FA8584825AB7183FE61B00F1C611F1D&first=1


I love the fabric used on the pattern envelope. 

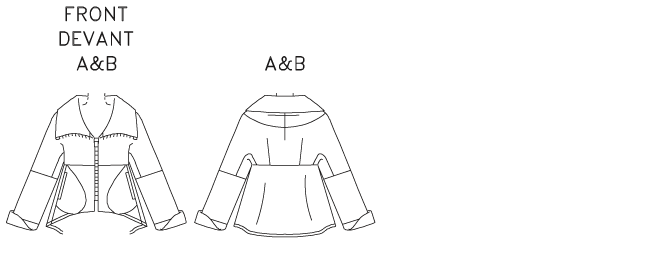
BB is 8 to 14 and FF 16 to 22. I made a 14 and like the fit.  You can see the detail in the line drawing all the details.  http://images.patternreview.com/sewing/patterns/vogue/8620/8620line.gif

Did it look like the photo/drawing on the pattern envelope once you were done sewing with it?
Yes, I think so!  I even silk-screened in the places Marcy advised to do so.  I didn't have the exact screens she used, but all the same, I do like mine and the placement is awesome.  Not too much but also just enough.  Know what I mean? 

Were the instructions easy to follow?
Omg, the instructions were wonderful!  I hadn't made a hong-kong finish in a while but felt the directions were great.  I had not previously made underarm gussets but the directions walked me all the way through without any difficulty.  In the above picture, I had been squirming and my photographer got a little impatient.  It really doesn't have that many wrinkles in it.  :)  I hope you can see the silk screening I used. 
 
What did you particularly like or dislike about the pattern?
I just love the styling of this jacket.  It looks very high end with a minimum amount of work.  Don't leave out all the little touches like topstitching around the pockets, hand-basting the zipper, and such.  Those touches make this jacket look boutique like. 

Fabric Used:
I just love this red denim I picked up at JoAnns.  It has just a little bit of stretch and the color is so pretty!

Pattern alterations or any design changes you made:
I didn't alter a thing.  Gasp!  I usually alter at least one thing, but this time absolutely nothing. 

Would you sew it again? Would you recommend it to others?
Yes.  I would really like to find a fun print like is shown in view B. 
http://www.bing.com/images/search?q=Vogue+8620&view=detail&id=21182C825FA8584825AB7183FE61B00F1C611F1D&first=1

Conclusion:
I just loved making this jacket.  It was fun to put together, the instructions are easy to follow, and it looks very high-end.  What fun for fall! 
Thanks for reading!
Sue