About Me

My photo
Sewing is therapy for me. I hoard fabric, patterns, notions, and spend more time shopping for fabric than I care to admit...

Wednesday, June 10, 2015

Butterick 6216 to the rescue!

I wanted a fast make for an upcoming trip to see DD1 and SIL1.  Even though I have a billizion patterns, (yes that is a real numerical value for an out of control stash...) I just couldn't find one that jumped out at me and said, YES my turn!


I did what any girl would and drove to Hancocks and found, oh lucky me!, that Butterick patterns were a measley dollar something.  So, purchased several.  I mean, I had to...am I right???

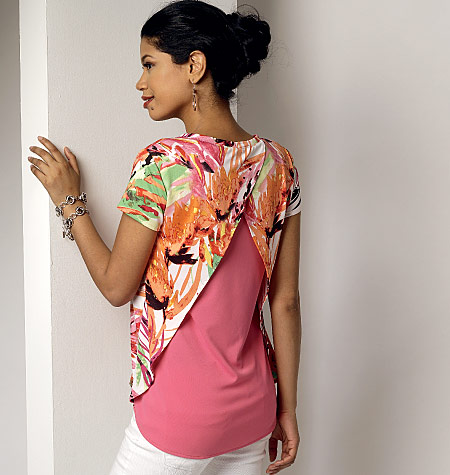
Butterick Misses' Tunic 6216


Butterick 6216 to the rescue!  Isn't it darling with the all business in the front but a definite party in the back!  I choose view A and had the two perfect fabrics from my stash that I knew would work perfectly!  I don't sew a lot of Buttericks, but with my success, I will be sewing more!


Instructions are very clear and easy to follow for this.  My two fabrics are remenants from other projects--both tops!  I don't recall the fiber contents but they are similarly stretchy and had good recovery.


I used seam binding instead of bias tape to stabilize the shoulders.  I thought it worked great!


My only real deviation from the directions/design was to hem the back undershirt portion and cut the top front and back slightly longer so I had room to turn and hem the same length as the insert.


I really like the neckband is included for the pattern that was very well proportioned and went in the neckline easy with no ripples!  YAY!


This top goes together easy and fairly fast!  I would say it took longer to hem the back overlay than it did to make the entire thing!


Oops, almost forgot that I made an FBA and also a swayback adjustment.


I just love my top, mostly because of the colors--this watermellony or geranium is one of my favs!!!


Thanks for reading!

Sue

Tuesday, June 9, 2015

The Men in my life!

Have you ever sewn for the men in your life?  Do you have many of them?  I have a husband, father, two sons two son-in-laws and an adorable grandson.  That is a lot of men!  I decided to create a shirt for them all, except for my father who is probably one of the pickiest people on the planet when it comes to clothing....but that is another story!

I chose the Strathcona Henley from Thread Theory as my pattern base.

I

I like the slim fit of the top--do you call it a top for a man?  Maybe I'll refer to these as a tee shirt with variations.  The pattern is described as a modern fitting, or slim fitting tee with neckline variations, sleeve length options, and the opportunity to create a Henley placket if you desire!


I briefly asked several of the guys what color of a shirt they would like/possibly wear if I made them one and they came up with gray or blue. Funny in a weird sort of way!  So, I made things easy on myself and ordered 4 yards of gray and 4 of the navy blue.


Both are lighter weight poly blend with good stretch and recovery.  I also let each of the choose their preferred style: long or short sleeves, placket or not.  I guessed on my grandsons as he is only 21 months and probably doesn't really care as long as it is comfortable.


The first shirt I made was for the hubby who wouldn't benefit from a slim-fitting top :).  I knew I would have to majorly alter the pattern to fit him.  The size range on this pattern is XS to XL.  The size on the pattern for an XL is 46-48" chest and 40-42" waist.  Without telling you his exact measurements, I knew I would have to widen the waistline by at least five inches so I added three inches to each side starting under the arm and ending at the hemline creating an a-line shape.  I only did this on the front shirt as I was thinking about how for me I have to create FBAs and I only do that on the front of the garment, not the back.  He also wanted elbow length sleeves and the crew neckline.


Construction is very easy and intuitive for this top and the instructions are really very good!  A beginner could tackle this with the right fabric and a good set of measurements--which in hindsight means more than just the chest and waist.  You also need to measure neckline length and depth, shoulder area and sleeve length.  All the necessary steps are in place for this pattern--stabilizing the shoulder seams.  Have you ever watched a guy pull off a shirt?  Not at all like I do which is carefully. They just grab the back of it by the neckline and yank.  I made sure to sew a stretch stitch everywhere and I topstitched everywhere as well just to keep this from falling apart in the future.


My first go for the hubby didn't receive the reaction I was hoping for--he HATED it!  He didn't like the lightweight fabric and he prefers his tops loose, not a slim fit as the pattern calls for.  I had him get a tee from his closet that he likes the fit of and I found a heavier all cotton knit and drafted my own pattern for him.  Success!  I have his approval now yay!


Next up was Daniel, my youngest.  He isn't a big guy.  His adorable wife makes him eat as he forgets! No wonder he ended up with the smallest shirt--next to the grandson of course!


Daniel needed a small shirt.  His chest is 36.5" and waist is 31.5.  He is always cold so he asked for long sleeves and in blue, just like dad!  He also wanted the shirt to look like he was wearing a short sleeve top over a long sleeve so could I put gray long sleeves there as well?  Of course I can!  In the photos, he is wearing Kevin's shirt but holding his shirt.  Why?  No idea but that is what he wanted to do so I rolled with it.


Andrew, my oldest son is the only guy requesting a placket.  He asked for gray and needed a medium as his chest is 40 with a 34 waist.  He is about 6'2" and I also measured the sleeve length for him as I was concerned it may be a little on the short side.  The placket directions for this tee are very interesting and drafted pretty much like what I imagine an engineer to draft a placket like.  It isn't difficult at all but there are a few steps that do help you get a very nice looking placket.  My only regret with this is that I wish I would have interfaced the placket area on the shirt itself as with this lightweight knit, it isn't the best placket I've ever made but it will do for Andrew.


Now, onto the son-in-laws.

Kevin and Daniel as just about exactly the same size with Kevin's chest being an inch bigger but with the same waistline.  He lives in Baton Rouge so I knew that he'd rather have a shirt a little bigger than smaller with all the heat and humidity present.  I went with a medium for him.  He too wanted gray with short sleeves.  I had a little mishap with his top and as I was trimming threads I accidentally cut a small hole in the sleeve.  Did I mention his was the last make of six shirts?  I just about cried but then remember that Thread Theory sends you an awesome little label for your shirt so I stitched that over the slit and now it is a cool design element--sorry you can't see that in the photos!


Brad, or son-in-law 2, needed a large with a chest of 44.5' and a waist of 39.5.  He is a solid guy and so is his son, my adorable grandson, Simon!

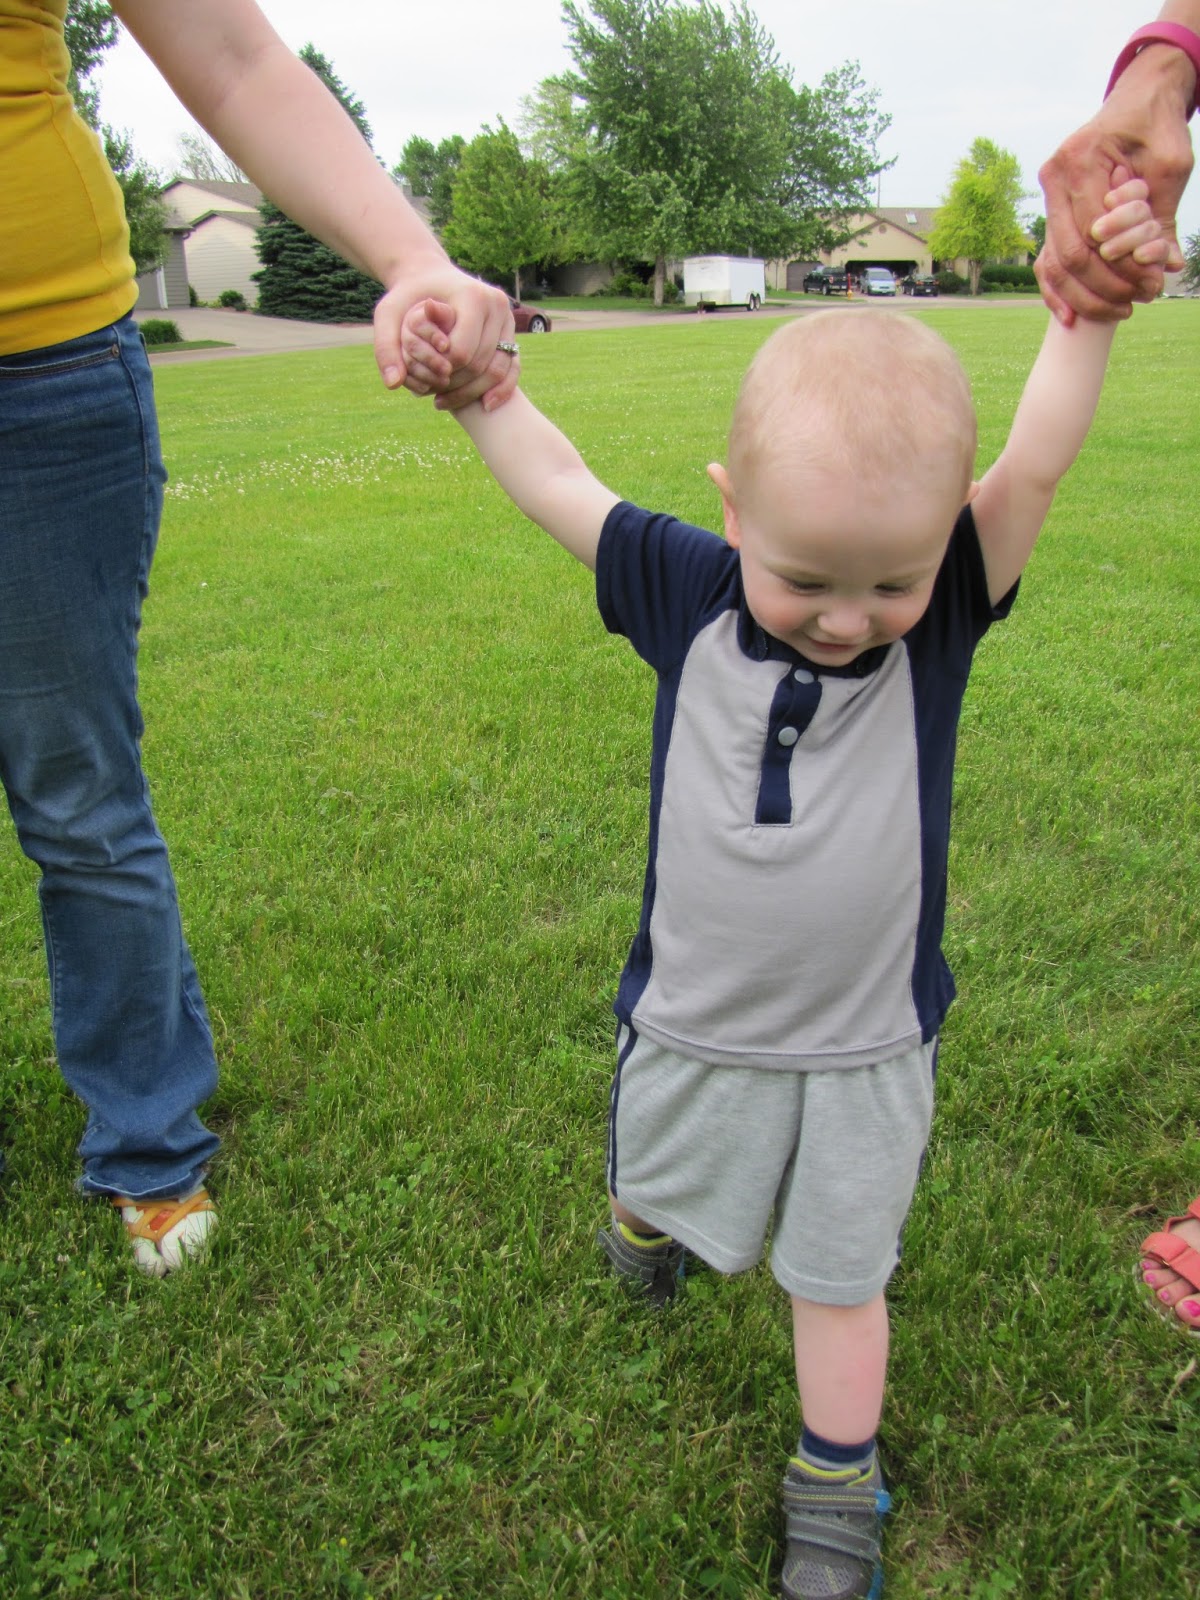
Simon's shirt was a mashup of the blue and gray and I used McCall's 6683.


I'd made the romper for him before and knew the pattern would fit.  I just left off the collar but kept the stand.  Simon measured 20 chest and 21" waist.  I asked his mommy if she wanted another onesie for him and she said no, simply because he occasionally likes to play with his belly button.  Oh the joy of being less than two years old!


It was interesting and fun to sew for the guys in my life.  They are just a picky when it it comes to fit, color, fabric weight and texture.  I'd really like to introduce some more color into their worlds but at least I didn't have to make six brown shirts.  Gray and blue was at least some variety!


Thanks for reading this very long post! Try this pattern from Thread Theory Designs, as long as your man is very slim and doesn't mind a clingier fit.  It's well drafted and looks good on a smaller sizes and shapes--as long as you aren't out of square--meaning your waistline is larger than your chest!  I'll make more of these if they ask, or maybe I'll just make more and give away to all these guys!

Sue



Friday, June 5, 2015

Sewaholic pattern Alma Blouse


I've had this pattern for a while, as this is one that I thought I must have a while back, purchased it, and promptly filed it in my stash.  Argh. Why don't I have a better system? I'll come up with one, I hope!

This is a very simple, semi-fitted pull over blouse with neckline and sleeve variations.  There are a lot of variations with this top, so if you love sewing with woven fabrics, this is for you!


Sewaholic patterns are made for pear-shaped women.  That translates into a smaller bust but wider hips.  Well, I am typically an hourglass or borderline rectangle which means that I have to make some modifications to the fit.  :)


I started with a size 14 but made an FBA as well as taking this in at the waistline and hips. Both of these alterations didn't surprise me in the least so I was well-prepared to make quite a few adjustments to the top prior to taking photos for this blog and more importantly, wearing in public!


I made the body of view C, with modified sleeves of B which I shortened by about 4 inches sans the belt.  I tweaked the fit quite a bit which I'll detail.  Can you see my invisible zip?  I am very proud of how well I put it in!  SCORE!!!  Hint, it's on the side I have facing the camera on the above photo!


My high bust measurement is about 36.5 inches.  In the past, I'd use my full bust to make a garment and would swim in it!  It is MUCH easier to make an FBA and I highly recommend it!  I typically use two resources for this: The first is a Craftsy class I took with Kathleen Cheetam (hope I spelled that right!) called Adjusting the bust and the second it a book called Fitting for Real People.  Both are equally helpful when it comes to making an FBA and both have similar methods.  One thing that I figured out is that I only need the adjustment in the bust not lengthened to the waist as a lot of classes and books recommend.  So, my FBA stops at the waistline.


I have been working to rid my sewing of facings, that is if I can without compromising on style or function so with this blouse, I used Lynda Maynard's book on Sewing with Couture Techniques to make banded neckline.  The technique has you measure the length you need, add four inches, and press the fabric to allow for shrinkage.  You also figure out the width of the band by adding the seam allowances, multiplying by two and adding an inch.  Don't gasp when you think of how wide this is, see how small mine ended up?  This is a great ratio!  Just make sure you staystitch the neckline before applying the band so nothing stretches out of shape.  I ended up making a double row of topstitching at the neckline to keep the seamline stay put, plus I like how it looks on the outside of the finished top.


Typically I lower the bust apex by an inch on the big four patterns and did this on this top but I was so wrong in assuming that I needed it!  I had to resew the darts to a higher apex placement, which is very unusual for me!


With the sleeve length, I like the length of the elbow, but wanted one shorter as it was so stinking humid today that I needed some breathing room--if you know what I mean!  I do think I will make a straight-up view B soon as I love the collar and sleeve length.


I used this super pretty linen-blend fabric from Hancocks.  It washed beautifully, pressed well and was on sale, so this was a very economical top to sew.  I had leftover fabric from the 1.5 yards I purchased so this is a top that you could splurge on some very nice fabric if you felt like it!

The invisible zipper was the most challenging part of the top and I spent the most time working on perfecting it.  I purposely used an ivory color just to show you that if applied correctly, you don't have to have a perfect color-match.  I used the newest issue of Threads Magazine for tips on how to insert this without ripples or having it show.  The only thing I will invest in is some nail polish the same color as the top so I can paint the zipper pull so it doesn't stand out so much!  Can you see it below?  If you insert an invisible zip correctly, you shouldn't be able to!


All in all, I like this top.  I most likely will sew again, especially since I spent so much time fitting it and fiddling with the details.  I am very pleased with the color as it beautifully coordinates with this lovely scarf my son and daughter-in-law gifted to me!

Thanks so much for reading!!!
Sue


Wednesday, June 3, 2015

Revisiting a favorite pattern and mixing it up a bit!

Without a doubt, this is one of my favorite patterns.  It is super easy, super stylish, and so many variations!


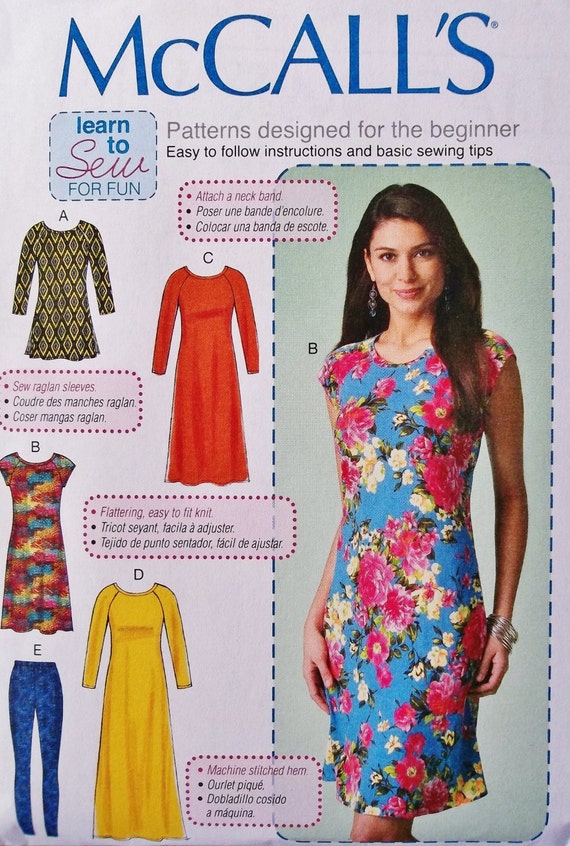
See what I mean?  I love the raglan sleeves.  Depending on the fabric this dress can be casual or more formal.  I've made the dress twice and this time I had to make the tunic.  Oh, and I MUST try the leggings!  

 Here are my first two versions:


This pattern is designed for a beginner but that doesn't mean that an experienced sewer can't use it as well!  When I find a pattern like this, I just love playing with different fabrics to see how many looks I can create.

In case you are wondering, this is a pullover tunic and dress that is close-fitting through the bust that has a neckband--YAY! and narrow hems.  The leggings have no side seams and a stitched hem along with an elasticized waist.
  

For this pattern, it's very important to get the fit right through the shoulders, neckline, and chest and I like dresses/tunics such as this to also give me the illusion of more of a chiseled waistline than I probably have and this one fits the bill!  It also skims over the hips and outer thigh.  I feel pretty good about how I look when I wear clothing from this pattern!  Also, I purposely didn't match the stripes at the shoulders.  This way I think it highlights the raglan sleeves.  


Will you just LOOK at this freaking cool fabric?  It is a "white/multi abstract art print made from Rayon and Lycra".  I purchased it from Fabric Mart when they were having a sale on knits.  I snagged up 2.5 yards of this for $4.50 a yard!  It was even prettier in person when it arrived at my door step so I couldn't wait to make something cool from it.  It sewed beautifully and washed and dried like a champ.  If it wasn't so distinct, I wish I would have gotten more!  


So I pretty much made view A but the sleeves were a little longer than I would have liked.  I am 5'7" with my extra length in my legs so if you are shorter you'll want to shorten the sleeves or if you have longer than normal arms, you'll want to lengthen those.  Typically sleeves are just about perfect on me when I make up a pattern.  Back to the sleeves--I turned them under a good three inches, hemmed and then cuffed them.  I like this length a lot!  


Did I mention that neckband?  I cut that on the cross grain rather than lengthwise so the stripes ran perpendicular to the top's stripes--just to change things up a bit.  What I didn't take into account was the fact that there isn't as much stretch on the cross grain so I had to cut the neckband about 2 inches longer.  That worked MUCH better!  


With this being a tunic, I just hate tugging them down and I was a tiny bit worried it might be short so I went ahead and lengthened it an inch and it was a great call!  


Wow, wow, wow do I love this pattern.  I can't wait to make it again!  

Thanks for reading!
Sue 

Summer white with a bit of black lace just for fun!

I. LOVE. white. summer. tops.  Yep!  I stood in front of my closet and wondered why on earth I haven't made many of them?  I gravitate towards them if I am in a department store such as Younkers, Macy's, and Target but when I was evaluating my creations as part of MMM I realized I don't have any white summer tops that I've made.  The time had come to change that...


In pops McCall's 7093 a cute little number that is basically a woven tee with some oomph and in a good way!  I love the color-blocking options, sleeve length variations, and hemline playfulness you get with this pattern AND at a recent trip to Hancock's it was only $1.49.  It was destiny, I had to have it!


I also purchased the white rayon I am made the top from on sale and the 1.5 yards I purchased cost me a total of 5 ish bucks.  I figured even if it didn't wash well, as a muslin it would work. Well, it washed beautifully, presses well and is perfect for creating a breezy top for the high humidity and summer temps that will hopefully eventually arrive!


I made a 14 with an FBA and no other adjustments.  I had the black lace fabric on my cutting board to use for another project and thought, why not?  I had enough to add to the front piece so I basted both pieces together and treated it as one.  Both are machine washable, and the black lace I've use in other applications and it washes beautifully so I took a chance on it with this top.


Construction is super easy.  There are five pattern pieces and if you include the pockets, six.  To create the sleeve shaping you sew darts where the shoulder seams would be.  My darts are much longer than the pattern originally called for.  I would have to make this again to figure out if the pattern is incorrect or if it was due to my fabric.  Guess I will have to make another one in order to figure that out!


One detail I LOVE is that with this new McCall's pattern you create a bias binding from the main fabric and sew that to the right side of the neckline, fold to the inside and topstitch in place.  The facing is now a design element, lays beautifully, and is so much easier to apply and make look good rather than using purchased bias tape.  Kuddos to you if you can make that application look nice!  Not sure why my eyes are closed but we'll roll with it...


I really love this top.  I am wearing it with black capris that are Not Your Daughter's Jeans that are awesome and one of the very last RTW purchases I've made.  I'd love to make a copy of them!

Thanks for reading!
Sue