About Me

My photo
Sewing is therapy for me. I hoard fabric, patterns, notions, and spend more time shopping for fabric than I care to admit...

Thursday, June 19, 2014

Named Clothing--Kanerva Button Back Peplum Blouse


 How cute is this little top from Named?  This is their Kanerva Button Back Peplum Blouse.  I ordered this pattern yesterday, downloaded it, and had it taped together in about an hour.  What I really love about this download is that you can choose which size you want  to print rather than have a range of sizes from zero to 14 in one.  I mean, I will never be a size zero, so why should I have to mess with it?  I printed off the size range I wanted and am very happy I only had two cutting lines to deal with and sort out.  :)   
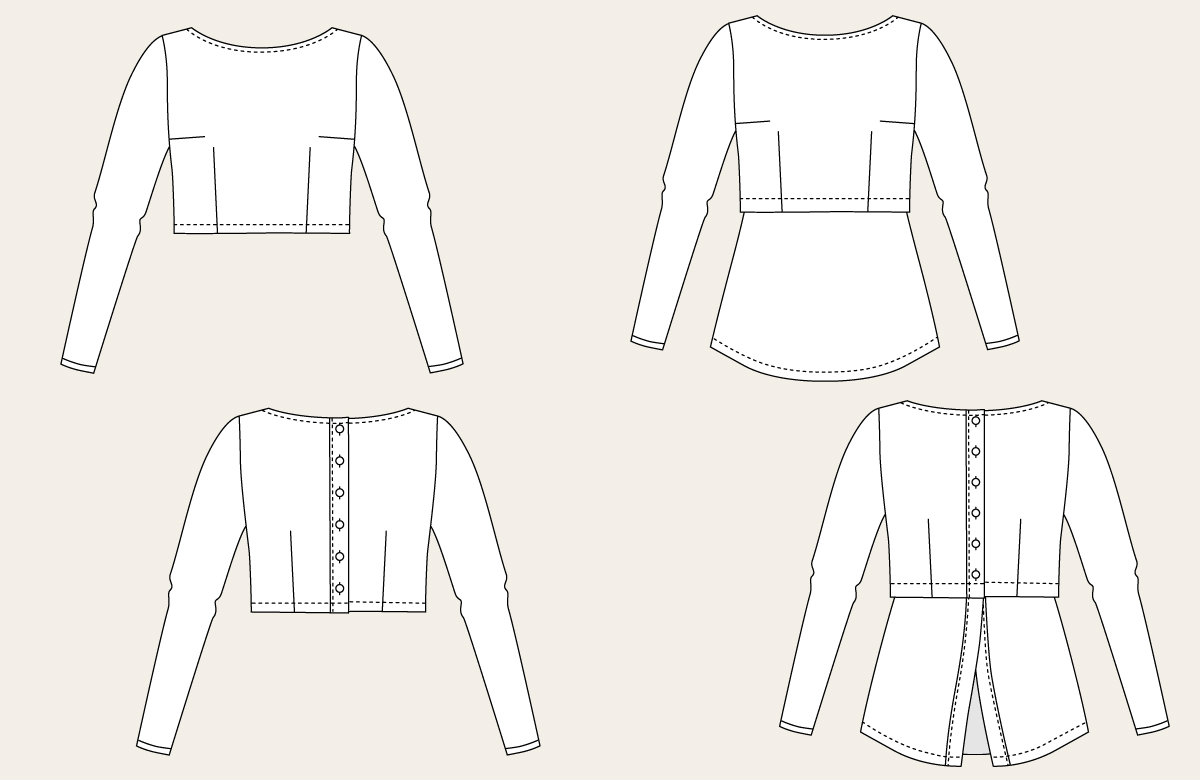


This pattern in rated as either simple or average depending on if you add the peplum or not.  I don't think the little skirt on the top added to the difficulty at all.  In fact, I would rate this entire pattern as simple.

So back to the download.  This was an environmentally responsible download.  There were 12 pages and the pattern pieces overlap one another.  After taping together, which went very smoothly as everything lined up perfectly, I used pattern tracing cloth that I purchased at either Joanns or Hancocks and using a permaenet marker (sharpie?) drew all my lines and markings necessary.  Next came choosing fabric and I choose this pretty little blue and white number from my stash.  Actually, this was a recent addition.  It is a vintage find from an antique store not too far from my home.  Since it was only 36" wide and I had only two yards, I had to shorten the sleeves, which is okay by me for this version.  I think it is fun to use vintage finds once in a while as I can't imagine how some of the dresses were made.  This fabric is from the 1940's!  It was in beautiful condition but as you can imagine a little fragile.  I will tell you how I managed that in a bit.


After cutting out and beginning to sew, I did pause and read the directions.  They were clear and concise and there was a great deal of helpful information if you are a beginning seamstress.  I found the actual steps to creating the top clear and concise.  The visuals are helpful as well.  I do believe there is one mistake as far as the visuals are in step five.  The task is to sew the back waist darts on the top but the image shows the bust dart.  If you are new to sewing, you may wonder where the heck that dart is that you are supposed to be sewing!


Other than your fabric, you need very little else to complete this top.  One inch strips of the length of the top is needed of fusible interfacing as well as six button closures.  Luckily I had all this stuff in my stash including the matching snaps I used instead of buttons--yippee!  I just needed a few hours to sew today not another run to the local fabric joints for a few measly notions!


Ok, so here is what I modified from the original pattern.  Oh, and isn't it cute?  Remember when I mentioned my fabric was a little fragile?  Well, while handling the fabric's cut edges, they tended to fray quite a bit so instead of turning and hemming the neckline and sleeve hems, I cut bias bands of the tiny bit of self fabric left over and serged that to the edges, turned those and topstitched about 1/8 inch from the seam.  It feels much more secure that way to me, especially as I continued to handle it.  Also, the directions didn't mention staystitching the neckline but I thought it was necessary so I added that step as well prior to attaching the neckband.  Instead of using buttons, I did use plastic snaps and my Kam snap pliers to set them and am very happy with the results!


So, I like the result of this little top.  The button up back is darling and the peplum is so sweet and cute.  There is enough ease that I can slip this on and off over my head without having to use the snaps--another like!  Everything went together well and I can't wait to try this in a beautiful floral cotton I purchased from Emma One Sock.  I did measure the location of the snaps prior to putting them in and feel like the bottom most one needs to be a tad lower so it more closely matches the model.  I will hopefully remember that for next time!


Thanks so much for reading my post!
Sue  

Friday, June 13, 2014

Vogue 8774 Really colorful pants!

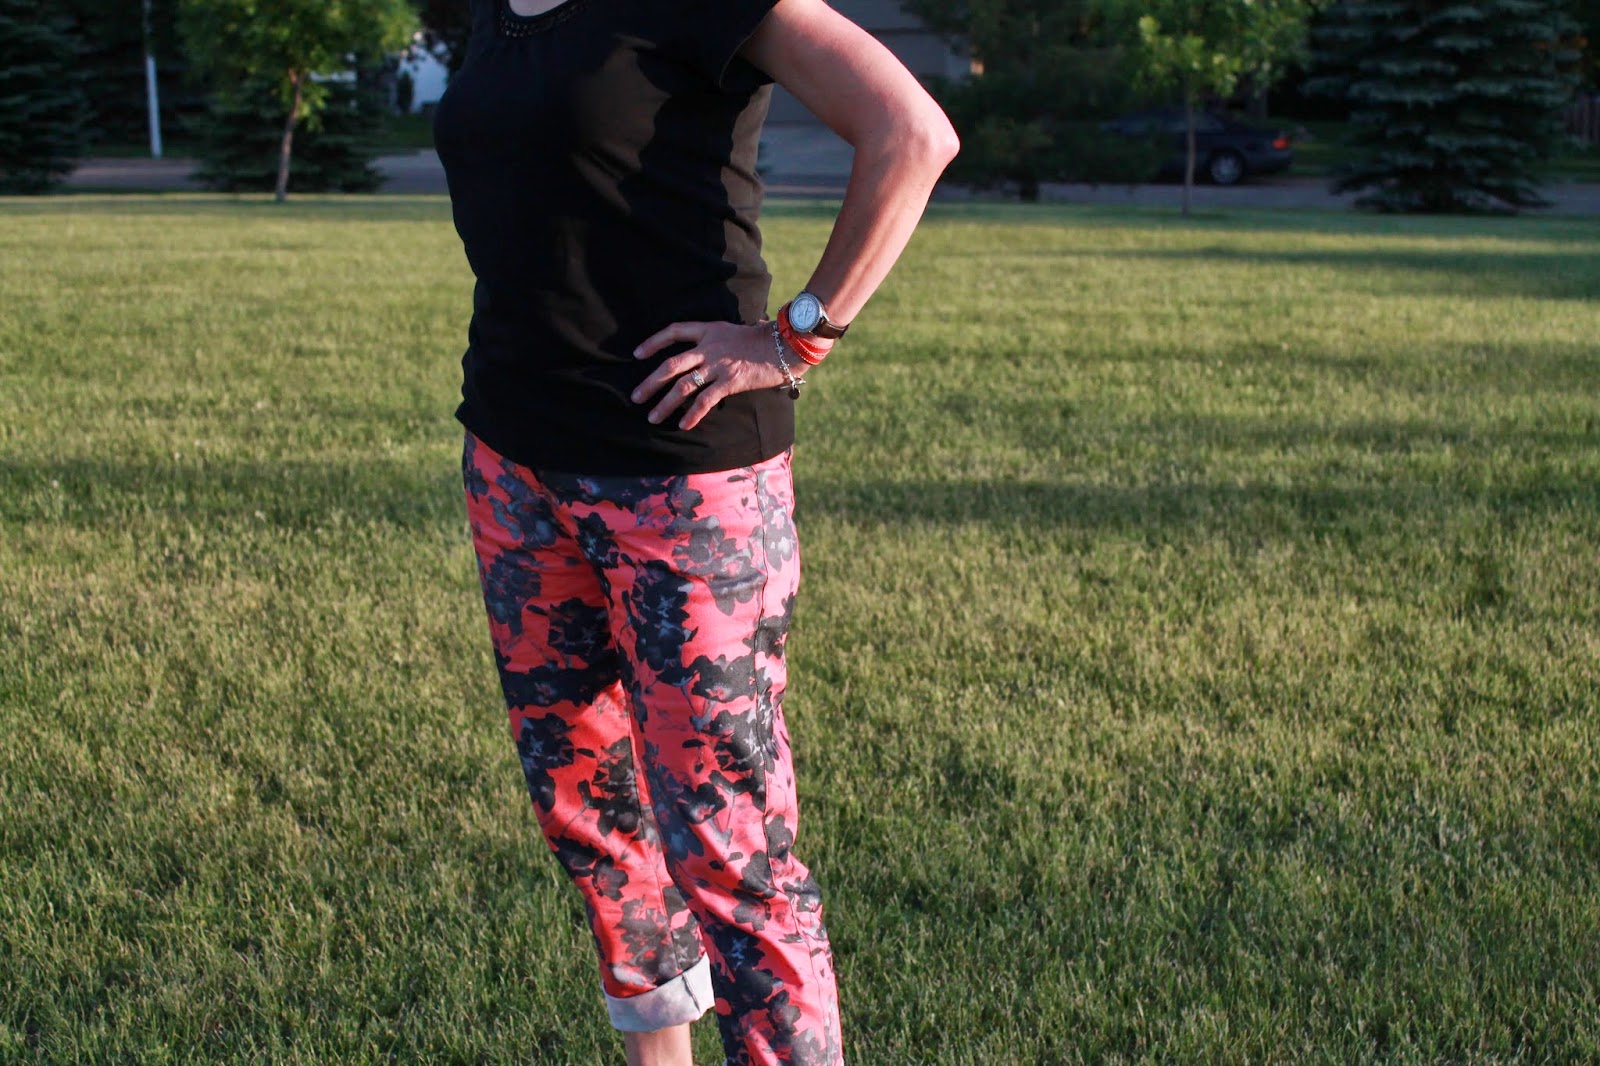
I had to make this Vogue pants/jeans pattern again.  I had so much fun the first time and have worn those pants numerous times, so I went to the drawing board again and pulled this beautiful but bright and busy fabric from my recent purchase.  I am sure DH thinks these will glow in the dark they are so bright, loud, and colorful but I don't care.  Floral pants are everywhere and with salmon/coral being my all time favorite color, I went for it and made them.  He can walk behind me if necessary.


From cutting out to sewing on the hook and eye closure, it honestly took me only about 3.5 hours to make these. Not sure why they whip up so quickly other than this is probably the best fitting, most well written pattern I have used for jeans.  Nothing needed ripped out, redone, or resewed.  I even added a few topstitching embellishments within that time frame I mentioned earlier.


Cutting out I started with a 16 but with my fabric I graded to a 14 in most places, particularly the legs.  If I didn't mention it earlier, I made view A or the straight leg version.


In case you are wondering this is a printed twill/denim from Emma One Sock.  It washes and dries beautifully.  I didn't attempt to match the pattern repeat.  I just didn't have enough yardage for that nor did I think it would add to the design.


I only added one row of topstitching in all the places shown on the pattern directions just because I didn't want anything to take away from the beautiful fabric and I felt like a double row of topstitching would do that.  It didn't help that I used black thread for my topstitching.  I didn't have the right color coral to match the fabric and I had already been to the fabric store twice in two days.  I just wanted to settle in and sew.
BTW, I am very happy with how my fly topstitching looks.  :)  I did however topstitch along the inner and outter leg seams along with the center back seam or butt of the pants. 


I plan on wearing these pants rolled up.  I am 5'7" and the pants hit me a little short to wear uncuffed so I need to remember to lengthen these when I make them for cooler weather.  I totally plan on this pattern becoming my TNT jeans pattern.  The fly goes together so well and you don't have that annoying gap that shows glimpses of the zipper.  Vogue solved that little issue with this pattern.  Yay!  Speaking of pattern strengths, I like how the waistline hits you at the top of my hip bones, about 2.5 to 3 inches from my natural waistline.  This is the perfect place for comfortable pants to sit--not too high, nor too low.


I like the little details as well with the watch pocket and the optional topstitching design you can incorporate onto the back pockets.  I added the watch pocket but didn't add the embellishment on the pockets.  Next time, I just might!  

All in all, I love my pants.  I wore them all day today and found them extremely comfortable, colorful, and fun to wear.

Thanks so much for reading! 
Sue

Sunday, June 8, 2014

Burda 7250 Take 2!

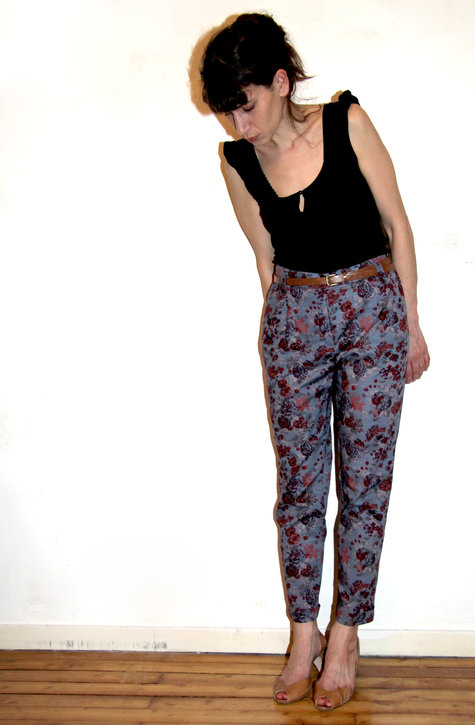
After making my khaki pants, I realized I had to make a  floral pair just like this picture I posted above.  How cute are these?  I simply love them!  


I ordered fabric from Emma One Sock and it arrived just in time to make another pair of Burda 7250.  This is the first time I've ordered from this site and it won't be the last!  My fabric came in individual packages that had tissue paper inside, sort of like when you buy a garment from a better clothing store or department store.  Well, one of the fabrics was this adorable linen print.  I had to make these pants again!  


These look a little wrinkled and they are.  We just got back from church and I had DH snap some pictures.  


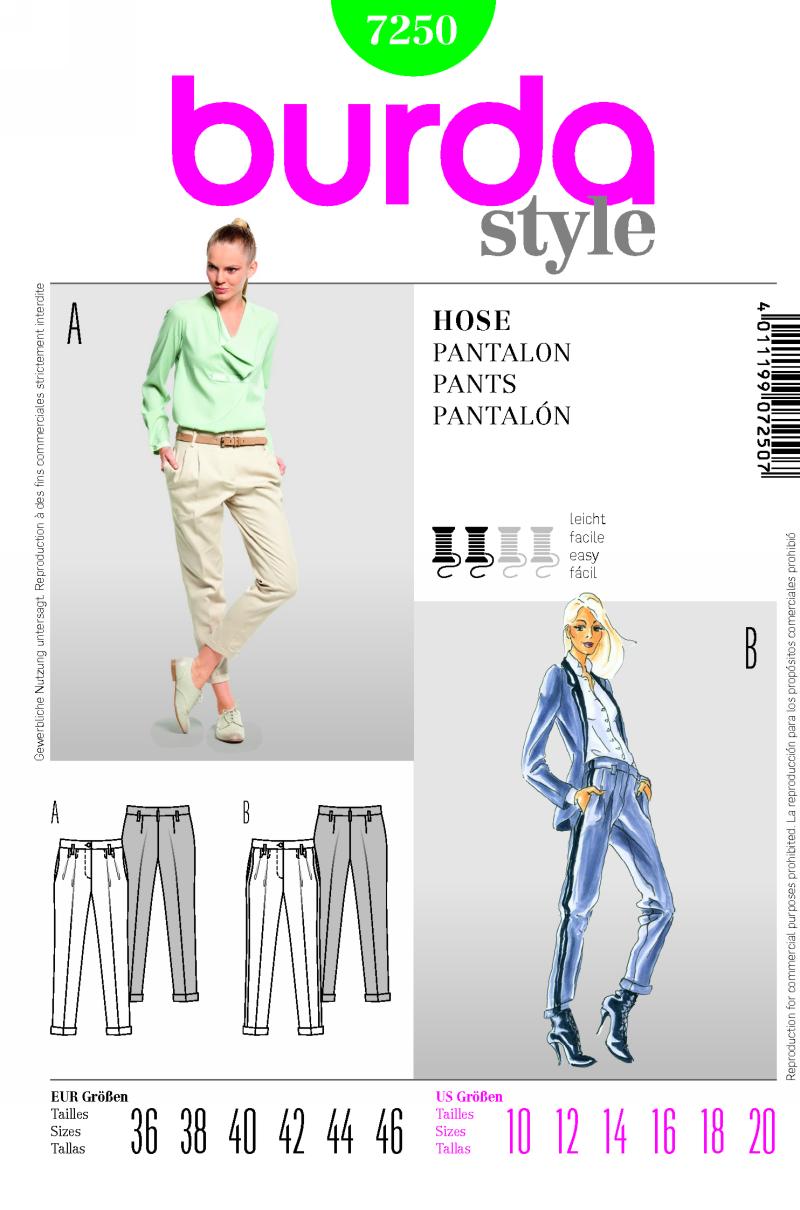
Burda doesn't give much of a description for this pattern other than semi-fitted.  There is a view A and B.  The only difference is that B has a stripe of other fabric, ribbon, or what have you down the outer leg seam.  I choose view A. I purchased 2 yards of this almost 60" fabric and have a little bit left over, perfect for the cuffs or inside stand of a collar.
 

I think my finished garment looks quite a bit like the pattern envelope.  I did make a couple of changes which I will highlight below. 

Likes/Dislikes:
Love the styling.  The front pleats are different.  The ankle length cuffed pants are darling, perfect for showcasing cute shoes!  If you are tall, you may want to check the length.  I am 5'7" and I wouldn't want these any shorter for ankle-length.      

I like the fit of these pants. They are very comfortable to wear.  I made very few changes to the pattern straight out of the package.  More on that later. 

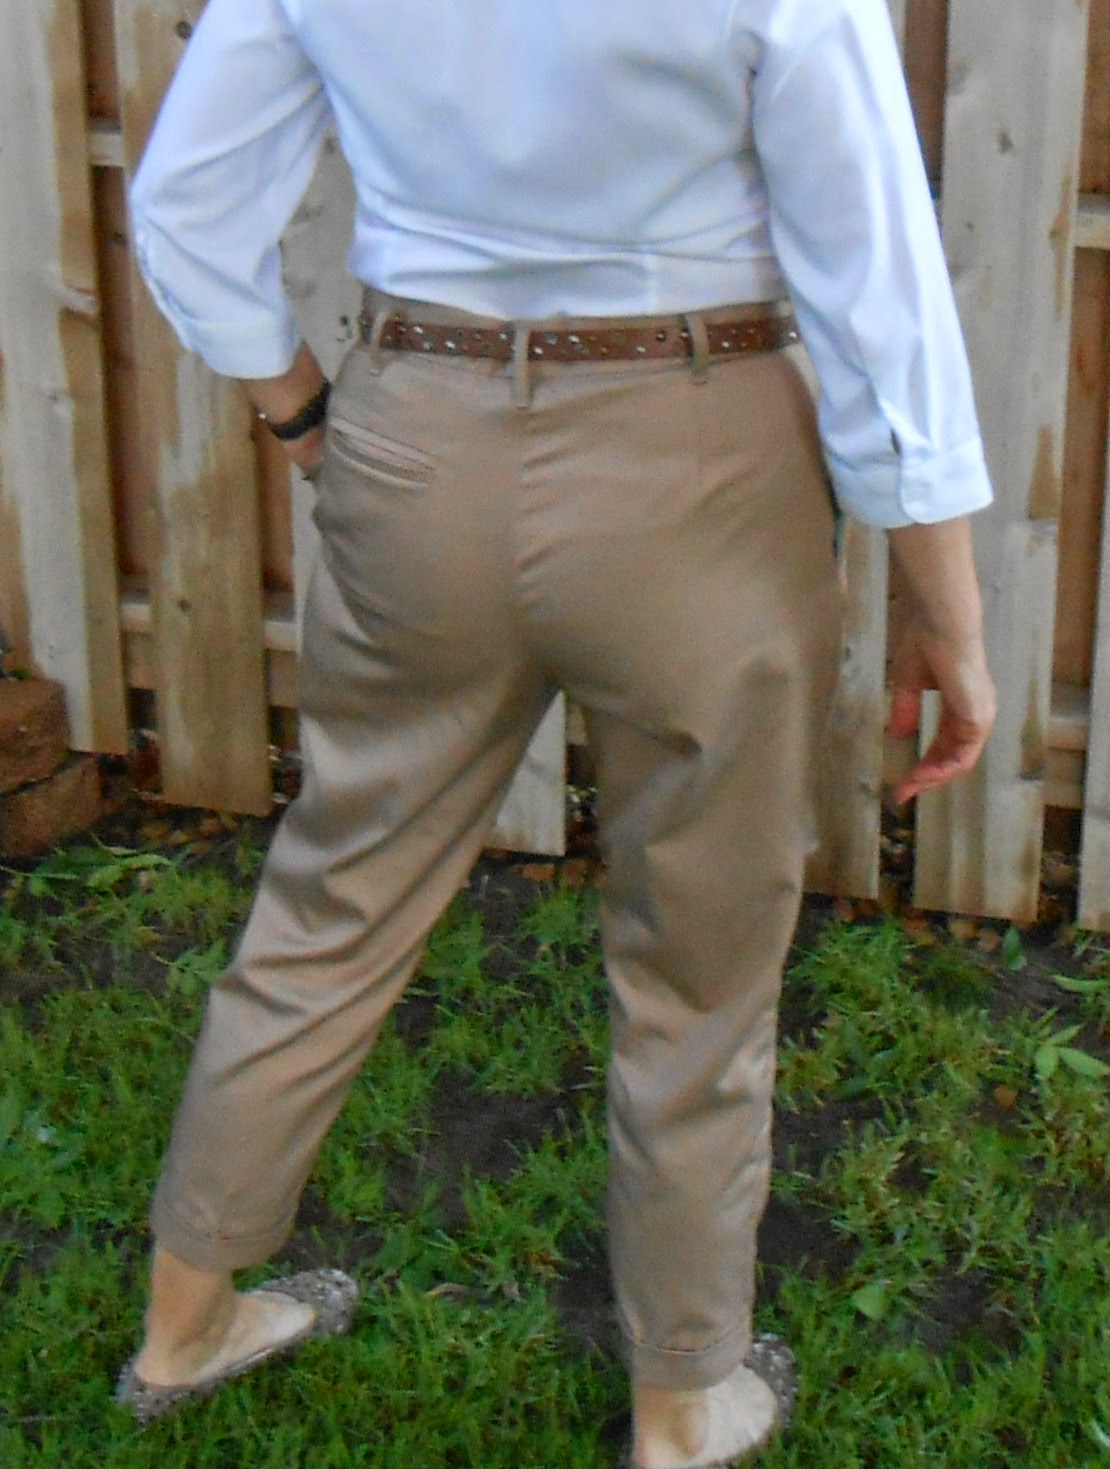
Dislikes: Since this is my second time making this pattern, I worked out my dislikes which were the back waistline being a little too big which you can see here in my khaki pair.  Part of the problem was that I used a pretty stiff interfacing for this and also reduced the waist in the back by about a 1/2".  It helped tremendously!  


Directions:There are 25 steps to these pants including putting the ribbon/fabric trim on the outer seam.  The fly is super easy and isn't a true fly but works great for this pattern.  I know that many reviewers remark that Burda's directions are minimal, and they are, however I read through every word and found them to be clear, concise, and the visuals helpful. If you have some sewing experience, you can put these pants together with few, if any problems! 


Modifications:
1. This time I lowered the waistline but about 3/4".  I'm still not sure this is where I want the waistband to hit, but it is comfortable and on me about 2 inches lower than my waistline.   
2. I added a welt pocket on the right for aesthetics only.  It is a true pocket and I doubt I will use it but I didn't want a plain back.  My derriere is too flat for that!    


3.  Because my fabric is a little lighter in weight, I attached stay-tape to the crotch seam just to help keep them from splitting when I move around a lot.  Does anyone have any ideas for using a lighter-weight fabric for pants?  What do you do?  
Recommendations:  
I enjoyed making these pants so much!  I cut them out and put them together in about three hours.  The zipper insert is super easy.  I love the cute cuffs and the pleats are great.  I think I am in love with my new pants and so glad I made a cute floral pair.  I hope you'll try this pattern.  I love it!  DH thinks these are super loud.  What do you think?  

Thanks for reading!Sue

Thursday, June 5, 2014

Burda 7250 Cuffed pants!


I seem to be on a pants kick lately due to my recent success with Vogue 8774--which was a recent blog post.  
 

I really love these pants made in a non-traditional fabric.  I've worn these about 5 times already so I decided to mix it up a little bit and find some additional patterns I also like.  My co-workers may get tired of seeing me in the same pants if I don't!  

I was looking around at Hancock while I was waiting in line to get my fabric cut and found this wonderful twill to make pants.  Ok, one decision down, next to find a pattern.  I snooped around on-line and came across this pattern and saw this unbelievably cute pair sewn up which was on Burda's website.  And lucky me, the next time I was at JoAnns, Simplicity/Burda patterns were on sale!  Yippee!


Burda doesn't give much of a description for this pattern other than semi-fitted.  There is a view A and B.  The only difference is that B has a stripe of other fabric, ribbon, or what have you down the outer leg seam.  I choose view A.  I used almost all of the 2.5 yards I purchased for this along with a zipper and some interfacing from my stash.  Total cost, about $12.


I think my finished garment looks quite a bit like the pattern envelope.  I did make a couple of changes which I will highlight below.


Likes/Dislikes:
Love the styling.  The front pleats are different.  The ankle length cuffed pants are darling, perfect for showcasing cute shoes!  Had it no rained about 3 inches today, I would have worn my red heels or my dark python printed heels.  The ground is so wet it started soaking into the neighbor's fence!   

I like the fit of these pants.  This finished garment was my wearable muslin.  I made very few changes to the pattern straight out of the package.  More on that later.

Dislikes: My only dislike is that the waist line is a little bigger than I'd like. I will remember that for next time.  See how it bunches just a bit at the back waist? 
  

Directions:
There are 25 steps to these pants including putting the ribbon/fabric trim on the outer seam.  The fly is super easy and isn't a true fly but works great for this pattern.  I know that many reviewers remark that Burda's directions are minimal, and they are, however I read through every word and found them to be clear, concise, and the visuals helpful. If you have some sewing experience, you can put these pants together with few, if any problems!


Modifications:
1. I lowered the waistline but about 1/2".  I found it a little higher than I wanted.
2. I added a double-welt pocket on the left for aesthetics only.  It is a true pocket and I doubt I will use it but I didn't want a plain back.  My derriere is too flat for that!   
3. I stitched very close to the edge of the crease that runs length of the front.  I avoid ironing as much as possible and I hope this helps.
4. I took the waistband in about 1/2 to 3/4 of an inch.  It's still a little big, but since I will be wearing a belt with these, it's fine.  I 'll just remember for next time to reduce it some more.   


Recommendations: 
I enjoyed making these pants so much!  I cut them out and put them together in about four hours.  The zipper insert is super easy.  I love the cute cuffs and the pleats are great.  I think I am in love with my new pants and want a cute floral pair.  I can see making these up in a wool (lined of course) for fall and in an adorable print or even plaid.  I hope you'll try this pattern.  I love it!  And, DH gave his stamp of approval--always a plus!

Thanks for reading!
Sue

Wednesday, May 28, 2014

McCall's Lace Dress M6883

M6883I had to make this dress.  It's so sweet and when I found the fabric that matched the envelope picture at JoAnns, I was sold!  I didn't even look at reviews I just snatched it up! 
What is really weird is that my pattern envelope doesn't match the McCall's pattern website for just the number.  My envelope says MP343 rather than M6883.  Not sure why?  Anyway here is my review.


Line Art
Pattern Description: Misses' dresses and slip.  Dresses, fitted through bust, have neck band and back zipper.  A, B: Back straps, elasticized upper back, hook and eye on back band.  B: shaped hemline, wrong side shows.  C: Stitched hem on sleeves.  A, C: Lower band.  Close-fitting bias slip has shoulder straps.  B, D: Narrow hem. 

Sizes range from 6 to 14 or 14 to 22.  I made a size 14.

Suggested fabrics are Poplin, Sateen, Cotton Blends, Linen, Lace, eyelet. C: Organza.  D: Charmeuse, Crepe de Chine.  Notions are 1-14" zipper, 3 Hooks and eyes.    For A & B you also need 1 yard of 1/4" elastic.


Obviously I made view C but I made a few changes.  More on that later.

Finished garment: I think it resembles the pattern photo, especially since I used the same fabric!  I obviously made changes at the neckline, sleeves, and hem.

Directions--I didn't notice any difficulties with them.  There are just 26 steps to this dress, provided you don't make changes.  I probably just glanced at the images.  For the slip, there are only eight steps.  Love an instant gratification project once in a while!

Likes/Dislikes:
The style, it is easy to wear.  I had fun making this pattern.  It fit well and I made so few modifications to it.
My only dislike is that the opening from the top of the zipper to the neck band is open.  Any ideas on why?

Modifications/Alterations:
1.  My usual 1/2" sway back adjustment.
2.  I made narrow french seams on the sides of the dress.  
3.  The one thing I don't like about this pattern is that with the lace dress, the directions have you use self-fabric for the neckband and hem.  Well, if you use lace like I did, it's not the prettiest finish.  Know what I mean?  Also, interfacing is also required and I wanted something opaque so I purchased about a half-yard of the white silk charmeuse and used that for the hem and neckband.  That way my interfacing didn't show through and it gave this dress a little more polish.  To have everything coordinate, I also made narrow charmeuse bands for the sleeve hem.
4.  For the slip, my only modification was to zig-zag the hemline since you wouldn't see it with the band of the dress covering it up.   
5.  I used two hook and eyes on the neck band instead of three.

Will I sew it again? Probably not--that doesn't mean I don't like it.  I am happy with the finished dress.  I have so many patterns that I haven't touched that I need to keep looking to my queue instead of revisiting patterns I have used.     

Conclusion/Recommendations:  This was an easy little dress to sew up and fun to wear.  Although the contrasting slip was a bold choice, I am glad I went with it.  Although DH didn't get my shoes in the picture, they matched the slip perfectly!

Thanks so much for reading!
Sue

Sunday, May 25, 2014

Vogue 8774


Hello!  My semester from hell is finally over and I am back to sewing!  I bit off  more than I could possibly do and stay sane.  My full time job as an instructional coach, teaching 2 classes at South Dakota State University and taking a graduate level class was a lot.  I should have known better, but I really need to learn to say no. It is finally over and I can get my life back.  Yay!

I purchased this fabric earlier this winter when I was visiting DD1 who lives in Delaware.  I loved it when I bought it but had no plan.  DD1 said, "Pants, mom.  Pants."  Really?  Pants?  I asked again and she insisted so here is my review for this Vogue pattern made with this wild fabric!


Vogue 8774, rated Average.  Description: Fitted, tapered or straight-legged jeans (below waist) have shaped waistband with hook and eye closure, carriers, front and back pockets, back yokes and binding for front fly zipper closing.  Topstitching and narrow hem.  Purchased belt.

Pattern Sizing: AAX (4 to 10) C5 (10 to 18).

Fabrics: Denim, lighweight canvas, velveteen.  Lining lightweight twill.  My fabric came from the home decor department, which DD2 promptly said she they looked like drapes.  Hmmm...., what do you think? 

Notions: one 7" zipper, one hook and eye closure and heavy thread for topstitching.

Yes, despite the fact my fabric is busy, it does resemble the pattern envelope.  At least I think so anyway!  I started with a 16 but took these in quite a bit at the waistline, a little in the hips and some in the thighs.  I made view A.  The pattern envelope doesn't have them cuffed, but it was so dreadfully humid today, I decided they needed to be. 

Directions: I thought the directions were really good.  Especially for the fly construction.  One of my beefs with patterns is that the fly doesn't fully cover the zipper however this pattern compensates for this!  Yay!  I thought everything was logical and put together in an intuitive manner.  There were a few steps I eliminated but more on that later.  

Likes:
1.  The one piece shaped waistband.  Comfortable and hits me at a great location wear wise.  Sort of at the top of my hip bone and doesn't dig into my waist.
2.  The fly construction.  As I stated previously, the fly covers the zipper completely.  Unlike some other patterns I have tried.  For this reason only, I will be using this pattern again!
3.  The back yoke, I like this.  It gives more shaping and ability to make a swayback adjustment easily.  Plus, I think it gives the pattern a sort of designer look.
4.  Belt loops that attach to the yoke.  I like this feature.  It makes the attachment of those easy and gives the pants a different look.  I don't think the loops are too long at all, despite what some other reviewers have said about this feature.
5.  Length.  Even though I cuffed my pants, they hit me just at the top of my foot.  Perfect.
6.  Although I didn't do this step, I do really like finishing off the fly facing with the bias edging.  I see this in higher end RTW all the time and do appreciate the extra little detail.  I do agree with other reviewers that this makes the denim rather bulky, but you could use a fabric that is rather light weight and it wouldn't necessarily add bulk.
Dislikes:
1.  This was my only dislike regarding the pattern.  If you choose to topstitch the design on the back pockets (view B) you should use interfacing?  Really?  I've never heard of this before. I didn't use all the rows of stitching but I did make one line of the design so no need for the interfacing.

Modification: I made my usual 1/2" swayback adjustment by shortening the seam between the back yoke and the waistband.  I think I could have gone another 1/4" at least and may try that next time.
As I said earlier, I took in the waistband about 1" and the hips about 1/2" and the upper thighs about an inch.  I really like the fit.  They are comfortable and don't gap anywhere.  

Recommendations:  Oh yes, I do recommend this pattern.  I like the fit, it was easy to put together and fairly fast.  I cut this out in an hour or so and stitched it up in about 3 hours.  For a puttzer like me, this is FAST!

I will be making more of these!
Thanks for reading!
Sue