Here is an image of both view of the pattern. I did a mashup of views 1 and 2. Right? I do love to do my own thing.

I used the bodice of view 1 without the pockets and the skirt of view 2 without the belt feature. Think about that for a minute. This is a fairly new release. In fact, I couldn't find a review on Sewing Pattern Review prior to me starting this project.
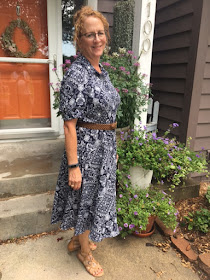
My fabric choice was a precut yardage from Fabric mart. This is a challis that I purchased for the bold pattern and print in deep navy and white.
It almost reminded me of a super wild bandanna print, but more sophisticated. Is that an oxymoron?
I made a few changes to the pattern based on the manner in which it was drafted--or at least I think that was what it was due to. I did some flat pattern measurements and found the bodice, waist, and hips would fit great.
Pattern placement was fun to play with for this dress. The front and back bodice were the easy parts to match the pattern. However the skirts were not based on the grainlines the pattern requested.
Honestly, based on how busy the design is, pattern matching only really needed to happen on the bodice and collar sections. The skirt and sleeves would have to be an afterthought, unless you had a solid and a lot of yardage. Mine started at over four yards and I didn't have enough to make everything match. Fight it or let the dress design win. If you only have so much yardage, then the dress design has to win.
The skirt has a lot of movement, even though I made the less full skirt. It still has a lot of body, twirl, and flow as you move. Also, it was super hard to get an even hem, despite leaving it be on the dress form for 48 hours.
I do like the overall fit. Colette patterns seem to be made for girls with a bigger than b-cup bodice. I didn't need an FBA. I only needed a sloping shoulder adjustment and swayback adjustment.
For the sleeves however, it wasn't so easy. The ease and length of sleeve cap is absolutely ridiculous. I followed the directions to a T and there was no way on God's green earth easing the sleeve cap would work. In case you are wondering, I do know that if you make a sloping shoulder adjustment, you also need to adjust the lower portion of where the sleeve attaches to the bodice. It wasn't operator error in this case.
What I ended up doing was to take an inverted pleat at the sleeve head to accommodate the massive amount of ease. I just hate it when I can't get everything to work together. I put in three rows of ease stitching about 100 pins to facilitate the amount of ease needed. Neither was no way near enough. After five tries, I gave up and went for the inverted pleat at the top of the sleeve cap. It works.
I am so proud of my pattern matching on the bodice. May I say it looks fantastic? I hope so as I think it does!
I decided to wear a belt with this dress. Here is the reason why. The lower portion of the facing that accommodates you putting on the dress as well as taking it off had zero buttons. There is at least a six in span of fabric that needs something there otherwise you will get gaping. In the photo below, you can see the bottom portion of the dress where I added two button and buttonholes. The buttonholes do need to be functioning in order to get the dress on and off.
My pointer finger is at the waistline and my other fingers span the area between it and the second buttonhole I added. That isn't even the bottom of the placket. That is a pretty large span if you ask my opinion. At some point in time, someone will see whatever you decide to wear as undergarments. Don't think it won't. You will be disappointed.
I really like the lower sleeve detail as it is fun but hard to see based on my busy print. I really like my finished dress. It wasn't difficult to sew by an means but if I can be completely honest, I am disappointed in the pattern. I expected a better fit in shoulder and sleeve area. I am however happy with my finished result.
Thanks for reading!
Sue


Nice work on all the adjustments, especially that sleeve cap. It looks great on you, fit and colour, and the pattern matching is fantastic.
ReplyDeleteBrave woman, cute dress - due, I'm sure, to your persistance and talent! I also admire your use of this fabric. I bought it as well, and got frustrated with it! thks for your review of the pattern.
ReplyDeleteThanks so much for the review! And what a great job matching the pattern! I bought this pattern too, but have been waiting for some reviews before I tackle it. I agree with you about the instructions - the way they skip back and forth between versions is a bit confusing. (I did find a solve for your placket problem - on page 40 it suggests sewing 3 snaps into the skirt placket, but the way it's written it looks like it's part of the belt instructions for V.2; on the whole I think extra buttonholes are probably nicer...)
ReplyDeleteI love your dress and your pattern matching is superb. Your description of dealing with the sleeve cap ease made my head hurt!
ReplyDeleteLove jacking off to these pictures
ReplyDeleteIwould love to lift up the back of her dress, pull down her panties and kiss her ass
Delete