Monday, July 31, 2017

Sewing for Elaina! A frakenpatterning of Simplicity 8304 and 2264.

This project is the first time I have 'frankenpatterned' something and know what, it was fun!  


You can see in the above photo which two patterns I morphed.  Maybe it wasn't that big of a stretch to put these two together but I did it anyway!


One thing I find a bit odd about some of the infant patterns is that the buttons or zippers on located on the child's back.  With the back to sleep campaign that has been going on for years, who wants to lay their child down on a back full of buttons or a zipper?  Not me!  So the photo above is the 'new' back.  I redrew the back and front neckline so this would button up the front.


I also attached panties to the waist area of the dress.  If you've held a wiggly little one, their dresses or shirts can creep up and no one wants that so I attached the panties from the pattern on the left to the dress on the right.

Elaina isn't quite big enough for this but I made it anyway out of this beautiful Stof cotton fabric.  This just sewed like a dream!  I can't wait to see her in it!  I just wish she didn't live so far from grandma!

I plan on sharing more infant and toddler creations I've made this summer for the grandkiddos.  They are so much fun to sew for!

Thanks for reading!
Sue :)

Saturday, July 29, 2017

Sewing vintage--Simplicity 8541 from 1969.

    Do you remember that upcycle contest I won a while back?  Well, I won a gift certificate to a site called oldpatterns.com.  It was a very enjoyable experience picking out some vintage patterns to try!    

    I just loved this one shown above.  It sort of reminds me a flight attendants dress.  The slight A-line shape with the front pleat and of course the collar drew me to this pattern right away!


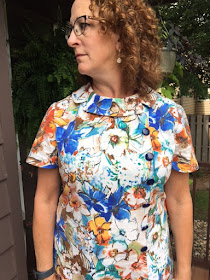
Here is my version of view 1.  Short sleeves that I had to cut on the bias due to my limited fabric.  This fabric has been in my stash since last summer.  This was a purchase I made when Hancock's was still in business.  I am still in mourning over that loss.  


I only made a swayback and sloping shoulder adjustment.  This pattern is a size 16 for a full bust of 38 and might I say, this fits really well?  I didn't even muslin it but did tissue fit it to find out if I need an FBA.  Turns out, I did not!


Those buttons are purely for asthetics.  I debated whether to use them or not.  These are a cobalt blue and while they are fine, I am not sure they truly work.  


I am so thrilled with the overall fit of this dress and the floral print of my linen.  


Look at the back!  If I do say so myself, I think that fits very well and my zipper application is pretty darn good!  

I have several other patterns to try that are also vintage.  I really enjoyed sewing this one!  DH likes it as well but not the buttons.  Maybe I should remove them?  

Thanks for reading!
Sue 

Friday, July 28, 2017

Simplicity 8383 a swingy dress!

Have you seen this pattern yet?  I skipped past it last time I was looking at patterns.  That was a mistake!  I could have had this adorable dress in my closet much sooner!

Image result for images Simplicity 8383

Look at how adorable this is!  That is if it is okay to say so myself!


This is an easy to sew dress and I literally sewed it up in less than two hours.  


It is super, duper short so I doubt I will wear this as a dress but more of a tunic.  Have you heard that rule, no mini skirts after 35?  I am way over that year!


I knew this would be short but with my limited amount of fabric, this was all the longer I could make it.  


I love how this fits at the shoulders and bust and then just flows.


This gorgeous fabric is from Stof.  It is 94% cotton and 6% lycra.  It stitches up beautifully!  


I reinforced those little areas where the sleeve attaches to the arm using a small piece of stay tape.


Look how smooth that upper back is along with the sleeves and upper arm.  


I recently promised a tutorial on how I stabilize the neckline...well here it is!


I use ordinary Dritz stay tape.  I can easily find this at JoAnns.  You can see where I stitched it on with it barely extending over the seam allowance.  


I use about every landmark I can on my machine or feet.  I line up the edge of the stay tape with a part of my presser foot.  After this step, I apply the neckband as usual.  The little edge of the stay tape is covered by the neckband.  


I had a blast making this dress/tunic!  It is well drafted and I can see making another view in the near future!

Thanks for reading!
Sue :)

Monday, July 24, 2017

Simplicity 1467 top made with some precious silk!

Hello all! I have been sewing up a storm lately and one of the projects to complete this summer was to use this silk fabric my son and daughter-in-law brought me from their trip to Thailand.  This gorgeous silk was a pashima.  It is very delicate and required some care to work with.


I had made a different top with the other portions of the silk that was a total wader even though I had made a muslin and worked out the fit details.  Again, it was due to this fabric being super delicate.  I managed to have enough left over to put together this top with a contrast back.  I am so much happier with this!  


Here is the pattern I used:

                        Image result for images Simplicity 1467
I like the clean lines of the top and the fact it is sleeveless.  


This fabric is also somewhat iridescent.  See what I mean when you look at the photos?


I really like the pink back!  This isn't the most precise sewing I've ever done but I knew from previous experience working with this fabric that what ever happened, was going to stay that way, much like when you sew with leather.
   

I did my best to sew very carefully but this was the 'shiftiest' fabric I have ever sewn with!!!


I did have to cut the front yoke on the bias.  I think it is fine given the jumbled way the elephants are strewn on this fabric.  

I enjoyed sewing this!

Thanks for reading!
Sue

A disaster for me--McCall's 7591


This pattern...I almost lost all faith in humanity as I sewed it.  I love the shape, the fact it can be made into a knit and I really loved my fabric.  What I didn't love is HOW FREAKING LOW CUT THIS IS!!!  
Honestly, I am very self-conscious even having my pictures of this dress online.  I merely wanted to show you how low cut this is.  My fashion photographer was making some silly comments to me as I modeled this, so ignore some of the goofy looks please!


I can't remember what he said here, but it obviously struck me as funny.  


I should have put a cami on under this.  What was I thinking?  


I do really love the bodice back and the way this snugs up at the armscyes.  At least there is no gaping there!

My intent was to make this into a maxi but I cut the skirt out incorrectly and didn't have quite enough fabric.  I ended up having to piece together the front of the skirt.  It works, but since this is a wadder for me, I will make a note on the pattern.


I had such high hopes for this dress!  This fabric, which is a Maggy London ITY knit, is just so wonderful next to your skin!  Plus it washes, dries, and sews up so beautifully.


I doubt I will sew this again, but I am glad I tried it. And yes, I did make an FBA :(

Until next time!
Sue

Sunday, July 23, 2017

Yet another Rova....

I hope you aren't getting tired of seeing another posting about the Jalie Rova.  This is perhaps my favorite dress pattern of the summer.  This is my third version and I love it as much as my other two!  
Jalie 3678 - ROVA - Pattern Cover


If you've been living under a rock and didn't realize that Jalie released a whole slew of new patterns this past spring, here is the one I keep creating.  With that styling and the fact it is made from a woven just makes my heart sing!


I am so in love with these embroidered denims.  This one was purchased from Fabric.com.  


Which of course means you have to cut this out on the crossgrain.  


This 'denim' is the weight of a chambray--perfect for this style of dress. 
 

Once again, I made my bias tape using that rectangle method.  So if you've never done this before, you  make a continuous bias tape by sewing the long ends of the rectangle together but you offset them by the finished width of the tape.  Then you cut carefully measuring as you cut.  I ended up with enough tape to bind the neckband and armsyces.


When I was planning the layout of this pattern, I made sure the long portion of the 'lace' was center front and center back.  This of course meant that I was unable to match my side seams.   I also made this slightly longer than my last dress.  That one, I made to hit above my knee, where the quadricep curves towards the inner leg...not sure if that makes any sense, but it hit me about 2.5 inches shorter than this one.  With the lace, I didn't want anyone to get any glimpses of anything I was unwilling to show!


I have a few other ideas for this dress but for now I must put it aside.  I hope I remember what my plans are next spring when it is warm again!

Thanks for reading!
Sue

Thursday, July 20, 2017

Summer sewing for Elaina! Ottobre 3/2013 # 2

Hello all!  I've been busy sewing for the little people in my life and I've loved every minute of it!

I used my stack of Ottobre design to find a few items to make for Elaina, 3 months.  I can't believe she is three months already!

I really wanted to try the romper for her.  Yes, they made this for a boy and I am sewing for a girl, but really, depending on the fabric, many articles can be either male or female.

Image result for Images ottobre 3/2013


As you can see, it is a one-piece romper with functioning pockets!  DD1 doesn't want things too ruffly and since they live in Baton Rouge, LA, and the temp and humidity is unbearable this time of the year, I knew I needed to make something in a natural fiber (cotton) and have just a garment that is cool and comfortable.


This little pattern ranges in sizes from 56 to 92 cm.  I did some quick math and found that I needed to make a size 62 cm or about 25 inches.  I wanted a bit of growing room so this size fit the bill.

This fabric I choose to use was all that is available for knits in my local area of the US.  It is from JoAnns.  It isn't the best quality, but was 100% cotton, is soft and the colors are cute.  Plus it isn't too girly or fussy.


This pattern literally goes together in about 30 or so minutes.  The longest part of the process is figuring out how much to stretch the trim that is on almost every surface of these that shows on the right side.  Just play with the trim on a scrap piece of main fabric and you'll pretty quickly discover what you need to do to make the trim lay correctly and look good.

I used actual ribbing for the trim.  It's a little difficult to find but this was in my stash from the now defunct Hancocks.  Can you tell I am still in mourning?


I almost left those little pockets off but decided they are such a cute part of the design I had to leave them on.  The DH asked what on earth she would do with those--put her baby car keys in there? Well, duh!

I love the drafting on every Ottobre design I've used.  This was easy to sew and it has a variety of options for either boys or girls.  Plus, little ones look darn cute in this!

Thanks for reading!
Sue

Tuesday, July 18, 2017

The Marilyn Dress by StyleArc! Celebrating the year of the sleeve!

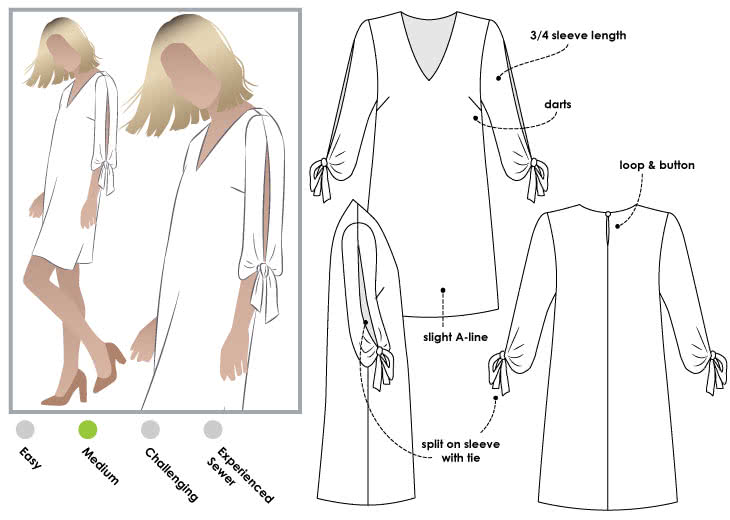
I accomplished three things with this make but first here is the pattern:

Marilyn Dress Sewing Pattern By Style Arc - Elegant but simple Split sleeve dress

This is the Marilyn Dress by StyleArc.  How cute is the design?  As you can tell, it has a v-neck, split 3/4 sleeves, a loop and button closure and front darts.  You have two choices for the v-neck.  I made the more modest one and there is a choice for a lower cut.  I  plan to wear this to work and church, so the more modest neck it was!


What were my three objectives with this dress?
 

First, I've had this pattern ever since it was released.  I thought it was super cute and unique. 


2.  And let's face it, with this being the year of the sleeve, I had to have it!  It's about time I made this up!


Lastly, I've had this gorgeous rayon in my stash for a very long time.


I love all the colors in it!  


 It is about time I used it!


Those sleeves!  


DH isn't quite sure about the length.  He thinks it should be a tad shorter.  What do you think? 


I call these air-condition sleeves.  So cleverly constructed!  


Of course I love the little ties created at the lower edge of the sleeve.  


I managed to get the pattern to match down each side of the sleeve which I don't show off very well here.  


The directions for this are fine.  The drafting is beautiful!  I really love this dress!

Thanks for reading!
Sue :)