Sunday, March 27, 2016

McCall's Hippy Shirt!

Another tunic you say?  Yep!  Here is the top my hubby dubbed the 'hippy' top.  Do you agree?  I'm still not clear if it is the print or the shape that reminds him of the hippy era.


Sorry about the wrinkles!  I wore this to Easter dinner at my parent's home which is about 40 miles away.


So here is the pattern I used (McCall's 7357):


And, here's the description: Loose-fitting, pullover tops have neck band, self-lined yokes, applied tab, side-front and side-back seams, three-piece sleeves, shaped hemline, and narrow hem. A: Short sleeves and contrast panels. A, B: Stitched hem on sleeves. B: Three-quarter length sleeves, and front sleeve and side slits. C: Purchased trim. C, D: Long sleeves gathered into binding.
Includes separate pattern pieces for A/B, C and D cup sizes.What? Separate cup sizes?  SCORE!

 So I made a mis-mash of B and D.  I used the length of D and the slight bell sleeve of B with the 3/4 length.  
This can go together really quick, despite the many pattern pieces!  I however made it more time-consuming by using french seams almost everywhere and also applying the minty green rick-rack on the front and along the sleeve seams.  I really like the trim!  

The instructions for this are very good and despite using this colorful fabric that shifted everywhere, I am very happy with my results!  I wore it today and received many compliments!  Don't you love that?  

My only very minor complaint regarding this top is the narrowness of the sleeves.  If you typically make an adjustment for full biceps or arms, you'll want to do that here as well.  In fact, you'll most likely want to pin the tissue together and see if the sleeve will fit over your arm at all.  
I love this top!  The fabric is from Hancock's.  Isn't it just so pretty, and doesn't it scream happy spring? 
Thanks for reading!
Sue 

Thursday, March 17, 2016

The Lorie jacket by StyleArc

Have you seen this pattern?
Get the Chanel Look without the complication!

It's called the Lorie jacket and it is from StyleArc.  Look at those design lines!  How awesome are they?  When I decided to create this jacket, I searched all over the web and found only 2 or so reviews, both of which were very favorable.  So, I went for it!


Here is the description from the StyleArc site:  Simple zip front jacket pattern with a designer look. The interesting back design lines along with shaped hem bands gives this jacket a great shape. Use your design skills to create a unique look by your selection of braids/trims. This jacket is fully lined. But can be sewn unlined if preferred.


I made this jacket pretty much as designed but I did leave off the zip.  I love the zip, but with my fabric choice and the gold bias trim, it was plenty busy.  


I love the overall style--it is pretty boxy but not sloppy looking.  The front and back yokes are perfect for using a contrast trim, self-trim, or piping.  I used self-fringe.  I love making fringe.  It is fast, fun, and adds such a neat little extra to your garment.  


Look how nice my shoulders and armscye turned out!  I am very pleased with how that part of my jacket turned out!  I made a 1/2" sloped shoulder adjustment by taking the shoulder seam in starting about midway from the neckline to the shoulder.  I added 1/4" shoulder pads but the garment called for 1/2" pads.  I remember wearing HUGE shoulder pads back in the 90's and while at times I will make a jacket or coat with 1/2" pads, I try to have minimal sized ones as they seem to be plenty!  Just enough to fill out the shoulder area without making you feel like a linebacker.  


What else did I do?  I made my usual 1/2" swayback adjustment and that is it!!!  

Let's talk about the plaid matching!  I am so very proud of how well I matched up the plaid.  This is an uneven plaid meaning that when you fold back a corner to a 45 degree angle, you can tell if the plaid is balanced or even or not.  Mine was not, so I took the very tedious step of cutting out each piece of the pattern one-by-one.  Tedious, but well worth the effort when I see the final result!  


I even included the back side panels in the plaid matching and see if you can see those seam lines.  


As I stated before, I left off the zipper.  I also didn't include the fringe on the sleeve hems or the jacket hem.  But I did include it at the neckline, front and back yokes and also the center front.  Check out the center front, I even matched the fringe plaid as well!!!  The gold is a bold choice, but with a gold thread running through the weave, I thought that the purchased gold trim would be a fun accent. What do you think?


As with almost every StyleArc pattern I've used the drafting is exceptional.  The instructions assume that you've made quite a few garments and know what you are doing.  I highly recommend reading the construction notes, main garment construction, and lining instructions BEFORE you start sewing this. Trust me, it will all make sense once you do!  A few things are left out completely as to how you tack down the hem facings on the sleeve and garment lower edge.  I hand hemmed those edges and then decided to hand hem the lower edge and sleeve lining as well.  I like hand sewing, especially on garments where I've taken my time to construct.  It sort of seams like icing a cake--the final finishing touch! 


I really love this jacket.  The fabric was purchased from Fabric Mart and is a boluce suiting. It sewed beautifully, pressed easily with a pressing cloth, and I think is very fun!

Thanks for reading!!!
Sue 

Sunday, March 13, 2016

For my March post, I knew I wanted to make some spring dresses.  I also know that I tend to sew brightly colored garments and I need some neutral garments in my closet, so I decided to make not one but two dresses and to make them different in style, texture, and color!


I think I achieved that goal, how about you?

Here are the pattern images:

  M6885, Misses' Dresses and Hat  

This pattern is McCall's 6885.  Look past the sack-like appearance and the dorky matching hat.  That image does nothing to sell this dress!

Misses' & Petite Size Knit Dresses, Tunics, Pant & Cowl
This Simplicity pattern, number 1018, definitely has a lot of possibilities!


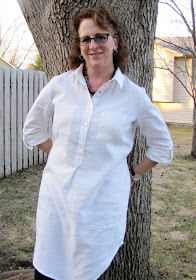
Back to the white dress, which is an easy fit dress that is made from a woven fabric.  Fitting through the bust and shoulders is essential as the rest of the garment is rather rectangular shaped, perfect for what I envisioned.


Here you can see the details of the placket and front pockets.


Treat your fabric well by choosing the right interfacing by auditioning several weights and crispness types to find the one that works best, depending on the style you are going for.  I really wanted the placket and collar to look polished and after a few tries, this interfacing worked perfectly. I ended up using Pro-woven light-crisp fusible interfacing from Fashion Sewing Supply.   My buttons were shell buttons from my stash and I think they are the perfect size so they don't overpower the placket opening.

Now, let's move on to the more colorful of the two:


For the knit and very colorful dress, I used this super cute and luscious knit in some of my most favorite colors!  This one also needs to fit through the bust but is much more fitted all over and flares out at the hem to give it some twirl-ability.


I treat my knits well when sewing by testing the stitches on the serger and whether my coverstitch or a single needle stretch stitch will work best for the hems.  If you get wavy seams when using your serger, pull out your manual and read about how to adjust the various knobs so that your seams lie nice and flat, just like mine do!  I am also pretty proud of the print matching at the princess seams, especially on the garment front.  Can you see my seams?


I also found a nice way to eliminate the little bulge you can get at an intersecting seam where the binding and neckline meet.  At the fold line on the binding, clip the seam through the outer part of the seam but not through the innermost seam.  Next fold one part of the seam to one side and the remaining seam the opposite way.    


With this knit, I used a bright pink thread to top-stitch the seam down and at the hems.  For soft and luscious knits such as this, I prefer using a lighter weight thread and a stretch stitch for the hems.

I am so looking forward to spring!  We've had some unseasonably warm weather here in the Northern Plains, so I've been able to wear both of these uber comfortable dresses!  I love spring!

Thanks for reading!
Sue from Ilove2sew!

Wednesday, March 2, 2016

A Butterick color-blocked top

I am sure I am like many other sewers.  I purchase a pattern simply because it intrigues me and then I pull it out multiple times but it takes me months to make it.  Why do I do this?  So unsure, but with my hesitation on how it would actually turn out, I kept putting it aside.  Well, with my latest obsession with using up smaller pieces in my stash, I finally pulled this out and made it.


B6218, Misses' Top

It is super cute in this rendition, huh?


B6218, Misses' Top

This view, however only used two fabrics and I wanted to use three, so I choose view D.


I've made quite a few Tilton girl patterns and always love the bit of 'quirk' that makes them unique fun to sew.  This top was no exception.


I wanted to show you the fabric I used for the right sleeve (and also the upper back).  It is salvaged from a top I purchased last summer but never wore.  I really love the colors and decided to hang onto it when I saw this pattern for the first time.  


Ok, so the front doesn't really have drag lines like that.  I, for some reason, pulled it down when I put my hand on my hip.  I kept this photo simply because I wanted to show you the faux button front.


Isn't the back just too much fun?  I did change it slightly from the pattern.  The design calls for leaving a good portion of that back side seam line open, creating a vent.  I felt like the vent was too high and I am too old to go around flashing people parts of my back hip line or even more horrifying would be my waist!  I simply sewed those seams together.  


 Here's another view of the back with the seam laying a little differently.  You'll notice too that I added a black band to the solid colored sleeve because I didn't have enough fabric to make it any longer.  I like the effect.


I really like this top.  Next time, I need to increase my FBA by a bit with all the drag lines I am seeing.  Oh, and before I go, check that neckband.  The neckline notches on this pattern are so awesome and the way the band ends up hugging the neck in all the right places made me smile!!!

Thanks for reading!
Sue