Saturday, April 12, 2014

Butterick 5954

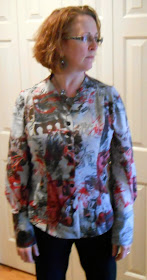
What a great little top, especially for summer!

Here is my review of Butterick 5954: 


Pattern information:
Misses' tunic: Close-fitting and flared, pullover tunic has front variations, shaped hemline, and narrow hem.  Wrong side shows on back hemline.  C, D: Collar.

Fabric Used:
This is a tissue weight knit that I think I purchased from Marcy Tilton.  It is a border print and I had a lot of fun trying to figure out how to maximize the pretty fabric edge.  I ended up cutting the fabric out on the crossgrain which worked just fine.  The fabric was a little fussy with the demands of hemming such a long piece (more on that later).  Other than wrestling with it a bit, I am very happy with the results.

Does the finished garment look like the pattern envelope?  Yes, except for my changes.  The overall shape is there.  I made a medium based on my measurements.   

Oh the wind was blowing today! 


How were the directions:
They were super easy to follow.  This pattern is labeled as very easy and it is just that!  A beginner could tackle this with no issues whatsoever.


Changes/Modifications/Alterations:


  • I almost always complete a swayback adjustment and I did this time as well.  
  • The neckline is obviously different.  I decided on View C
  • but didn't want the cowl neckline so I cut a piece of 2" wide fabric 20% shorter than the circumference and stitched it onto the neckline just like a band would be.  I top-stitched a double row of stitching to keep the neckband seam in place.  I like how it turned out.  The pattern directions would have you use a hemmed neck and I just don't like how that looks.  
  • I also stitched down the right front over the left to just below the waistline.  My fabric is more of a tissue weight and when I tried it on it felt like I would have to constantly adjust it.  No one wants to do that!  
  • I folded out 2 inches on the side seams of the center back seam for a total of 4 inches and I am glad I did!  I think it is just what I wanted as far as fullness.   


Recommendations?
I do recommend this little top.  I believe the line drawings are deceiving as far as the back of the top goes.  If you believed the drawing the back would be only slightly shorter than the front which simply isn't the case.

This goes together easily and is a fast little project.  Next time, I may consider using a rolled hem to finish off the lower portion of the top.  It took me longer to press and hem the entire thing that it did to cut out and sew the top.


I like this tunic.  I would like a sleeveless version for summer without the overlay.  I'd also consider a top more appropriate for fall or winter, provided the right fabric comes along.

One caveat: if you have large shoulder muscles (I don't) you may want to test the fit of the upper sleeve.  I found that while I was wearing it and lifting my arms over my head those sleeves were just a tad tight.  Maybe tight isn't the right word--but if it isn't, I am not sure what is!

Thanks for reading!
Sue

Tuesday, April 8, 2014

Sewaholic Pattern Minoru jacket--take 2!


Here is my second review for the uber popular Minoru jacket by Sewaholic patterns.   


When you see the pattern, you think why yes, I can see why so many people have whipped this up and some more than once!   It is very cute, very RTW, and a classic design.  And, who doesn't love the concealed hood?  Genius!


Here is my version of the Minoru jacket.  

This time I used a light-weight water repellant linen I purchased from fabric mart.  It gathered beautifully around the neckline, unlike my first version where I used a heavier brocade-type fabric that was much to heavy for the design.  

I found the correct sized zipper in the bright orange, the perfect contrast for the light grey fabric.  With the orange zipper I wanted a lining that would pop and I found this silky print at Joanns.  It is the perfect sort of wowza I was looking for.  Plus, it was 40% off and who doesn't love a bargain?  I wasn't so lucky with the hood zipper but found a grey that matched the main fabric perfectly!  

I made a size 14 and it fits great.  As you can see, I added side seam pockets, that I drafted by simply laying my hand on the fabric, measuring around it, adding seam allowances and attaching where they felt most comfortable.  I didn't add the inside jacket pocket as I didn't find it would be that handy for keys, wallet, etc.  

Modifications: other than the side seam pockets, nothing major really.  Although now that I think about it, I believe that pattern has you attach the zipper to the front after applying the band and band facing.  I sandwiched my zipper in between the band and facing so the zipper's edges were enclosed. I found the waistline elastic too long so I cut about three inches off of the pattern guide's suggestions.  

As you can see from my photo, the zipper doesn't reach the bottom of the jacket despite following the back of the envelope precisely for the length of zipper I needed.  I really don't mind that though, I do believe it gives you a little more walking room. 

Other reviewers have mentioned how high the collar is and yes, it is high but if you make the hood, you need plenty of room to stuff it inside the collar pieces.  I don't mind the height of it at all.  If it really bugs you, you can fold it down. 

My only dislikes are the sleeve length and the cuffs.  I found the sleeves really long and if you are shorter than 5'7" you may need to alter these.  Also, I don't like the cuffs.  I would like them to bunch a little tighter than they do.  I will have to think about whether I want to go through the work of taking them off, cutting the elastic smaller and reattaching.

I do love my jacket.  I wore it to work today and received many compliments.  If you haven't tried this jacket yet, what are you waiting for?

Thanks for reading!
Sue

Thursday, April 3, 2014

Burda 7189 a new blouse!


For some reason, I rarely make blouses.  I am not sure why.  I love making them.  They are so much fun to create in a variety of fabrics and you can be just about as creative as you want.  Why did I wait so long to make this one up?  Here is my review for Burda Style 7189


There is no description on the back of the envelope.  Not sure why?  So here is mine: semi-fitted blouse in either short or long sleeves or dress with princess seams and pleat detail, that button up the front.  The dress has a hidden placket.  Dress and short sleeved blouse has stand collar and blouse b has a partial stand collar.  Long sleeved blouse has plackets and long cuffs.  The back has a yoke detail and princess-type seams.  


I used this yummy print from Marcy Tilton. I believe it is just about 100% cotton but with some sort of special treatment to prevent wrinkling.  The photo really doesn't do it justice!   I used two layers of light gray interfacing from Fashion Sewing Supply.  I used the 'Couture' light weight fusible interfacing.  The gray worked perfect with my fabric!

Finished product--yes, it does look like the pattern envelope, don't you agree?  I was a little worried you wouldn't be able to see the details with my busy print but it did work!  

What I like/dislike: 
The styling--it is unique and I love the fit.  I did cut it two sizes larger than I do with the big 4 since Burda doesn't fit me well in the bust area.  I probably could have done a FBA, but when I made my muslin, I found that I liked the fit everywhere, so I just made the larger size.  It is modest for work--a bonus!  

What I didn't like was the directions for the placket/cuff.  What a pain it was based on the directions provided!  I read it numerous times and still didn't get it so I followed the visuals which were ok, not stellar, but fine.  If you've never made a placket before, find a different set of directions and follow those for this step!  

The sleeves look just fine cuffed!  
The placket that drove me crazy!  It did turn out nice. 

I also found the pleating a little quirky.  Based on the written and verbal directions I spent quite a few minutes scratching my head.  I finally figured it out and it worked fine, in fact I really like that detail.  The back and back yoke are unique and while most of the big four patterns have you do all this pivoting, which I dread, this one is sewn in two steps and it works perfectly!  


Modifications: 
I made my usual 1/2" sway back adjustment.  I have a picture of that here as a follower of my blog asked how I do this.  For woven fabrics, I make a slit at the back waistline to about an inch from the seam allowance on the other side and I fold the top over bottom so that a total of a 1/2" is removed.  I've included a picture here: 


I did add staystitching to the areas that you cut into to accommodate the yokes on the front and back.  I plan on wearing this blouse a lot and didn't want the fabric to give without that extra support of the stitching.  
I found the length of the sleeves to be long--but then again, they are very long on the model as well.  I am 5'7" and typically don't have to alter the sleeves at all, so you may want to check the length before you cut this out.  You may need to adjust. I added topstitching to some of the seams that you can see in some of my photos.  I like to topstitch and think it is fun!


I enjoyed making this blouse.  I may make a short sleeved one soon for summer.  The dress is also pretty cute and would look great in a variety of fabrics.  
Thanks for reading!
Sue